Zabbix
1.Prerequisites:
This section explains on how to integrate and ingest alerts from Zabbix monitoring tool into CloudFabrix AIOPs platform.
Zabbix supports alert notifications via email, sms, script or webhook. CloudFabrix AIOPs platform uses webhook notification method from Zabbix to receive and ingest the alerts or events.
Click here for Alert Sources to create a Webhook URL for Zabbix alert notifications in CloudFabrix OIA application.
2.Configure Zabbix for Alert notifications over a Webhook:
Step 1: Login to Zabbix monitoring tool through web-browser UI
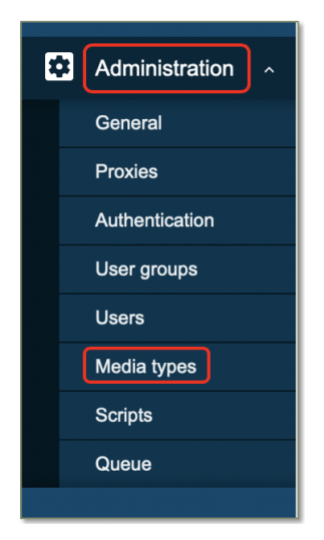
Step 2: On left menu, expand Administration and click on Media types
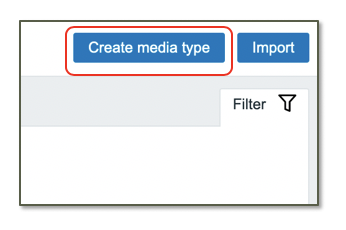
Step 3: Click on Create media type
Step 4: Click on Media type, Enter name for the Webhook and select Type as Webhook from the drop down.
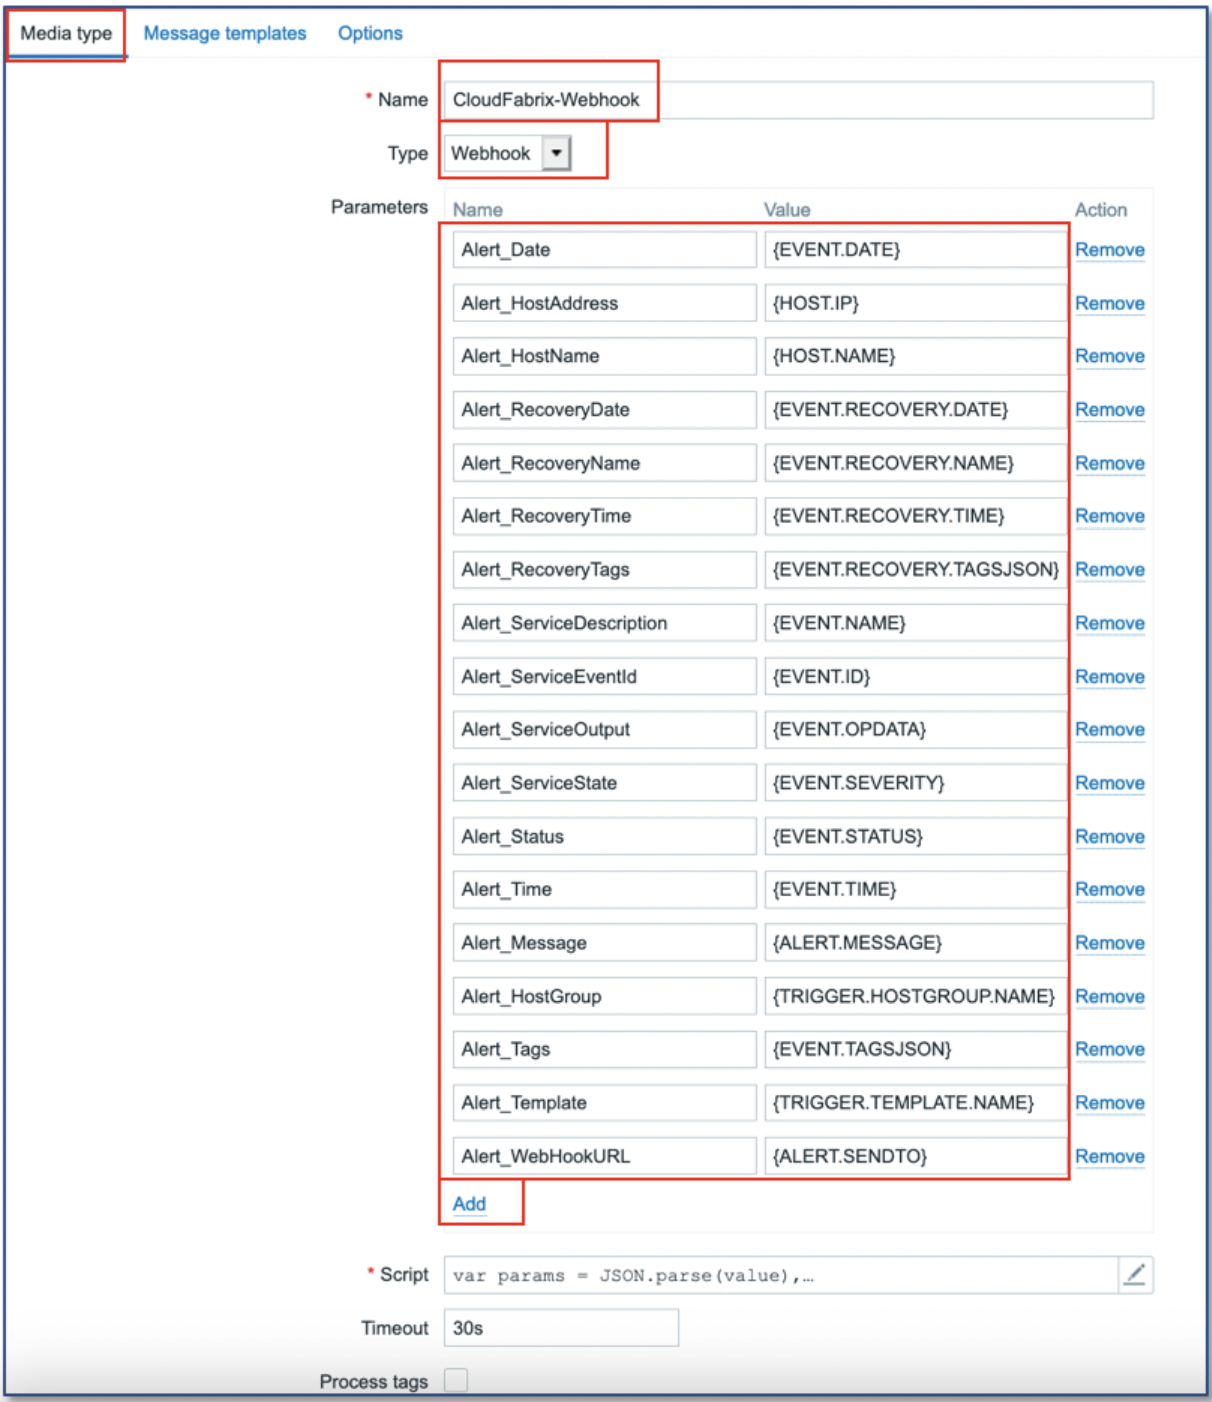
Step 5: As highlighted in the above screen, add the below parameters.
Alert_Date => {EVENT.DATE}
Alert_HostAddress => {HOST.IP}
Alert_Hostname => {HOST.NAME}
Alert_RecoveryDate => {EVENT.RECOVERY.DATE}
Alert_RecoveryTime => {EVENT.RECOVERY.TIME}
Alert_RecoveryName => {EVENT.RECOVERY.NAME}
Alert_RecoveryTags => {EVENT.RECOVERY.TAGSJSON}
Alert_ServiceDescription => {EVENT.NAME}
Alert_ServiceEventId => {EVENT.ID}
Alert_ServiceOutput => {EVENT.OPDATA}
Alert_ServiceSeverity => {EVENT.SEVERITY}
Alert_Time => {EVENT.TIME}
Alert_Status => {EVENT.STATUS}
Alert_Message => {ALERT.MESSAGE}
Alert_HostGroup => {TRIGGER.HOSTGROUP.NAME}
Alert_Tags => {EVENT.TAGSJSON}
Alert_Template => {TRIGGER.TEMPLATE.NAME}
Alert_OS => {INVENTORY.OS}
Alert_RecoveryStatus => {EVENT.RECOVERY.STATUS}
Alert_ResolvedDuration => {EVENT.DURATION}
Alert_WebHookURL => {ALERT.SENDTO}
Step 6: Edit the Script field and add the below Java script
var params = JSON.parse(value),
req = new CurlHttpRequest(),
resp;
req.AddHeader('Content-Type: application/json');
//req.AddHeader('Authorization: Basic <base64encoded - username:password>');
//Below example when HTTP Basic authentication is used for Webhook,
//Username: cfxuser, Password: cfxuser
//req.AddHeader('Authorization: Basic Y2Z4dXNlcjpjZnh1c2Vy');

var params = JSON.parse(value);
payload = {};
payload.Alert_ServiceEventId = params.Alert_ServiceEventId;
payload.Alert_HostName = params.Alert_HostName;
payload.Alert_HostAddress = params.Alert_HostAddress;
payload.Alert_Date = params.Alert_Date;
payload.Alert_Time = params.Alert_Time;
payload.Alert_ServiceSeverity = params.Alert_ServiceSeverity;
payload.Alert_ServiceDescription = params.Alert_ServiceDescription;
payload.Alert_ServiceOutput = params.Alert_ServiceOutput;
payload.Alert_Message = params.Alert_Message;
payload.Alert_RecoveryDate = params.Alert_RecoveryDate;
payload.Alert_RecoveryTime = params.Alert_RecoveryTime;
payload.Alert_RecoveryName = params.Alert_RecoveryName;
payload.Alert_RecoveryTags = params.Alert_RecoveryTags;
payload.Alert_Status = params.Alert_Status;
payload.Alert_HostGroup = params.Alert_HostGroup;
payload.Alert_Tags = params.Alert_Tags;
payload.Alert_Template = params.Alert_Template;
resp = req.Post(params.Alert_WebHookURL,
JSON.stringify(payload)
    );
return resp;
Note
If the Zabbix version is 6.x or above, please use the below Java Script
var params = JSON.parse(value),
req = new HttpRequest(),
resp;
req.addHeader('Content-Type: application/json');
//req.AddHeader('Authorization: Basic <base64encoded - username:password>');
//Below example when HTTP Basic authentication is used for Webhook,
//Username: *****, Password: ****
//req.AddHeader('Authorization: Basic ******');

var params = JSON.parse(value);
payload = {};
payload.Alert_ServiceEventId = params.Alert_ServiceEventId;
payload.Alert_Hostname = params.Alert_Hostname;
payload.Alert_HostAddress = params.Alert_HostAddress;
payload.Alert_Date = params.Alert_Date;
payload.Alert_Time = params.Alert_Time;
payload.Alert_ServiceSeverity = params.Alert_ServiceSeverity;
payload.Alert_ServiceDescription = params.Alert_ServiceDescription;
payload.Alert_ServiceOutput = params.Alert_ServiceOutput;
payload.Alert_RecoveryDate = params.Alert_RecoveryDate;
payload.Alert_RecoveryTime = params.Alert_RecoveryTime;
payload.Alert_RecoveryName = params.Alert_RecoveryName;
payload.Alert_RecoveryTags = params.Alert_RecoveryTags;
payload.Alert_Status = params.Alert_Status;
payload.Alert_HostGroup = params.Alert_HostGroup;
payload.Alert_Tags = params.Alert_Tags;
payload.Alert_Template = params.Alert_Template;
payload.Alert_OS = params.Alert_OS;
payload.Alert_RecoveryStatus = params.Alert_RecoveryStatus;
payload.Alert_ResolvedDuration = params.Alert_ResolvedDuration;
payload.Alert_Message = params.Alert_Message;
resp = req.post(params.Alert_WebHookURL,
JSON.stringify(payload)
    );
return resp;
Step 7: Click on Apply to save the Script
Step 8: Make sure Enabled is check-box is checked.
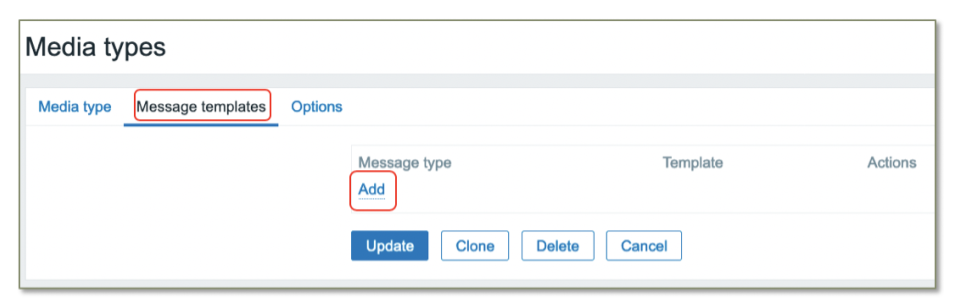
Step 9: Click on Message Templates tab and click on Add as show in the below screen
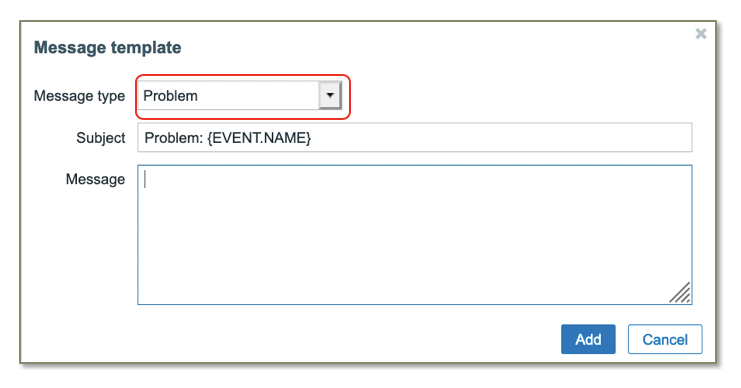
Step 10: From Message Type drop down menu, select Problem, Enter Subject as Problem: {EVENT.NAME}, leave Message as blank and click on Add
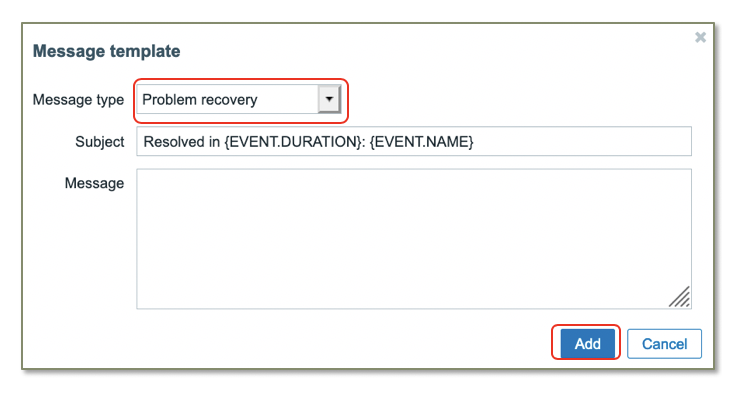
Step 11: Click on Add to add another Message Template. From Message Type drop down menu, select Problem recovery, Enter Subject as Resolved in {EVENT.DURATION}: {EVENT.NAME}, leave Message as blank and click on Add
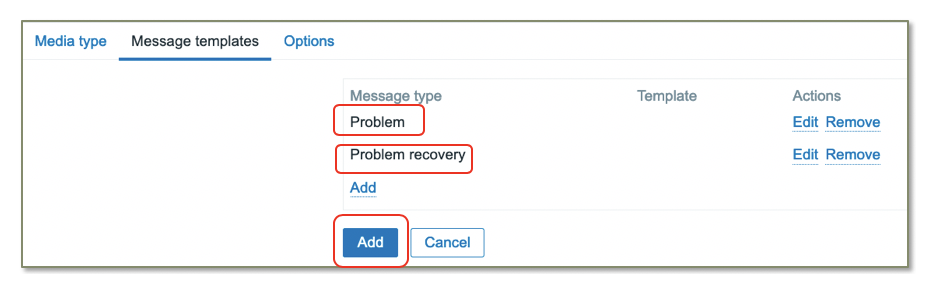
Step 12: Click on Add to save the Webhook Media Type.
Step 12: Click on Add to save the Webhook Media Type.
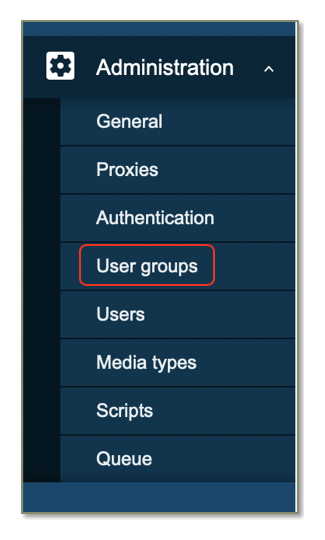
Step 13: On left menu, expand Administration and click on User groups to add a new user group with read-only permissions.
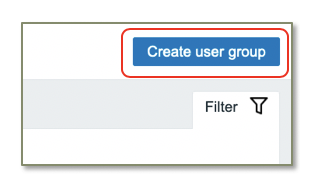
Step 14: Click on Create user group
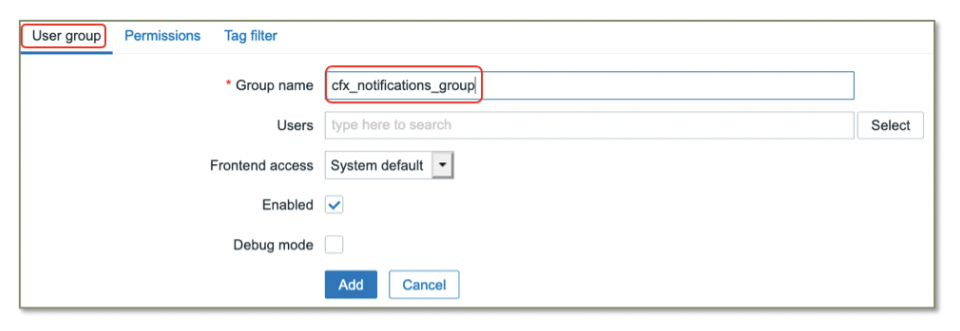
Step 15: Click on User group tab, enter Group name as cfx_notifications_group
Step 16: Click on Permissions tab, and click on Select to select all groups

Step 17: Select all Host Groups as shown below and click Select.
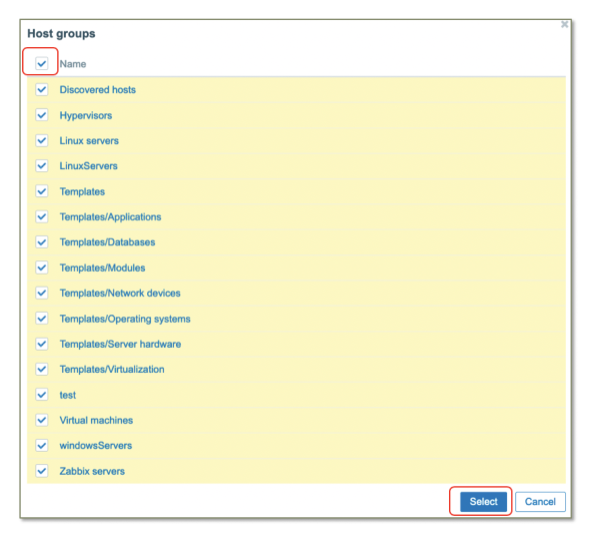
Step 18: Select Read permission, select Include subgroups check-box and click on Add button

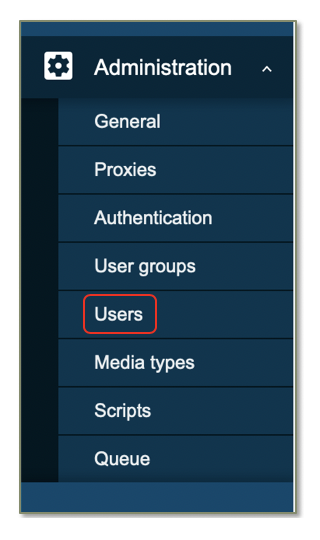
Step 19: On left menu, expand Administration and click on Users to add a new user with Read-only permissions.
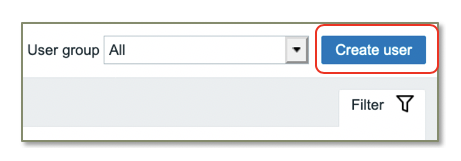
Step 20: Click on Create user.
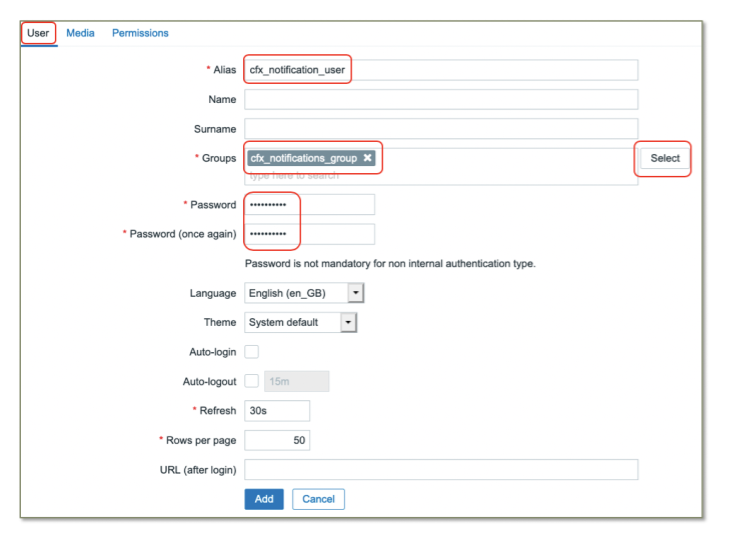
Step 21: Click on User tab, enter Alias as cfx_notification_user. Click on Select to select the cfx_notifications_group that was create above (Step 15). Enter user password.
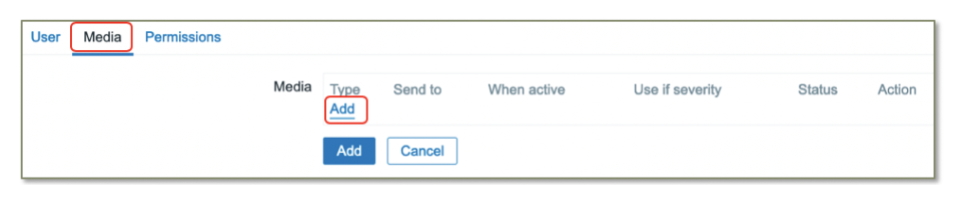
Step 22: Click on Media tab and click on Add button as show in the below screen to add Webhook details.
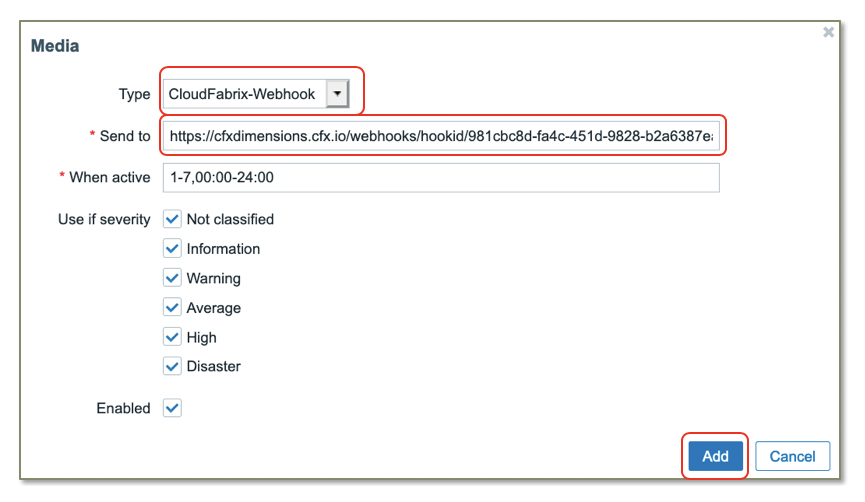
Step 23: Select CloudFabrix-Webhook that was created in one of the step above (Step 4), and for Send to field add the Webhook URL (created under Alert Sources section), leave the rest of fields as shown in below screen and Click Add
Step 24: Click Add button to complete in adding the Webhook notification in Zabbix.

Info
**Testing the Webhook notification**: Under **Media Type** section of the menu, select the **Webhook** that was created above and click on **Test**
Tip
If there is a <mark>test failure</mark> with error message <font color="red"> cannot get URL: Couln't resolve hostname, httprequest.c.323 internal </font>,edit the **Webhook media type** and enter the Webhook URL as a value for **Alert_WebHookURL** attribute, save it and try the **Test** connection again.
Warning
Zabbix Triggers Please make sure to select **PROBLEM event generation mode** as **single** for sending Alert notifications to CloudFabrix AIOPs system. When **multiple** option is selected, Zabbix generates a new event ID everytime it evaluates the condition of the trigger. CloudFabrix AIOps system uses the event ID to track the lifecycle of an event from open to closure. Below is the same screen for a reference.

3. Zabbix Alert Field Mappings:
| Zabbix Field | CFX OIA Field | Mandatory |
|---|---|---|
| Alert_ServiceEventId | key | Yes |
| Alert_ServiceDescription/ Alert_ServiceOutput | message | Yes |
| Alert_HostName | assetName | Yes |
| Alert_HostAddress | assetIpAddress | Yes |
| Alert_Status | status (=OPEN if PROBLEM else CLEARED) | Yes |
| Alert_Date / Alert_Time | raisedAt | Yes |
| Alert_RecoveryDate / Alert_RecoveryTime | clearedAt | Yes |
| Alert_Tags / Alert_RecoveryTags | Tags (additional attributes) | No |
| Alert_Template | alertType | Yes |
| Alert_HostGroup | Customer_name (for enrichment) | No |
| Alert_ServiceState | severity | Yes |