RDA Studio Installation Guide
This document provides instructions on how to deploy RDA Studio in RDA Fabric platform's environment.
RDA Studio Software installation prerequisites
CloudFabrix supports Windows, Linux, and Mac OS environments to install, configure and run RDA studio software. Below are the prerequisites which need to be in place before RDA studio can be installed and configured.
Note
For security reasons, the username/password is not included in this documentation. If you require access credentials, please reach out to the Support Team(support@fabrix.ai)
1. Prerequisites
Before you proceed, make sure you meet the following requirements
Windows 10 / Linux / Mac OS X with the below software are installed
- CPU - 2
- Memory - 8 GB
- Disk - 50 GB
- Docker version 18.09.2 (or above)
- Docker-compose (1.27.x and above)
- Python 3.12.x (recommended) or above
- pip3 utility
Internet Connectivity to download the 'RDA' studio docker image.
- CloudFabrix docker registry URL: docker2.cloudfabrix.io
- If there is HTTP Proxy in place, please refer to Docker documentation on how to configure HTTP Proxy settings for the Docker service.
Verify Prerequisites
Make sure the below commands are in the PATH variable in the user's login profile.
Run the below commands to verify currently installed RDA prerequisites.
2. Linux OS Environment
RDA software installation on Linux OS
Step 1:
Login to Linux box using standard ssh tool (eg. putty or using ssh client)
On Ubuntu VM, sample output is as follows: Linux rda-studio-vm 5.4.0-144-generic #161-Ubuntu SMP Fri Feb 3 14:49:04 UTC 2023 x86_64 x86_64 x86_64 GNU/LinuxStep 2:
Create the following directory structure after logging into Linux machine for setting up directory structure for the
RDA Studio
sudo mkdir -p /opt/rda_studio/cfxdx/home/
sudo mkdir -p /opt/rda_studio/cfxdx/config/network_config
sudo mkdir -p /opt/rda_studio/cfxdx/output
sudo chown -R `id -u`:`id -g` /opt/rda_studio
Step 3:
Create rda-studio.yaml file for RDA studio
cd /opt/rda_studio/

cat > rda-studio.yaml << EOF
version: '3.1'
services:
  cfxdx:
    image: docker2.cloudfabrix.io:443/external/ubuntu-cfxdx-nb-nginx-all:8.2.0.1
    restart: unless-stopped
    mem_limit: 6G
    memswap_limit: 6G
    volumes:
      - /opt/rda_studio/cfxdx/home/:/root
      - /opt/rda_studio/cfxdx/config/network_config/:/tmp/config/
      - /opt/rda_studio/cfxdx/output:/tmp/output/
      - /opt/rda_studio/cfxdx/config/network_config/:/network_config
    ports:
      - "9998:9998"
      - "443:443"
    environment:
      NLTK_DATA : "/root/nltk_data"
      CFXDX_CONFIG_FILE: /tmp/config/conf.yml
      RDA_NETWORK_CONFIG: /network_config/config.json
      RDA_USER: rdademo
      RDA_PASSWORD: rdademo1234

EOF
Tip
If you have deployed on-premise docker regsitry VM and downloaded the RDA Fabric images including RDA Studio, please specify the on-premise docker registry VM's ip address as shown below. Otherwise, skip this step.
services:
  cfxdx:
    image: <on-premise-docker-registry-ip>:5000/ubuntu-cfxdx-nb-nginx-all:8.2.0.1
    restart: unless-stopped
    volumes:
      - /opt/rda_studio/cfxdx/home/:/root
      - /opt/rda_studio/cfxdx/config/:/tmp/config/
      - /opt/rda_studio/cfxdx/output:/tmp/output/
      - /opt/rda_studio/cfxdx/config/network_config/:/network_config
    ports:
      - "9998:9998"
      - "443:443"
    environment:
      CFXDX_CONFIG_FILE: /tmp/config/conf.yml
      RDA_NETWORK_CONFIG: /network_config/config.json
      RDA_USER: rdademo
      RDA_PASSWORD: rdademo1234
Tip
If you are in an HTTP Proxy environment, please configure the HTTP Proxy environment variables as shown below. If there are any target endpoint(s) that don't need to go through the HTTP Proxy, please specify their IP addresses or FQDN names as comma-separated values under the no_proxy and NO_PROXY environment variables.
services:
  cfxdx:
    image: <on-premise-docker-registry-ip>:5000/ubuntu-cfxdx-nb-nginx-all:8.2.0.1
    restart: unless-stopped
    volumes:
      - /opt/rda_studio/cfxdx/home/:/root
      - /opt/rda_studio/cfxdx/config/:/tmp/config/
      - /opt/rda_studio/cfxdx/output:/tmp/output/
      - /opt/rda_studio/cfxdx/config/network_config/:/network_config
    ports:
      - "9998:9998"
      - "443:443"

    environment:
      CFXDX_CONFIG_FILE: /tmp/config/conf.yml
      RDA_NETWORK_CONFIG: /network_config/config.json
      RDA_USER: rdademo
      RDA_PASSWORD: rdademo1234
      http_proxy: "http://user:password@192.168.122.107:3128"
      https_proxy: "http://user:password@192.168.122.107:3128"
      no_proxy: "127.0.0.1"
      HTTP_PROXY: "http://user:password@192.168.122.107:3128"
      HTTPS_PROXY: "http://user:password@192.168.122.107:3128"
      NO_PROXY: "127.0.0.1"
Step-4:
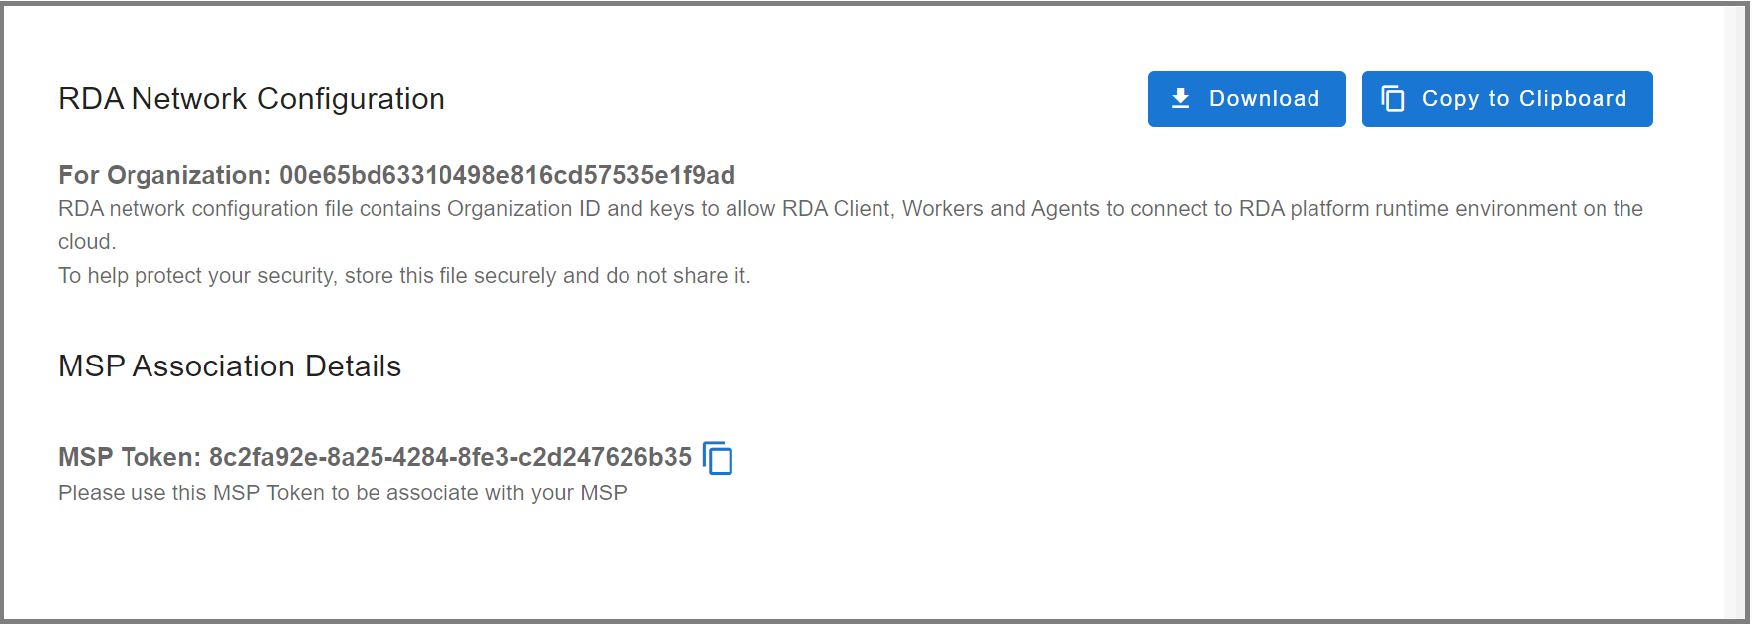
The RDA Studio service registers and communicates with the RDAF platform using a configuration file that contains your tenant ID, data fabric access tokens, and object storage credentials.
Download RDA Fabric Configuration from the portal by going to Configuration --> RDA Administration --> Network and copy it to the local filesystem where the RDA Studio node is going to be installed.
- Save the file as
config.json
Step-5:
- Copy the downloaded RDA Fabric configuration file to the VM or host on which RDA Studio is going to be installed and copy the file to below mentioned path.
Step-6::
Docker Login
Run the below command to create and save the docker login session into CloudFabrix's secure docker repository.
Tip
Note-1: RDA Studio communicates with RDA Fabric that is running in cloud or on-premise datacenter over ports 4222/TCP & 9443/TCP. Please make sure RDA Studio has outbound network access over these network ports. In addition, make sure RDA Fabric is configured to allow inbound network traffic for the same ports to accept the traffic from RDA Studio.
Note-2: Please verify config.json is configured with publicly accessible IP/FQDN of RDA Fabric for NATs and Minio endpoints.
Step-7:
Tip
If Ubuntu version is v22.04.2 LTS or above & Docker Compose version is v2.16.0 or above, Use the following Commands mentioned below
This section provides additional steps to deploy RDA Studio on Ubuntu OS (Certified on 18.04). Using the currently logged-in user, run the following commands to make sure the user has sufficient permissions.
- If the above command throws an error permission denied error, run the following command to
provide sufficient privileges to the currently logged-in user to run
docker.
sudo curl -L "https://github.com/docker/compose/releases/download/1.29.2/docker-compose-$(uname -s)-$(uname -m)" -o /usr/local/bin/docker-compose
sudo chmod +x /usr/local/bin/docker-compose
sudo ln -s /usr/local/bin/docker-compose /usr/bin/docker-compose
Open firewall to allow 9998,443 port
Step-8:
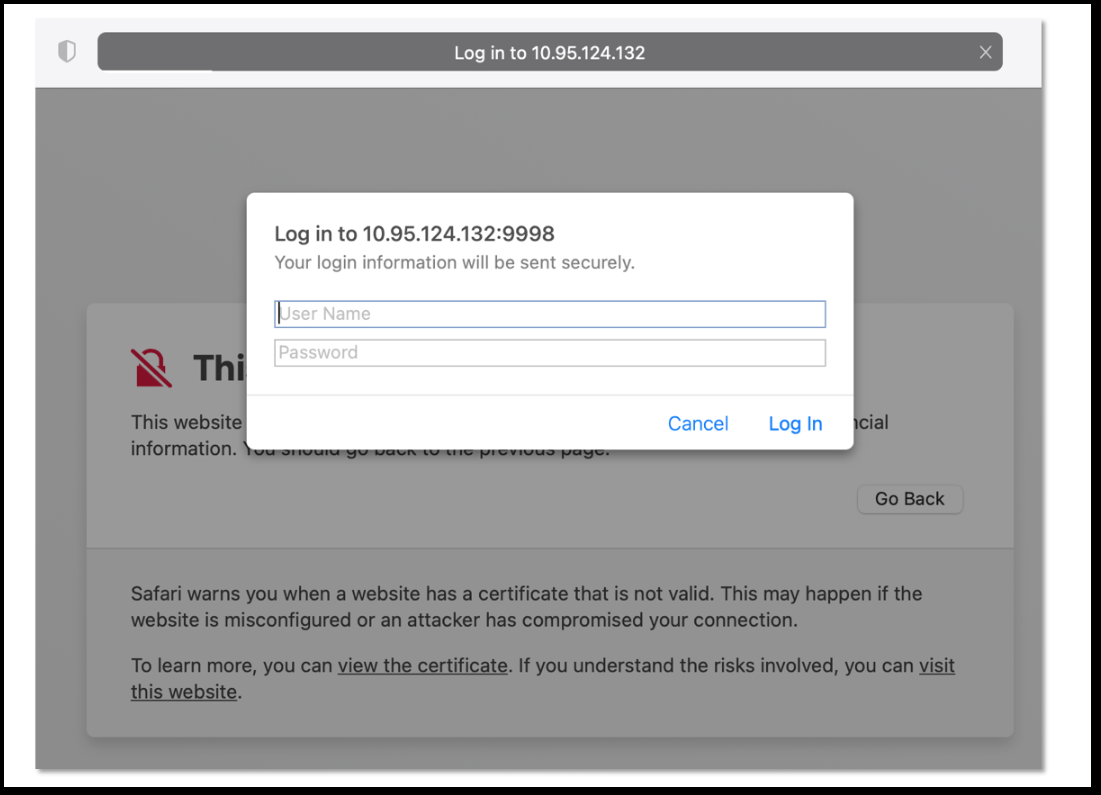
To access RDA Studio UI, open up a browser and enter the URL as https://ipaddress:9998 OR https://ipaddress:443
Note: Access RDA using https://rda-studio-ip-address:9998/ OR https://rda-studio-ip-address:443
The default user name is 'rdademo' and the password is 'rdademo1234'
3. Mac OS Environment
Note: Please check the Prerequisites - Installation Prerequisites before you proceed.
Note: Make sure the below commands are in the PATH variable in the user's login profile.
Run the below commands to verify currently installed RDA prerequisites.
Verify Prerequisites
Make sure the below commands are in the PATH variable in the user's login profile.
Run the below commands to verify currently installed RDA prerequisites.
Step-1:
Create a virtual environment using python3
Step-2:
Source virtual env that was created in Step 2 as shown below.
Step-3:
Install docker-compose tool needed to install RDA as shown below
Note: Make sure docker-compose is installed properly
Step-4:
Create the following directory structure after logging into Linux machine for setting up directory structure for the first RDA Studio
mkdir -p /Users/$(whoami)/rda_studio/cfxdx/home
mkdir -p /Users/$(whoami)/rda_studio/cfxdx/config/network_config
mkdir -p /Users/$(whoami)/rda_studio/cfxdx/output
Note: Above /home/$(whoami) is example User's home directory. Users can update as per mac user account.
Step-5:
Create rda-studio.yaml file for RDA studio
cd /Users/$(whoami)/rda_studio/

cat > rda-studio.yaml << EOF

services:
  cfxdx:
    image: docker2.cloudfabrix.io:443/external/ubuntu-cfxdx-nb-nginx-all:8.2.0.1
    restart: unless-stopped
    volumes:
      - /Users/$(whoami)/rda_studio/cfxdx/home:/root
      - /Users/$(whoami)/rda_studio/cfxdx/config:/tmp/config
      - /Users/$(whoami)/rda_studio/cfxdx/output:/tmp/output
      - /Users/$(whoami)/rda_studio/cfxdx/config/network_config:/network_config
    ports:
      - "9998:9998"
      - "443:443"
    environment:
      NLTK_DATA : "/root/nltk_data"
      CFXDX_CONFIG_FILE: /tmp/config/conf.yml
      RDA_NETWORK_CONFIG: /network_config/config.json
      RDA_USER: rdademo
      RDA_PASSWORD: rdademo1234

EOF
Step-6:
The RDA Stdio node registers and communicates with the RDAF platform using a configuration file that contains your tenant ID, data fabric access tokens, and object storage credentials.
Download RDA Fabric Configuration from the portal by going to Configuration --> RDA Administration --> Network and copy it to the local filesystem where the worker node is going to be installed.
- Save the file as
config.json
Step-7:
- Copy the downloaded RDA Fabric configuration file as shown below.
Step-8:
Docker Login
Run the below command to create and save the docker login session into CloudFabrix's secure docker repository.
Tip
Note-1: Make sure docker is up and running before Step-9
Step-9:
cd /Users/$(whoami)/rda_studio

docker-compose -f rda-studio.yaml pull
docker-compose -f rda-studio.yaml up -d
Step-10:
To access RDA Studio interface, open up a browser and enter the URL as https://ipaddress:9998 OR https://ipaddress:443
Note: Access RDA using https://rda-studio-ip-address:9998/ OR https://rda-studio-ip-address:443
The default user name is rdademo and the password is rdademo1234
4. Windows OS Environment
Note: Please check the Prerequisites - Installation Prerequisites before you proceed.
Note: Make sure the below commands are in the PATH variable in the user's login profile.
Verify Prerequisites
Make sure the below commands are in the PATH variable in the user's login profile.
Run the below commands to verify currently installed RDA prerequisites.
Step-1:
Create the following directory structure after logging into Windows machine for setting up directory structure for the RDA Studio.
Tip
Assumption is that, user will execute the below commands from "C:\" directory.
C:\
C:\mkdir rda_studio
C:\mkdir rda_studio\cfxdx\home
C:\mkdir rda_studio\cfxdx\config\network_config
C:\mkdir rda_studio\cfxdx\output
Step-2:
Create rda-studio.yaml file for RDA studio using your favorite studio (notepad or wordpad).
You can copy the following rda-studio.yaml content to a file 'rda-studio.yaml and copy to
the following location --> C:\rda_studio\
Tip
Copy and paste the following lines to C:\rda_studio\rda-studio.yaml using your favorite editor and save the file.
services:
  cfxdx:
    image: docker2.cloudfabrix.io:443/external/ubuntu-cfxdx-nb-nginx-all:8.2.0.1
    restart: unless-stopped
    volumes:
      - C:\\rda_studio\\cfxdx\\home\\:/root
      - C:\\rda_studio\cfxdx\\config\\:/tmp/config/
      - C:\\rda_studio\\cfxdx\\output\\:/tmp/output/
      - C:\\rda_studio\\cfxdx\config\\network_config\\:/network_config
    ports:
      - "9998:9998"
      - "443:443"
    environment:
      NLTK_DATA : "/root/nltk_data"
      CFXDX_CONFIG_FILE: /tmp/config/conf.yml
      RDA_NETWORK_CONFIG: /network_config/config.json
      RDA_USER: rdademo
      RDA_PASSWORD: rdademo1234
Step-3:
Once the above yaml content is saved to rda-studio.yaml file, copy the file to following location.
Step-4:
The RDA Stdio node registers and communicates with the RDAF platform using a configuration file that contains your tenant ID, data fabric access tokens, and object storage credentials.
Download RDA Fabric Configuration from the portal by going to Configuration --> RDA Administration --> Network and copy it to the local filesystem where the worker node is going to be installed.
- Save the file as
config.json
Step-5:
- Copy the downloaded RDA Fabric configuration file as shown below.
Step-6:
Docker Login
Run the below command to create and save the docker login session into CloudFabrix's secure docker repository.
Tip
Note-1: Make sure docker is up and running before Step-7
Step-7:
Step-8:
To access RDA Studio interface, open up a browser and enter the URL as https://ipaddress:9998 OR https://ipaddress:443