Guide to Install and Configure RDA Fabric platform in on-premise environment.
1. RDAF platform and it's components
Robotic Data Automation Fabric (RDAF) is designed to manage data in a multi-cloud and multi-site environments at scale. It is built on microservices and distributed architecture which can be deployed in a Kubernetes cluster infrastructure or in a native docker container environment which is managed through RDA Fabric (RDAF) deployment CLI.
RDAF deployment CLI is built on top of docker-compose container management utility to automate the lifecycle management of RDAF platform components which includes, install, upgrades, patching, backup, recovery, other management and maintenance operations.
RDAF platform consists below set of services which can be deployed in a single virtual machine or a baremetal server or spread across multiple virtual machines or baremetal servers.
-
RDA core platform services
- registry
- api-server
- identity
- collector
- scheduler
- portal-ui
- portal-backend
-
RDA infrastructure services
- NATs
- MariaDB
- Minio
- Opensearch
- Kafka
- HAproxy
- GraphDB
- Qdrant (Optional)
Note
CloudFabrix RDAF platform integrates with above opensource services and uses them as back-end components. However, these opensource service images are not bundled with RDAF platform by default. Customers can download CloudFabrix validated versions from publicly available docker repository (ex: quay.io or docker hub) and deploy them with GPL / AGPL or Commercial license as per their support requirements. RDAF deployment tool provides a hook to assist the Customer to download these opensource software images (supported versions) from the Customer's chosen repository.
-
RDA application services
- cfxOIA (Operations Intelligence & Analytics)
- cfxAIA (Asset Intelligence & Analytics) (Note: AIA application type is deprecated and all of it's capabilities are available through base RDA Fabric platform itself. For more information, please contact cfx-support@cloudfabric.com)
-
RDA worker service
- RDA event gateway
- RDA edgecollector
- RDA studio
2. Docker registry access for RDAF platform services deployment
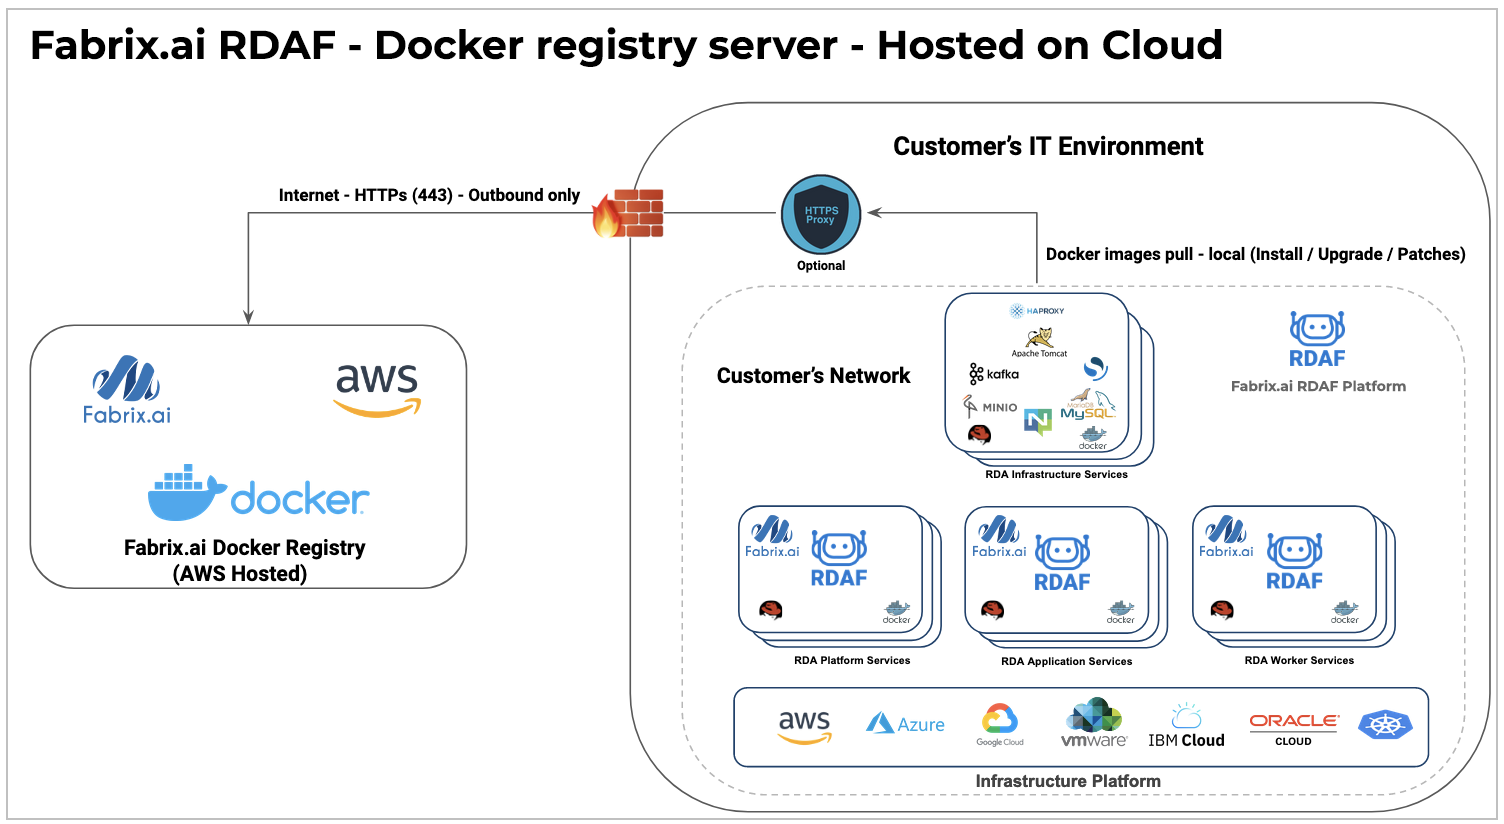
CloudFabrix provides secure docker images registry hosted on AWS cloud which contains all of the required docker images to deploy RDA Fabric platform, infrastructure and application services.
For deploying RDA Fabric services, the environment need to have access to CloudFabrix docker registry hosted on AWS cloud over internet. Below is the docker registry URL and port.
Outbound internet access:
- URL: https://docker2.cloudfabrix.io
- Port: 443
Below picture illustrates network access flow from on-premise environment to access CloudFabrix docker registry hosted on AWS cloud.
Docker registry hosted on AWS cloud
Tip
Please click on the picture below to enlarge and to go back to the page please click on the back arrow button on the top.
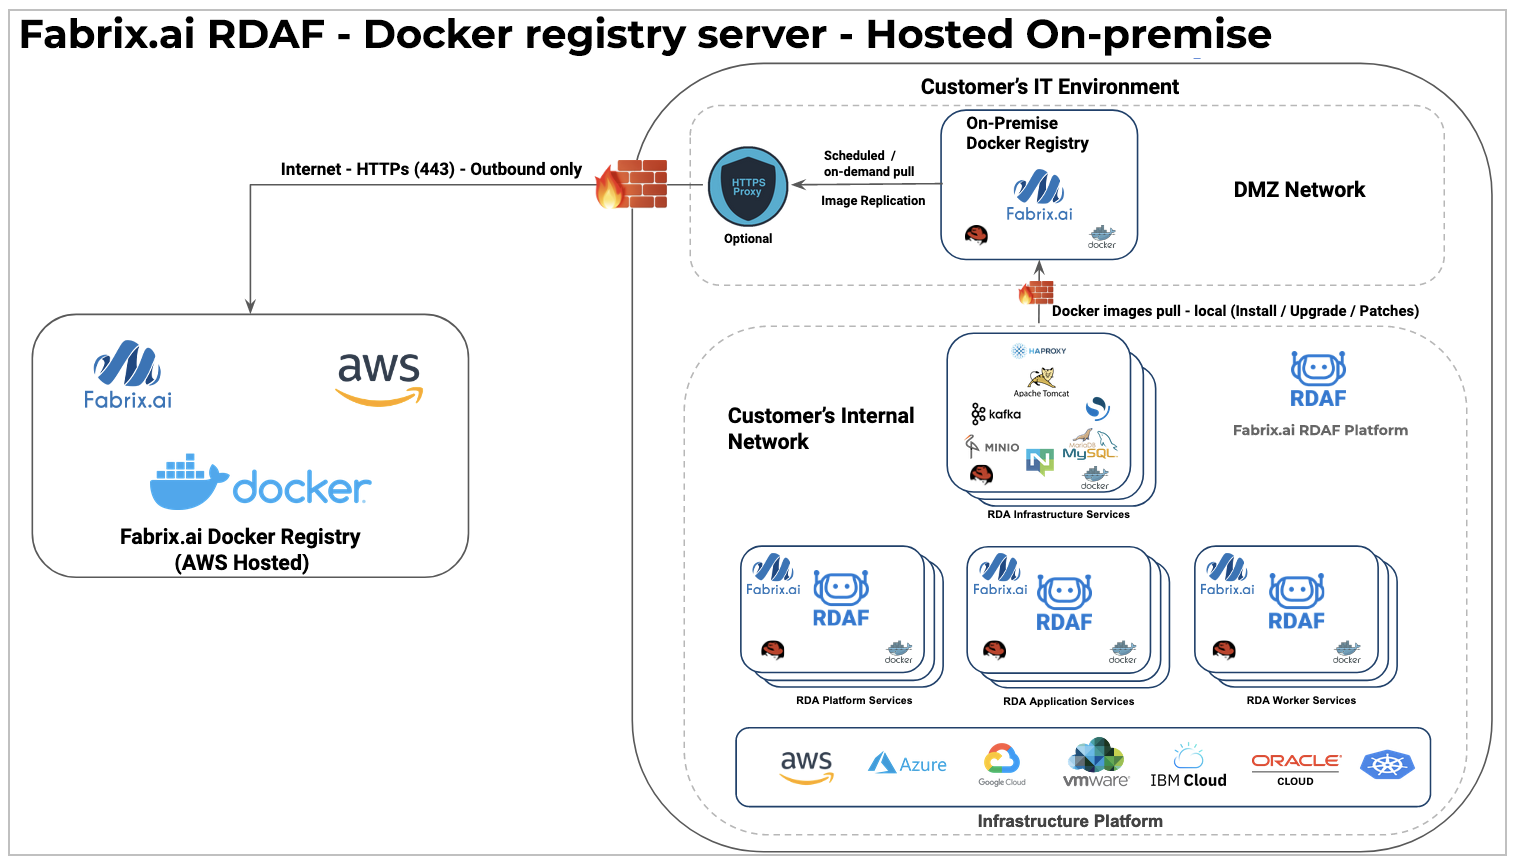
Additionally, CloudFabrix also support hosting an on-premise docker registry in a restricted environment where RDA Fabric VMs do not have direct internet access with or without HTTP proxy.
Once on-premise docker registry service is installed within the Customer's DMZ environment, it communicates with docker registry service hosted on AWS cloud and replicates the selective images required for RDA Fabric deployment for a new installation, on-going updates and patches.
RDA Fabric VMs will pull the images from on-premise docker registry locally.
Below picture illustrates network access flow from on-premise environment to access CloudFabrix docker registry hosted on AWS cloud.
Docker registry hosted On-premise
Tip
Please click on the picture below to enlarge and to go back to the page please click on the back arrow button on the top.
Please refer On-premise Docker registry setup to setup, configure, install and manage on-premise docker registry service and images.
Tip
On-premise docker registry server is recommended to be deployed. However, it is an optional service if there is no restriction in accessing the internet. With on-premise docker registry server, images can be downloaded offline and keep them ready for a fresh install or an update. It will avoid any network glitches or issues in downloading the images from internet during a production environment's installation or upgrade.
3. HTTP Proxy support for deployment
Note
RHEL is supported only for versions earlier than 8.0. Fresh installations with version 8.0 are not supported.
Optionally, RDA Fabric docker images can also be accessed over HTTP proxy during the deployment if one is configured to control the internet access.
On all of the RDA Fabric machines where the services going to be deployed, should be configured with HTTP proxy settings.
- Edit /etc/environment file and define HTTP Proxy server settings as shown below.
Note
If the Worker has already been deployed and if the HA Proxy Settings need to be enabled later, please follow the below mentioned steps.
- View the sample no_proxy and NO_PROXY elements that were added to the
rda_worker sectionin thevalues.yamlfile below.
rda_worker:
mem_limit: 8G
memswap_limit: 8G
privileged: false
Environment:
  RDA_ENABLE_TRACES: 'no'
  DISABLE_REMOTE_LOGGING_CONTROL: 'no'
  RDA_SELF_HEALTH_RESTART_AFTER_FAILURES: 3
  no_proxy: 127.0.0.1,localhost
  NO_PROXY: 127.0.0.1,localhost
Info
Note: IP Address details are given for a reference only. They need to be replaced with appropriate HTTP Proxy server IP and port applicable to your environment.
Warning
Note: For no_proxy and NO_PROXY environment variables, please include loopback and IP addresses of all RDA platform, infrastructure, application and worker nodes. This will ensure to avoid internal RDA Fabric's application traffic going through HTTP proxy server.
Additionally, include any target applications or devices IP address or DNS names where it doesn't require to go through HTTP Proxy server.
Optionally, RDA Fabric docker images can also be accessed over HTTP proxy during the deployment if one is configured to control the internet access.
On all of the RDA Fabric machines where the services going to be deployed, should be configured with HTTP proxy settings.
- Edit /etc/profile.d/proxy.sh file and define HTTP Proxy server settings as shown below.
- Update file permissions with execute and source the file or logout and login again to enable the http proxy settings.
- Configure http proxy for APT package manager by editing /etc/apt/apt.conf.d/80proxy file as shown below.
Note
If the Worker has already been deployed and if the HA Proxy Settings need to be enabled later, please follow the below mentioned steps.
- View the sample no_proxy and NO_PROXY elements that were added to the
rda_worker sectionin thevalues.yamlfile below.
rda_worker:
mem_limit: 8G
memswap_limit: 8G
privileged: false
Environment:
  RDA_ENABLE_TRACES: 'no'
  DISABLE_REMOTE_LOGGING_CONTROL: 'no'
  RDA_SELF_HEALTH_RESTART_AFTER_FAILURES: 3
  no_proxy: 127.0.0.1,localhost
  NO_PROXY: 127.0.0.1,localhost
-
rdaf worker install command is used to deploy / install RDAF worker services.
-
Run the below command to deploy all RDAF worker services.
-
Once the worker container is up with tag 8.2.1, validate proxy settings within the worker container by checking docker inspect command.
-
Once the worker is installed, please check the proxy env via docker
exec -it <worker id>
Info
Note: IP Address details are given for a reference only. They need to be replaced with appropriate HTTP Proxy server IP and port applicable to your environment. Username and Password fields are optional and needed only if the HTTP Proxy is enabled with user authentication.
Warning
Note: For no_proxy and NO_PROXY environment variables, please include loopback and IP addresses of all RDA platform, infrastructure, application and worker nodes. This will ensure to avoid internal RDA Fabric's application traffic going through HTTP proxy server.
Additionally, include any target applications or devices IP address or DNS names where it doesn't require to go through HTTP Proxy server.
DNS Resolution and CFX Registry Access Issues
Note
If the above proxy settings are not working and seeing DNS challenge or CFX registry access, Please follow the below steps
- Steps to resolve DNS issues and access to CFX registry

- To update the DNS records we need to update the below domains in
etc/hostsfile
Note
quay.io is having a dynamic ip, so before updating the host file check the ip again by using the command mentioned below.

- Please check the DNS Server Settings by using the below command
- To update the additional DNS Servers please run the below command
network:
    version: 2
    renderer: networkd
    ethernets:
      ens160:
        dhcp4: no
        dhcp6: no
        addresses: [192.168.125.66/24]
        gateway4:  192.168.125.1
        nameservers:
          addresses: [192.168.159.101,192.168.159.100]
- To apply the above changes please run the below command
- If you still see any DNS Server settings issue, please run the below commands
- Configure Docker Daemon with HTTP Proxy server settings.
Create a file called http-proxy.conf under above directory and add the HTTP Proxy configuration lines as shown below.
Warning
Note: If there is an username and password required for HTTP Proxy server authentication, and if the username has any special characters like "\" (ex: username\domain), it need to be entered in HTTP encoded format. This is applicable only for Docker daemon. Please follow the below instructions.
HTTP Encode / Decode URL: https://www.urlencoder.org
If the username is john\acme.com : The HTTP encoded value is john%%5Cacme.com and the HTTP Proxy configuration looks like below.
-
Restart the RDA Platform, Infrastructure, Application and Worker node VMs to apply the HTTP Proxy server settings.
-
To apply the HTTP Proxy server settings at the docker level please run the below 2 given commands
- After restarting the docker services please verify the configuration by checking the docker environment using below command
Environment=HTTP_PROXY=http://192.168.125.66:3128 HTTPS_PROXY=https://192.168.125.66:3129 NO_PROXY=localhost,127.0.0.1,docker2.cloudfabrix.io
Note
You can find more info about docker proxy configuration in below URL https://docs.docker.com/config/daemon/systemd/#httphttps-proxy
- Verify if you are able to connect to CloudFabrix docker registry URL running the below command.
curl -vv https://docker2.cloudfabrix.io:443
* Rebuilt URL to: https://docker2.cloudfabrix.io:443/external/
*   Trying 54.177.20.202...
* TCP_NODELAY set
* Connected to docker2.cloudfabrix.io (68.121.166.41) port 443 (#0)
* ALPN, offering h2
* ALPN, offering http/1.1
* successfully set certificate verify locations:
*   CAfile: /etc/pki/tls/certs/ca-bundle.crt
  CApath: none
* TLSv1.3 (OUT), TLS handshake, Client hello (1):
* TLSv1.3 (IN), TLS handshake, Server hello (2):
* TLSv1.2 (IN), TLS handshake, Certificate (11):
.
.
.
*  SSL certificate verify ok.
> GET / HTTP/1.1
> Host: docker2.cloudfabrix.io
> User-Agent: curl/7.61.1
> Accept: */*
>
< HTTP/1.1 200 OK
Note
The username/password has not been provided in this documentation. If you need access credentials, please reach out to the Support Team at (support@fabrix.ai)
- After configuring the Docker deamon, Please run the below
docker logincommand to verify if Docker daemon is able to access CloudFabrix docker registry service.
WARNING! Using --password via the CLI is insecure. Use --password-stdin.
WARNING! Your password will be stored unencrypted in /home/rdauser/.docker/config.json.
Configure a credential helper to remove this warning. See
https://docs.docker.com/engine/reference/commandline/login/#credentials-store

Login Succeeded
Login Succeeded should be seen as shown in the above command's output.
4. RDAF platform resource requirements
RDA Fabric platform deployment can vary from simple to advanced depends on type of the environment and requirements.
A simple deployment can consist of one or more VMs for smaller and non-critical environments, while an advanced deployment consists of many RDA Fabric VMs to support high-availability, scale and for business critical environments.
CloudFabrix provided OVF support: VMware vSphere 6.0 or above
4.1 Single VM deployment:
The below configuration can be used for a demo or POC environments. In this single VM configuration, all of RDA Fabric platform, infrastructure and application services will be installed.
For deployment and configuration options, Please refer OVF based deployment or Deployment on RHEL/Ubuntu OS/Rocky Linux OS section within this document.
| Quantity | VM Type |
CPU / Memory / Network | Storage |
|---|---|---|---|
| 1 | OVF Profile: RDA Fabric Infra InstanceServices: Platform, Infrastructure, Application & Worker |
CPU: 8Memory: 64GBNetwork:1 Gbps/10 Gbps |
/ (root): 75GB/opt: 50GB/var/lib/docker: 100GB/minio-data: 50GB/kafka-logs: 25GB/var/mysql: 50GB/opensearch: 50GB/graphdb: 50GB |
4.2 Distributed VM deployment:
The below configuration can be used to distribute the RDA Fabric services for smaller or non-critical environments.
For deployment and configuration options, Please refer OVF based deployment or Deployment on RHEL/Ubuntu OS/Rocky Linux OS section within this document.
- RDAF Platform VMs deployment on RHEL/Ubuntu OS/Rocky Linux
| Quantity | OVF Profile |
CPU / Memory / Network | Storage |
|---|---|---|---|
| 1 | OVF Profile: RDA Fabric Infra InstanceServices: Platform & Infrastructure |
CPU: 8Memory: 32GBNetwork:1 Gbps/10 Gbps |
/ (root): 75GB/opt: 50GB/var/lib/docker: 50GB/minio-data: 50GB/kafka-logs: 25GB/var/mysql: 50GB/opensearch: 50GB/grapgdb: 50GB |
| 1 | OVF Profile: RDA Fabric Platform InstanceServices: Application (OIA) |
CPU: 8Memory: 48GBNetwork:1 Gbps/10 Gbps |
/ (root): 75GB/opt: 50GB/var/lib/docker: 50GB |
| 1 | OVF Profile: RDA Fabric Platform InstanceServices: RDA Worker |
CPU: 8Memory: 32GBNetwork:1 Gbps/10 Gbps |
/ (root): 75GB/opt: 25GB/var/lib/docker: 25GB |
4.3 HA, Scale and Production deployment:
The below configuration can be used to distribute the RDA Fabric services for production environment to be highly-available and to support larger workloads.
For deployment and configuration options, Please refer OVF based deployment or Deployment on RHEL/Ubuntu OS/Rocky Linux OS section within this document.
| Quantity | OVF Profile |
CPU / Memory / Network | Storage |
|---|---|---|---|
| 3 | OVF Profile: RDA Fabric Infra InstanceServices: Infrastructure |
CPU: 8Memory: 48GBNetwork: 10 Gbps |
SSD Only/ (root): 75GB/opt: 50GB/var/lib/docker: 50GB/minio-data: 100GB/kafka-logs: 50GB/var/mysql: 150GB/opensearch: 100GB/graphdb: 50GB |
| 2 | OVF Profile: RDA Fabric Platform InstanceServices: RDA Platform |
CPU: 4Memory: 24GBNetwork: 10 Gbps |
/ (root): 75GB/opt: 50GB/var/lib/docker: 50GB |
| 3 or more | OVF Profile: RDA Fabric Platform InstanceServices: Application (OIA) |
CPU: 8Memory: 48GBNetwork: 10 Gbps |
/ (root): 75GB/opt: 50GB/var/lib/docker: 50GB |
| 3 or more | OVF Profile: RDA Fabric Platform InstanceServices: RDA Worker |
CPU: 8Memory: 32GBNetwork: 10 Gbps |
/ (root): 75GB/opt: 25GB/var/lib/docker: 25GB |
Important
For a production rollout, RDA Fabric platform's resources such as CPU, Memory and Storage need to be sized appropriately depends on the environment size in terms of alert ingestion per minute, total number of assets for discovery and frequency, data retention of assets, alerts/events, incidents and observability data. Please contact support@cloudfabrix.com for a guidance on resource sizing.
Important
Minio service requires minimum of 4 VMs to run it in HA mode and to provide 1 node failure tolerance. For this requirement, an additional disk /minio-data need to be added on one of the RDA Fabric Platform or Application VMs. So, the Minio cluster service spans across 3 RDA Fabric Infrastructure VMs + 1 of the RDA Fabric Platform or Application VMs. Please refer Adding additional disk for Minio for more information on how to add and configure it.
4.4 Network layout and ports:
Please refer the below picture which outlines the network access layout between the RDAF services and the used ports by them. These are applicable for both Kubernetes and non Kubernetes environments as well.
Tip
Please click on the picture below to enlarge and to go back to the page please click on the back arrow button on the top.
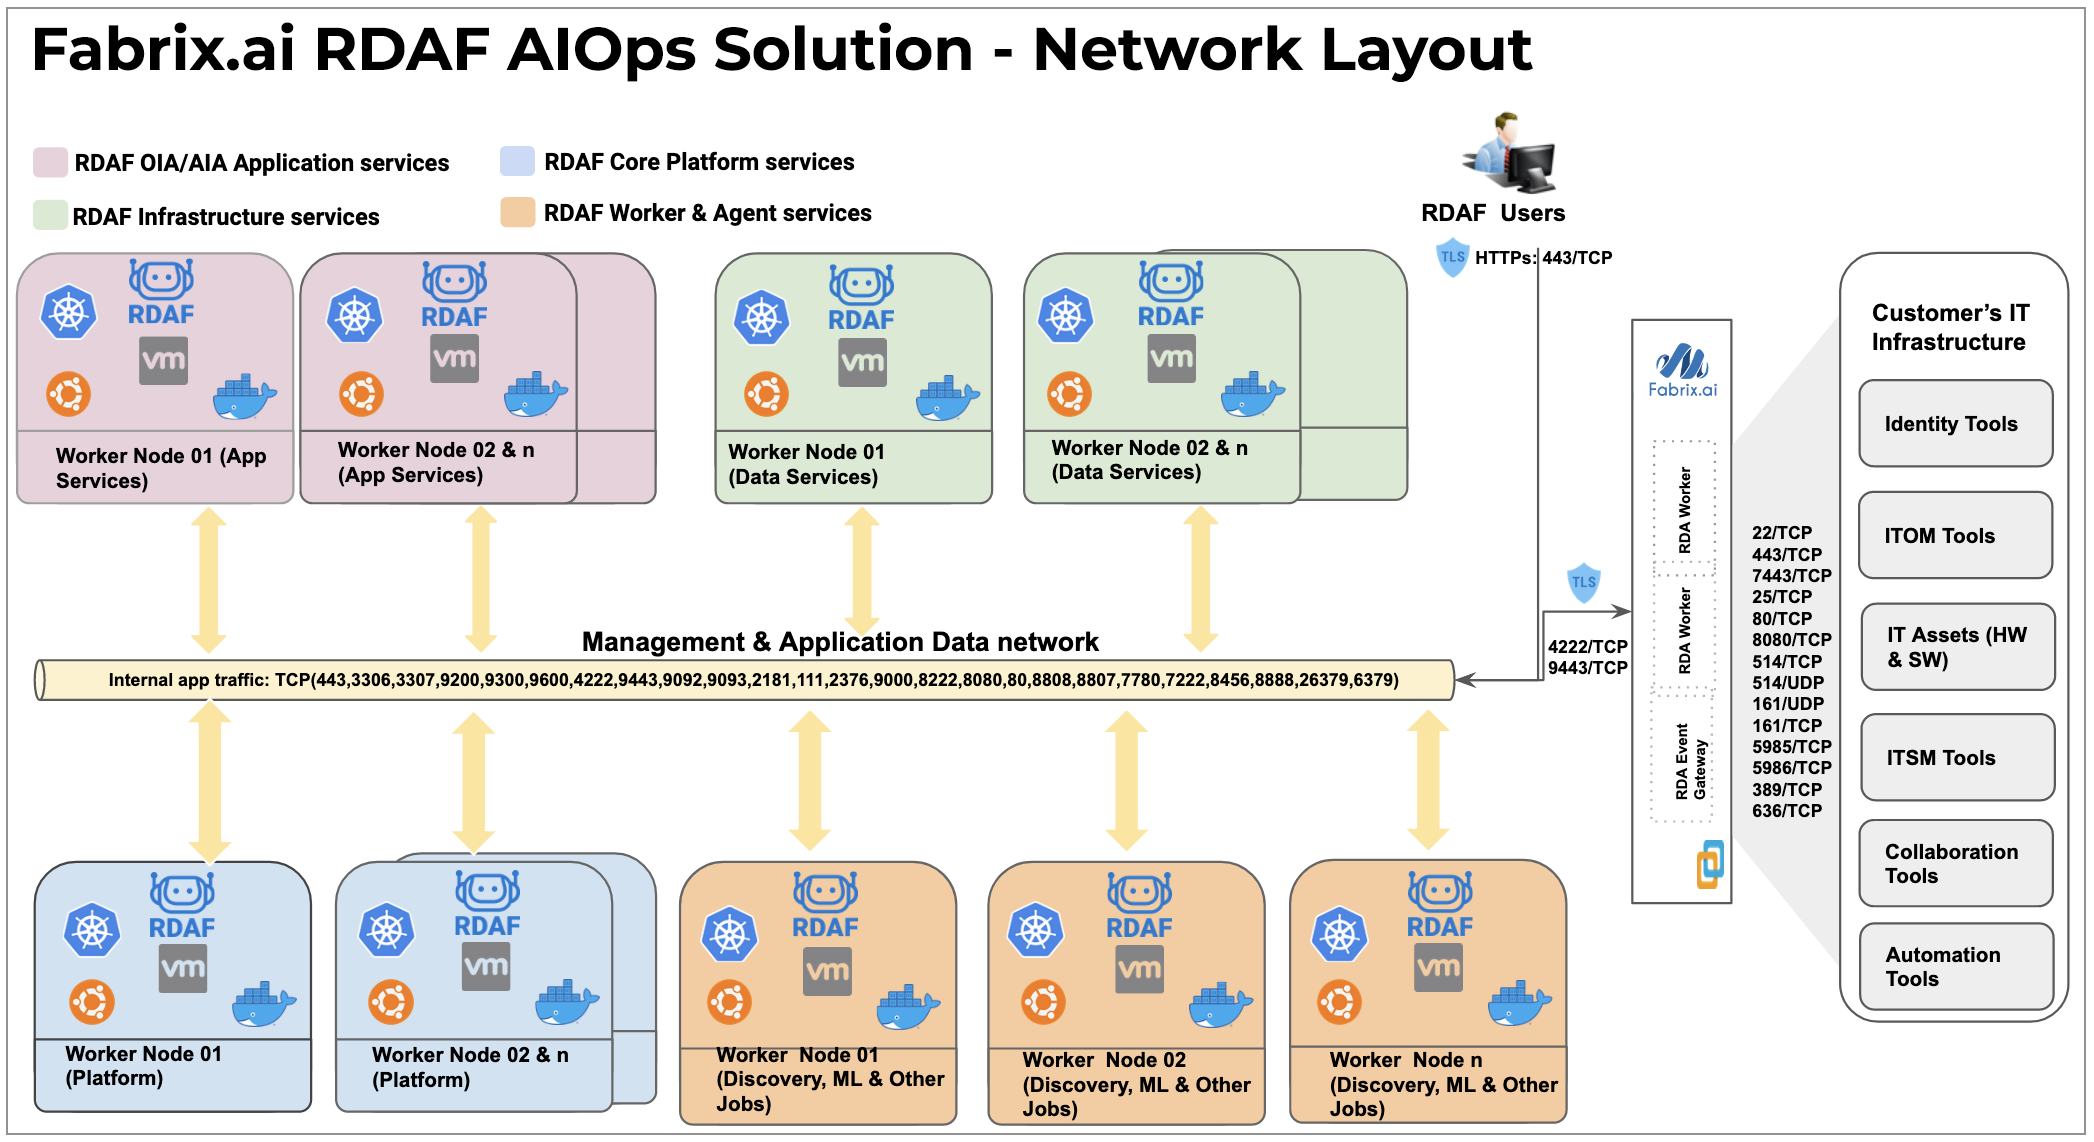
RDAF Services & Network ports:
| Service Type | Service Name | Network Ports |
|---|---|---|
| RDAF Infrastructure Service | Minio | 9000/TCP (Internal) 9443/TCP (External) |
| RDAF Infrastructure Service | MariDB | 3306/TCP (Internal) 3307/TCP (Internal) 4567/TCP (Internal) 4568/TCP (Internal) 4444/TCP (Internal) |
| RDAF Infrastructure Service | Opensearch | 9200/TCP (Internal) 9300/TCP (Internal) 9600/TCP (Internal) |
| RDAF Infrastructure Service | Kafka | 9092/TCP (Internal) 9093/TCP (Internal & External) |
| RDAF Infrastructure Service | NATs | 4222/TCP (External) 6222/TCP (Internal) 8222/TCP (Internal) |
| RDAF Infrastructure Service | HAProxy | 443/TCP (External) 7443/TCP (External) 25/TCP (External) 7222/TCP (External) |
| RDAF Core Platform Service | RDA API Server | 8807/TCP (Internal) 8808/TCP (Internal) |
| RDAF Core Platform Service | RDA Portal Backend | 8080/TCP (Internal) 8081/TCP (Internal) 8082/TCP (internal) 8000/TCP (internal) |
| RDAF Core Platform Service | RDA Portal Frontend (Nginx) | 7780/TCP (Internal) |
| RDAF Application Service | RDA Webhook Server | 8888/TCP (Internal) |
| RDAF Application Service | RDA SMTP Server | 8456/TCP (Internal) |
| RDAF Monitoring Service | Log Monitoring | 5048/TCP (Internal) 5049/TCP (External) |
Internal Network ports: These ports are used by RDAF services for internal communication between them.
External Network ports: These ports are exposed for incoming traffic into RDAF platform, such as, portal UI access, RDA Fabric access (NATs,Minio & Kafka) for RDA workers & agents that were deployed at the edge locations, Webhook based alerts, SMTP email based alerts etc.
Asset Discovery and Integrations: Network Ports
| Access Protocol Details | Endpoint Network Ports |
|---|---|
| Windows AD or LDAP - Identity and Access Management - RDAF platform --> endpoints (Windows AD or LDAP) |
389/TCP 636/TCP |
| SSH based discovery - RDA Worker/Agent (EdgeCollector) --> endpoints (Ex: Linux/Unix, Network/Storage Devices) |
22/TCP |
| HTTP API based discovery/Integration: RDA Worker / AIOps app --> endpoints (Ex: SNOW, CMDB, vCenter, K8s, AWS etc..) |
443/TCP 80/TCP 8080/TCP |
| Windows OS discovery using WinRM/SSH protocol RDA Worker --> Windows Servers |
5985/TCP 5986/TCP 22/TCP |
| SNMP based discovery: - RDA Agent (EdgeCollector) --> endpoints (Ex: network devices like switches, routers, firewall, load balancers etc) |
161/UDP 161/TCP |
5. RDAF platform VMs deployment using OVF
Download the latest OVF image from CloudFabrix (or contact support@cloudfabrix.com).
Supported VMware vSphere version: 6.5 or above
-
OVF OS Version: Ubuntu 24.04.x LTS
-
OVF Download Link: https://macaw-amer.s3.us-east-1.amazonaws.com/images/vmware/v9.0.0/CFX-Ubuntu-v9.0.0.zip
Step-1: Login to VMware vCenter Webclient to install RDA Fabric platform VMs using the downloaded OVF image.
Info
Note: It is expected that the user who is deploying VMs for CloudFabrix RDA Fabric platform, have sufficient VMware vCenter privileges. Also, has necessary pre-requisite credentials and details handy (e.g IP Address/FQDN, Gateway, DNS & NTP server details).
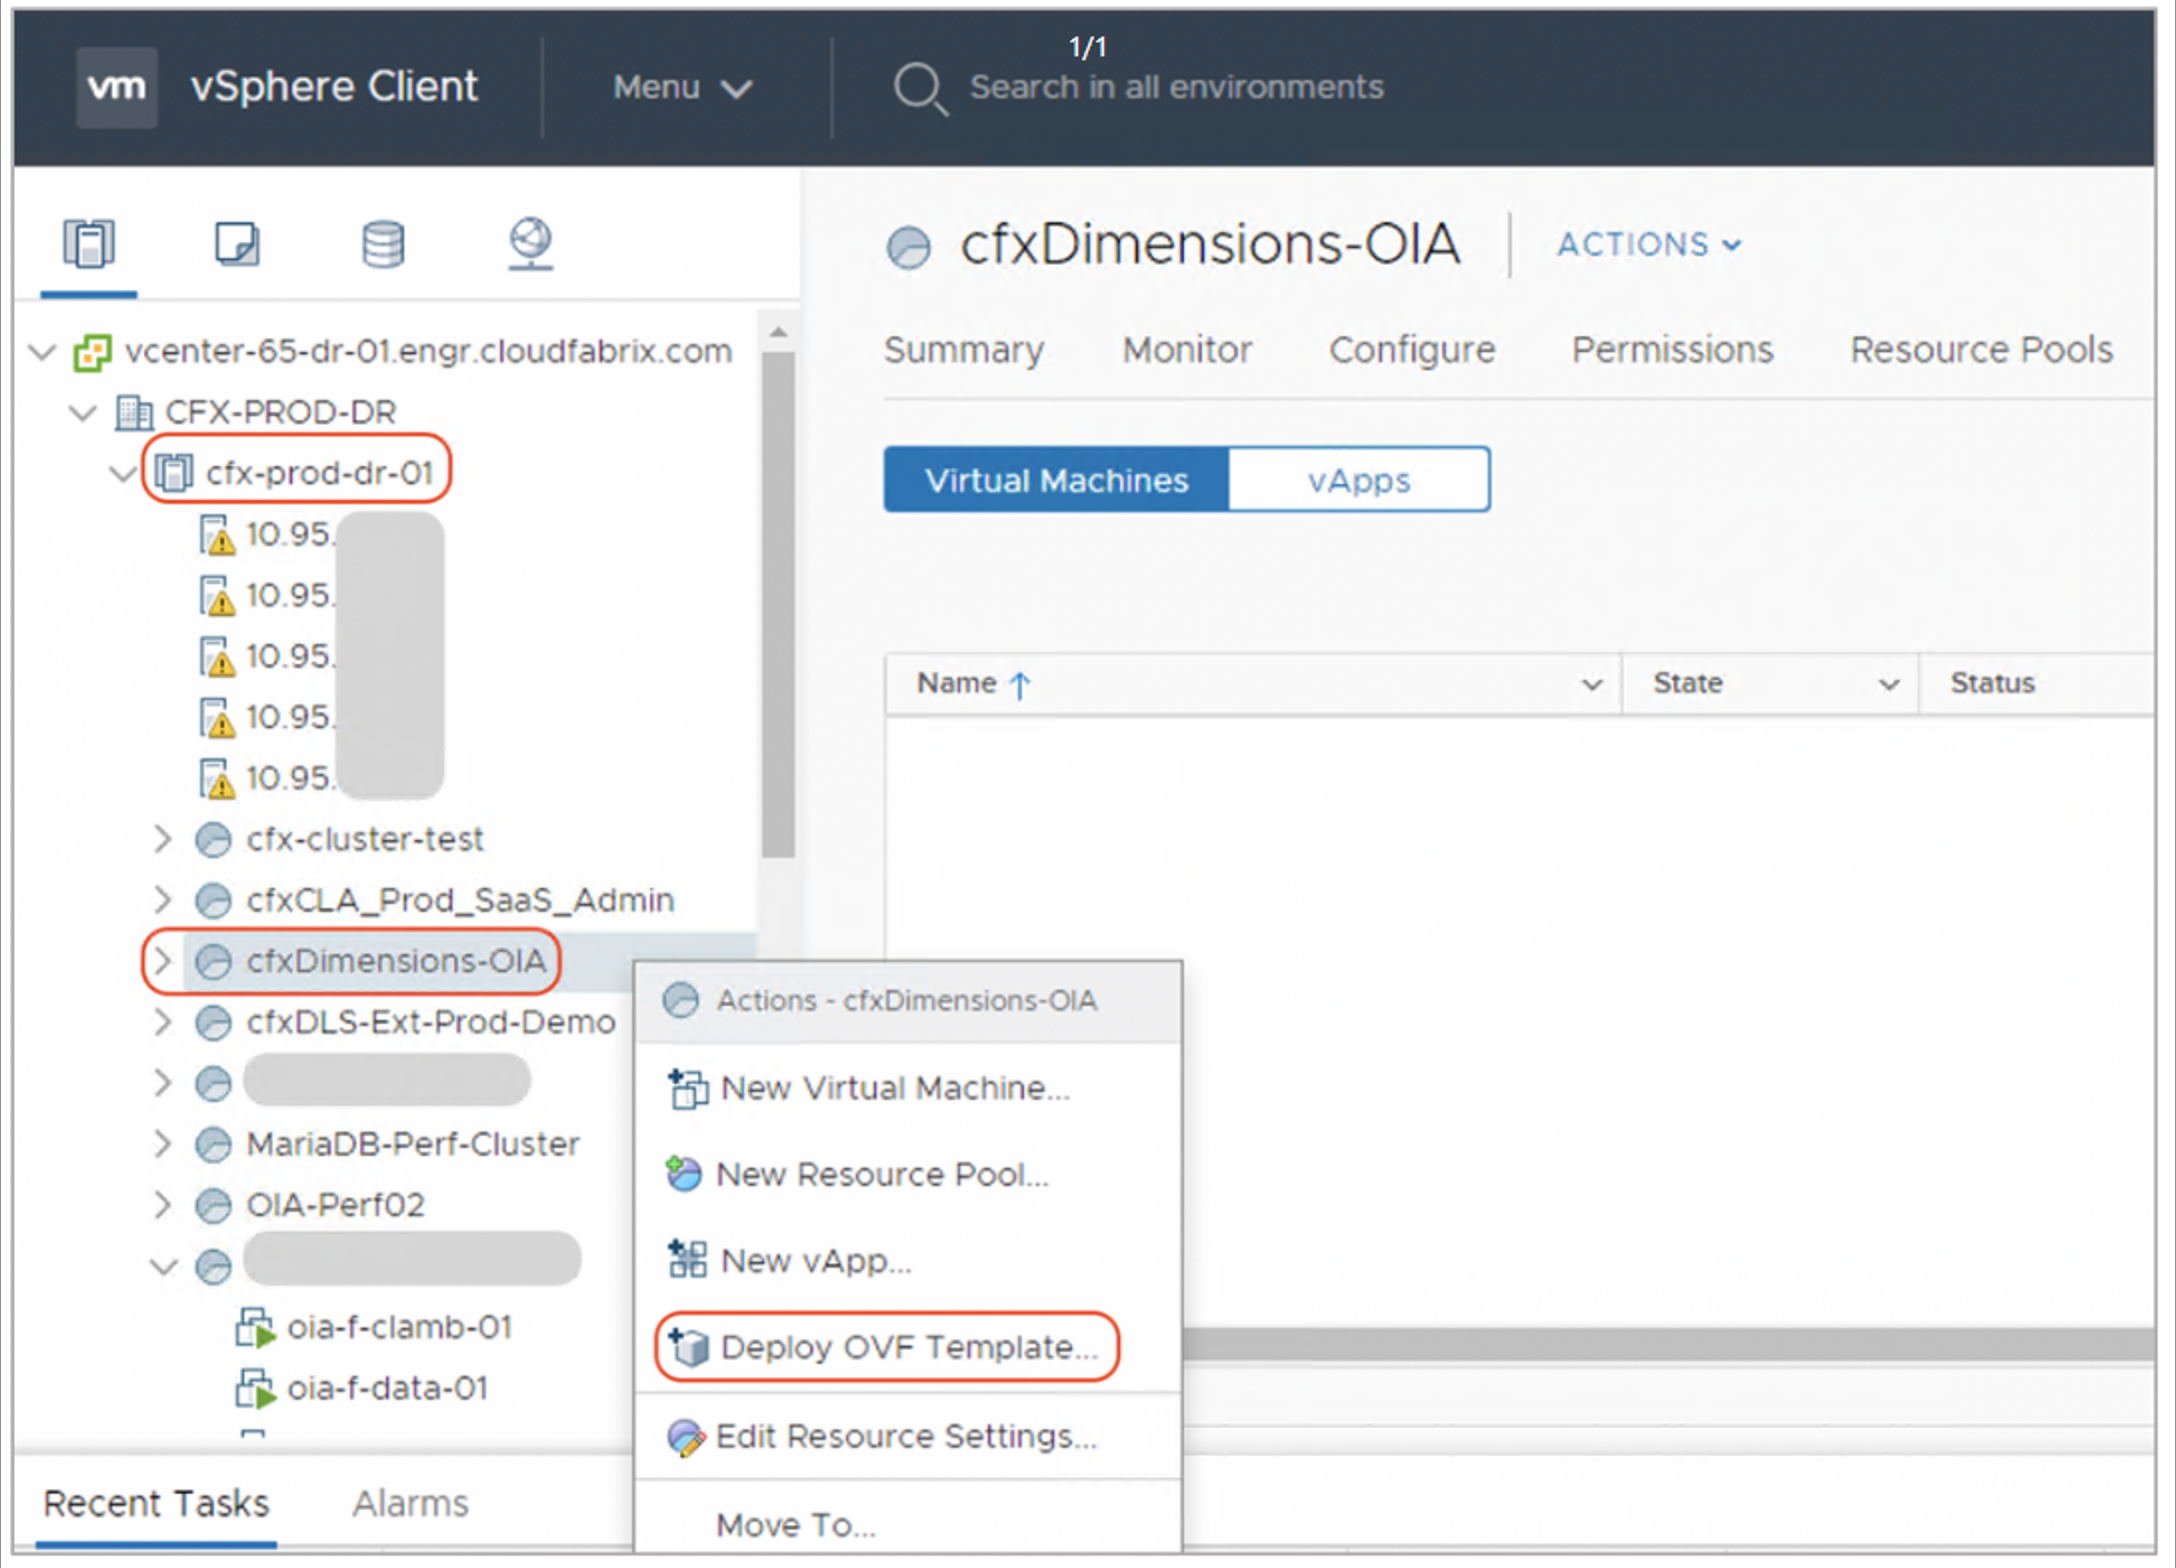
Step-2: Select a vSphere cluster/resource pool in vCenter and right click on it and then select -> Deploy OVF Template as shown below.
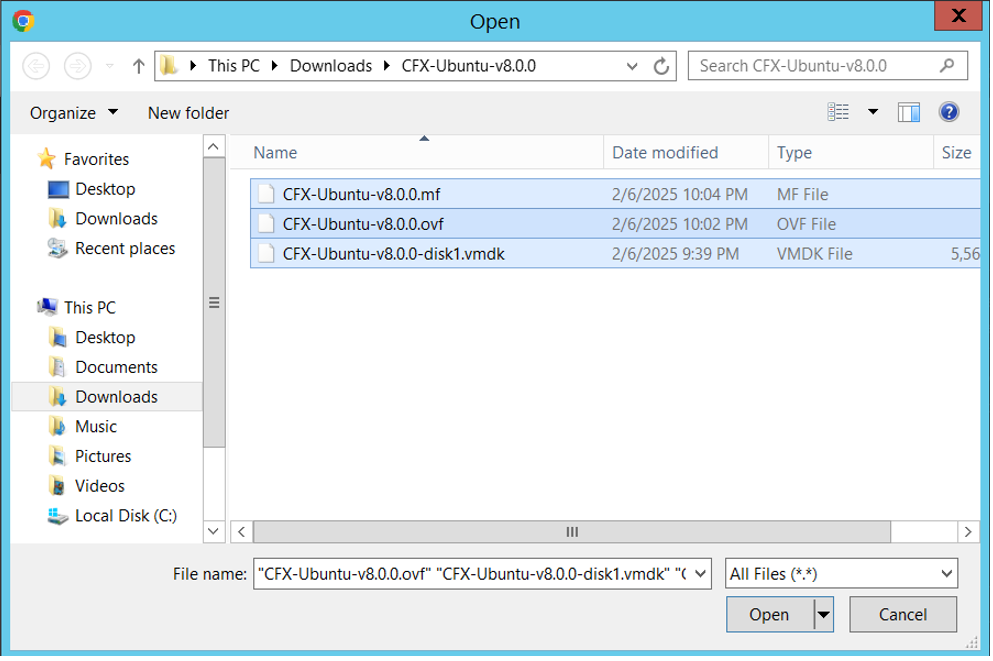
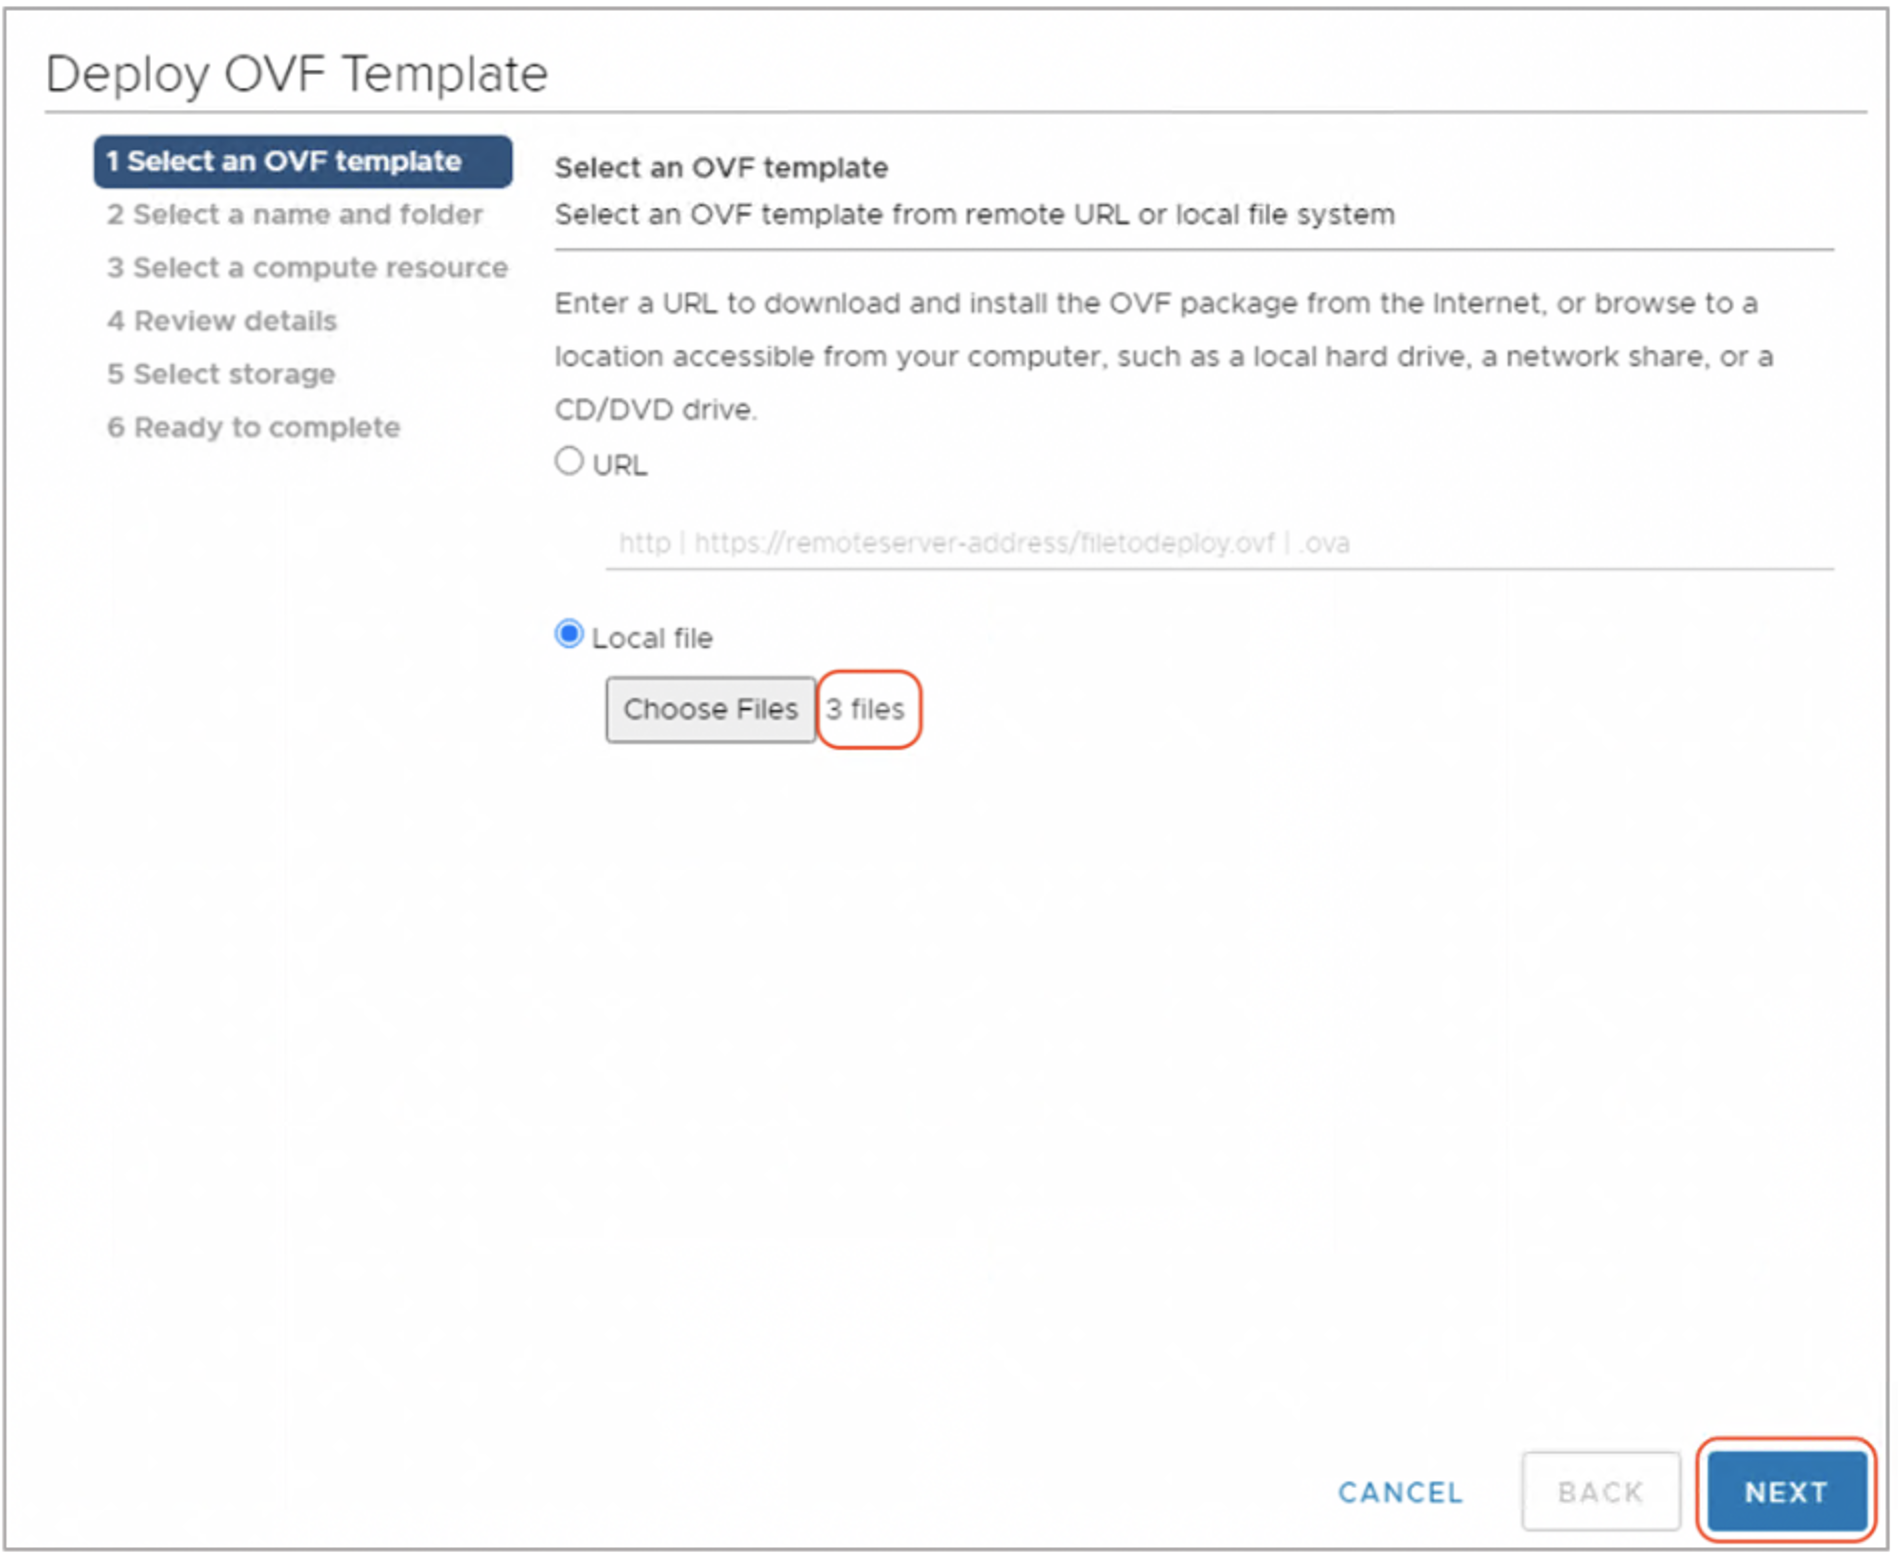
Step-3: Select the OVF image from the location it was downloaded.
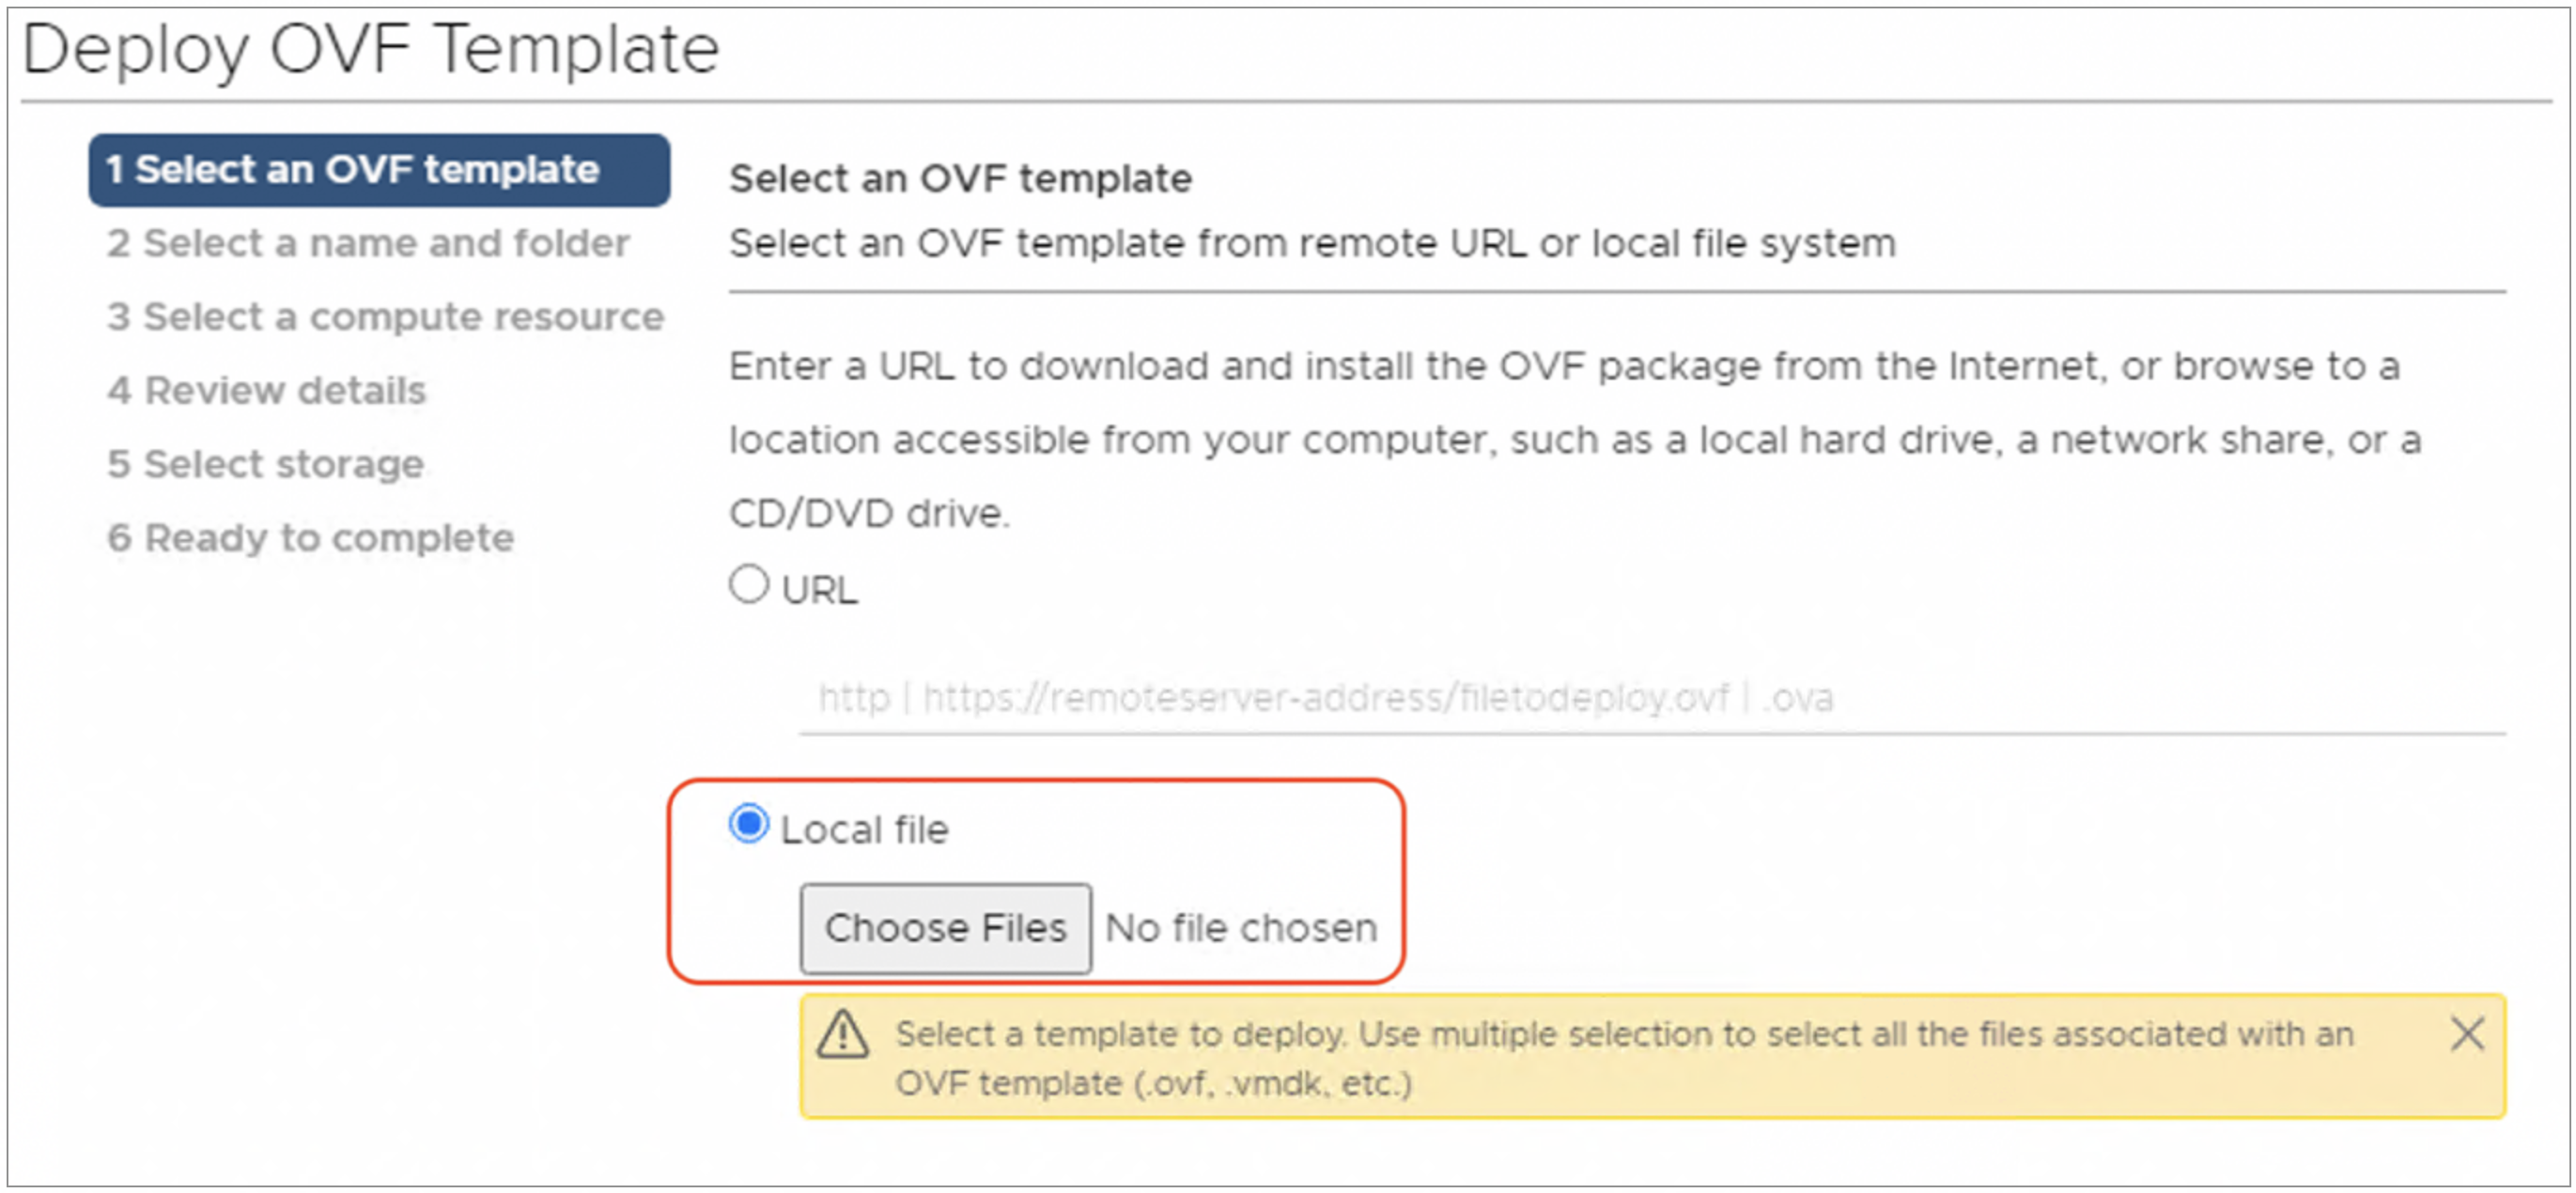
Info
Note: When VMware vSphere Webclient is used to deploy OVF, it expects to select all the files necessary to deploy OVF template. Select all the binary files (.ovf, .mf, .vmdk files) for deploying VM.
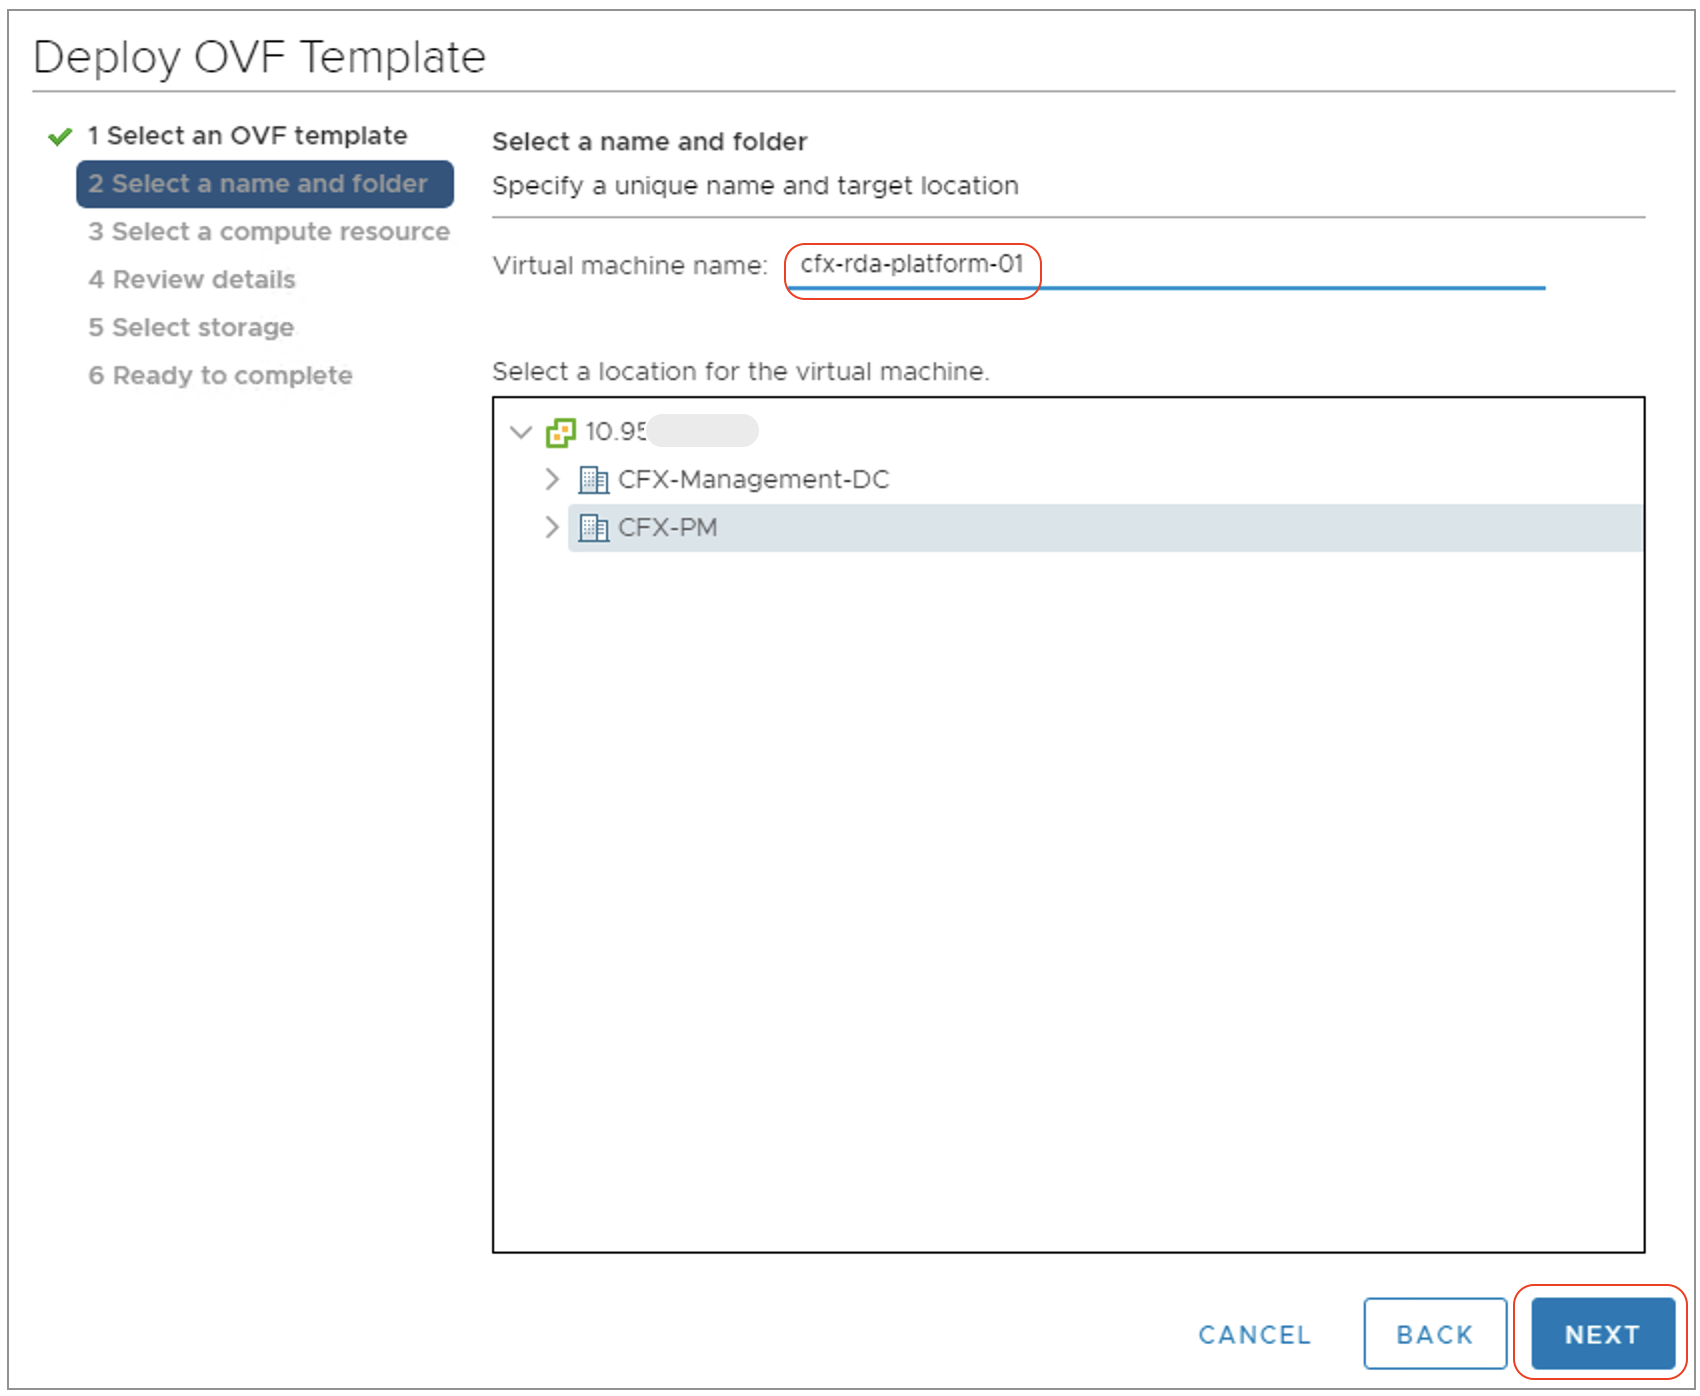
Step-4: Click Next and Enter appropriate 'VM Name' and select an appropriate Datacenter on which it is going to be deployed.
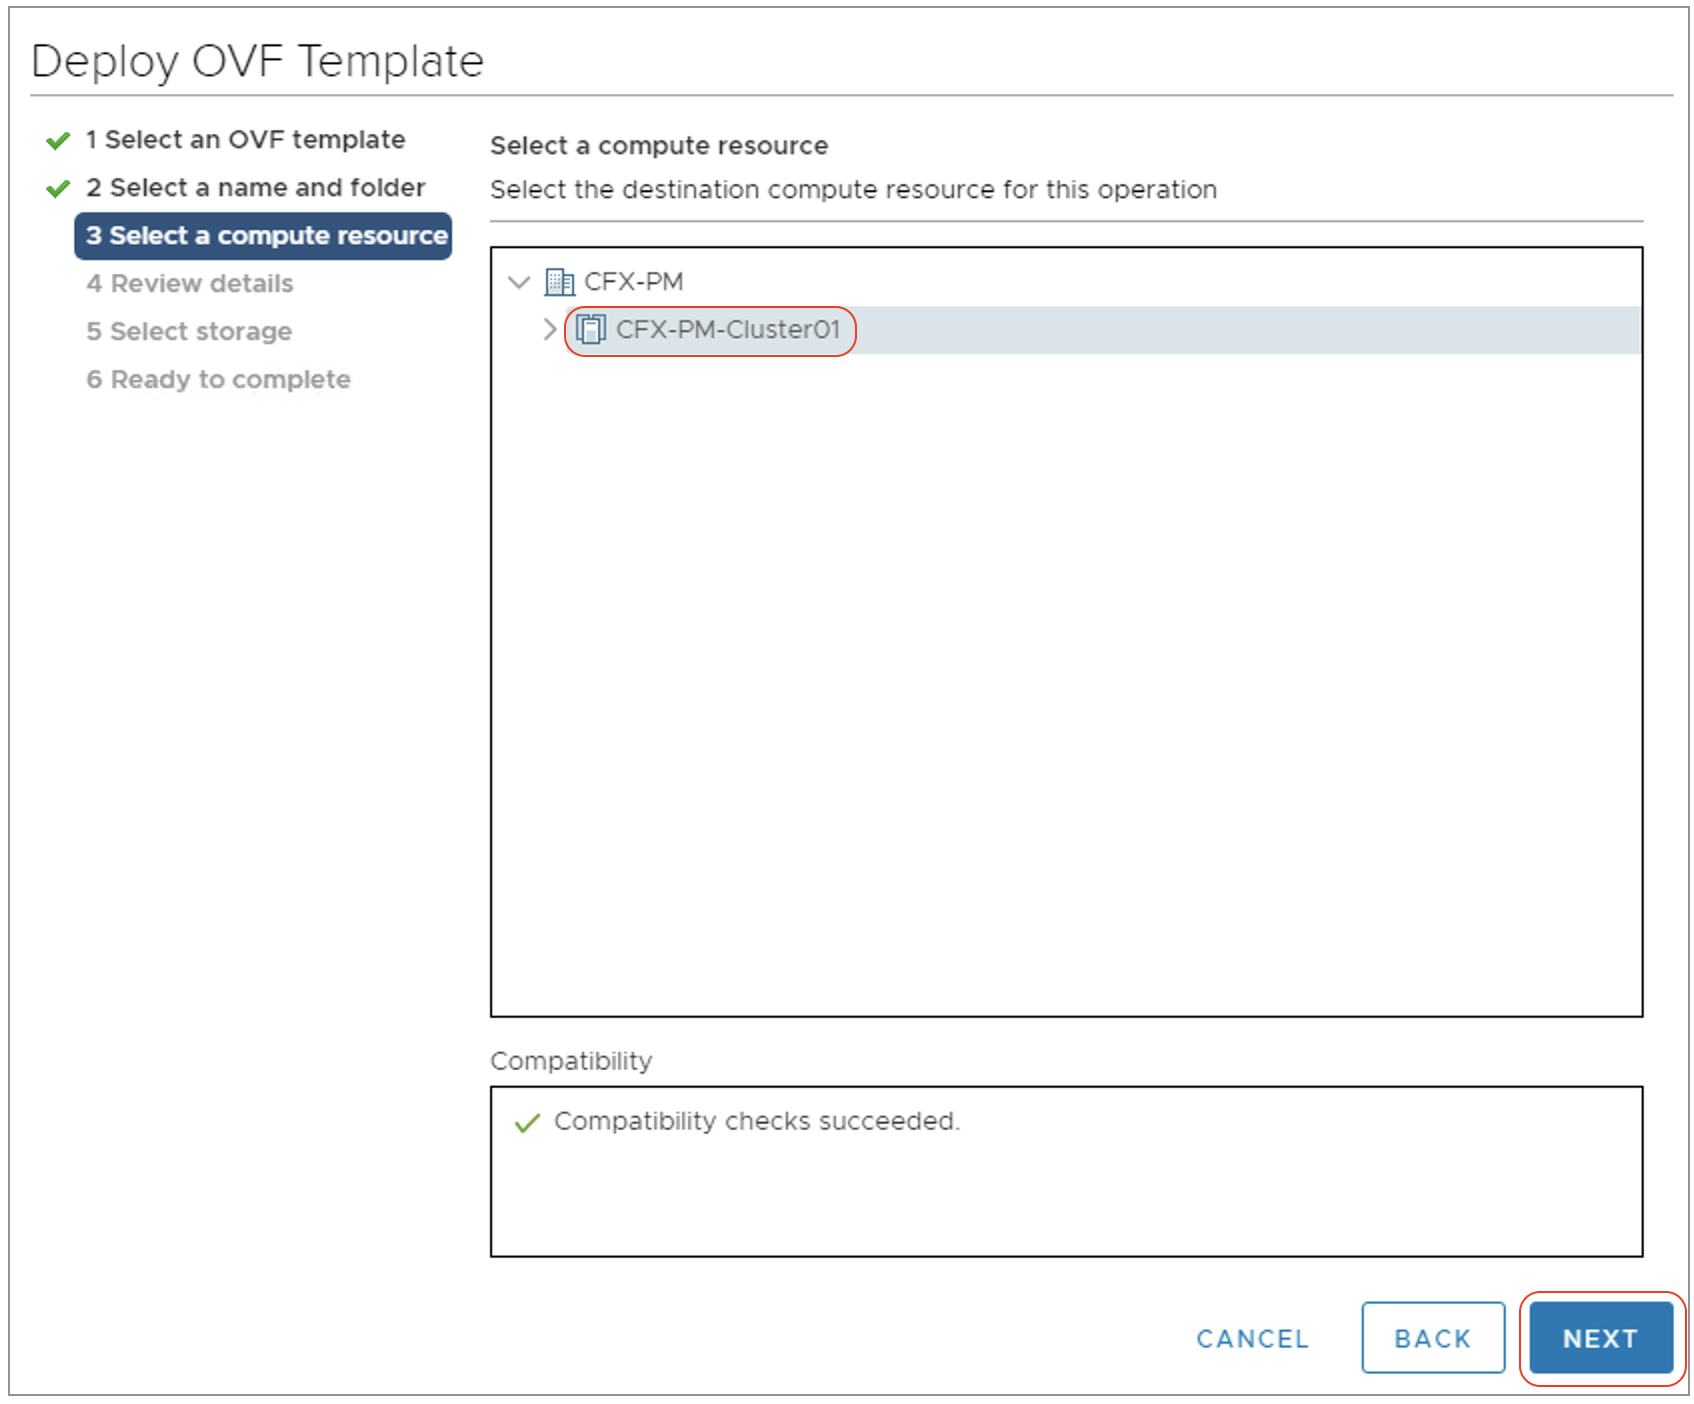
Step-5: Click Next and select an appropriate vSphere Cluster / Resource pool where the RDA Fabric VM is going to be deployed.
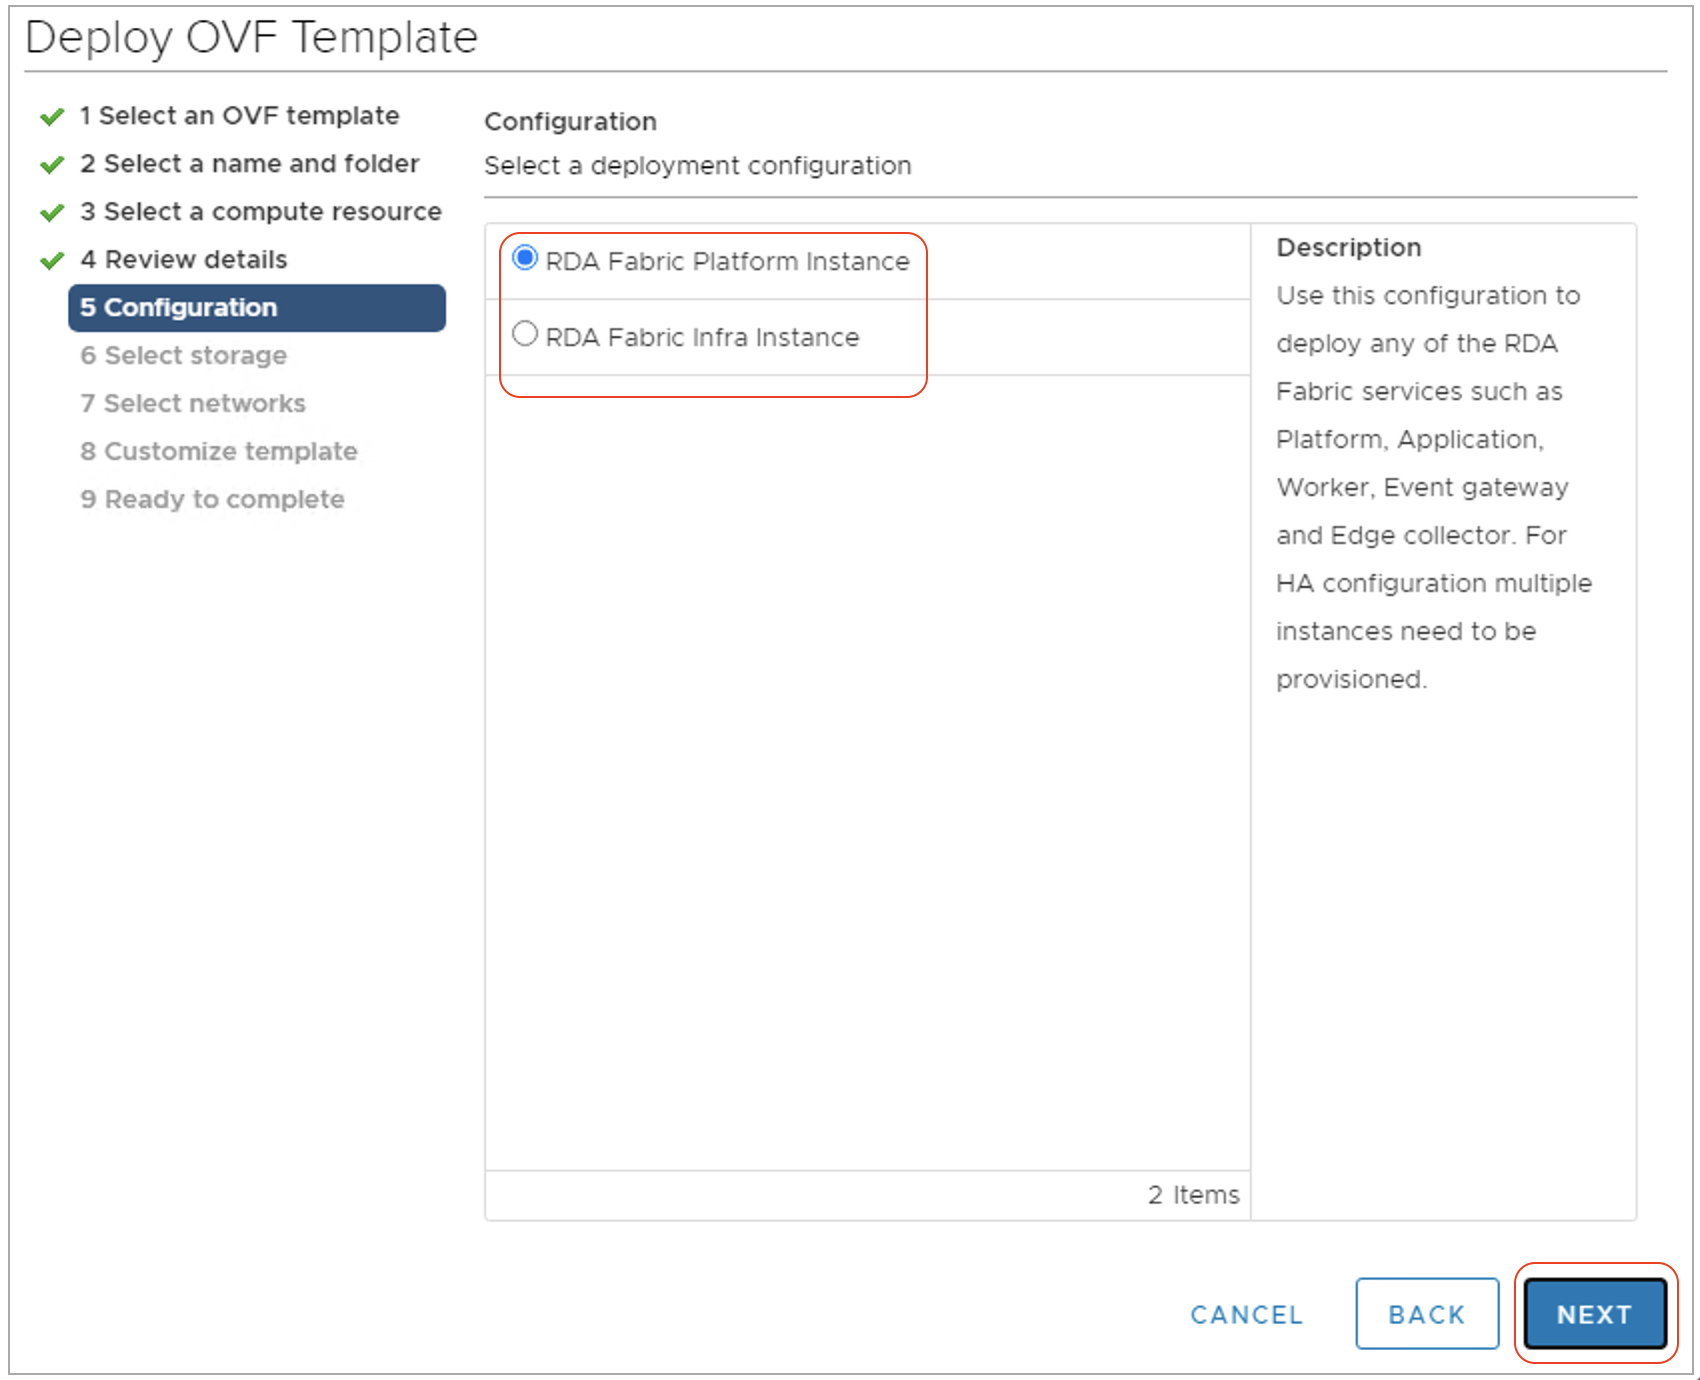
Step-6: Click Next and you are navigated to deployment configuration view. The following configuration options are available to choose from during the deployment.
-
RDA Fabric Platform Instance: Select this option to deploy any of the RDA Fabric services such as Platform, Application, Worker, Event gateway and Edge collector. For HA configuration, multiple instances need to be provisioned.
-
RDA Fabric Infra Instance: Select this option to deploy RDA Fabric infrastructure services such as MariaDB, Kafka, Minio, NATs and Opensearch. For HA configuration, multiple instances need to be provisioned.
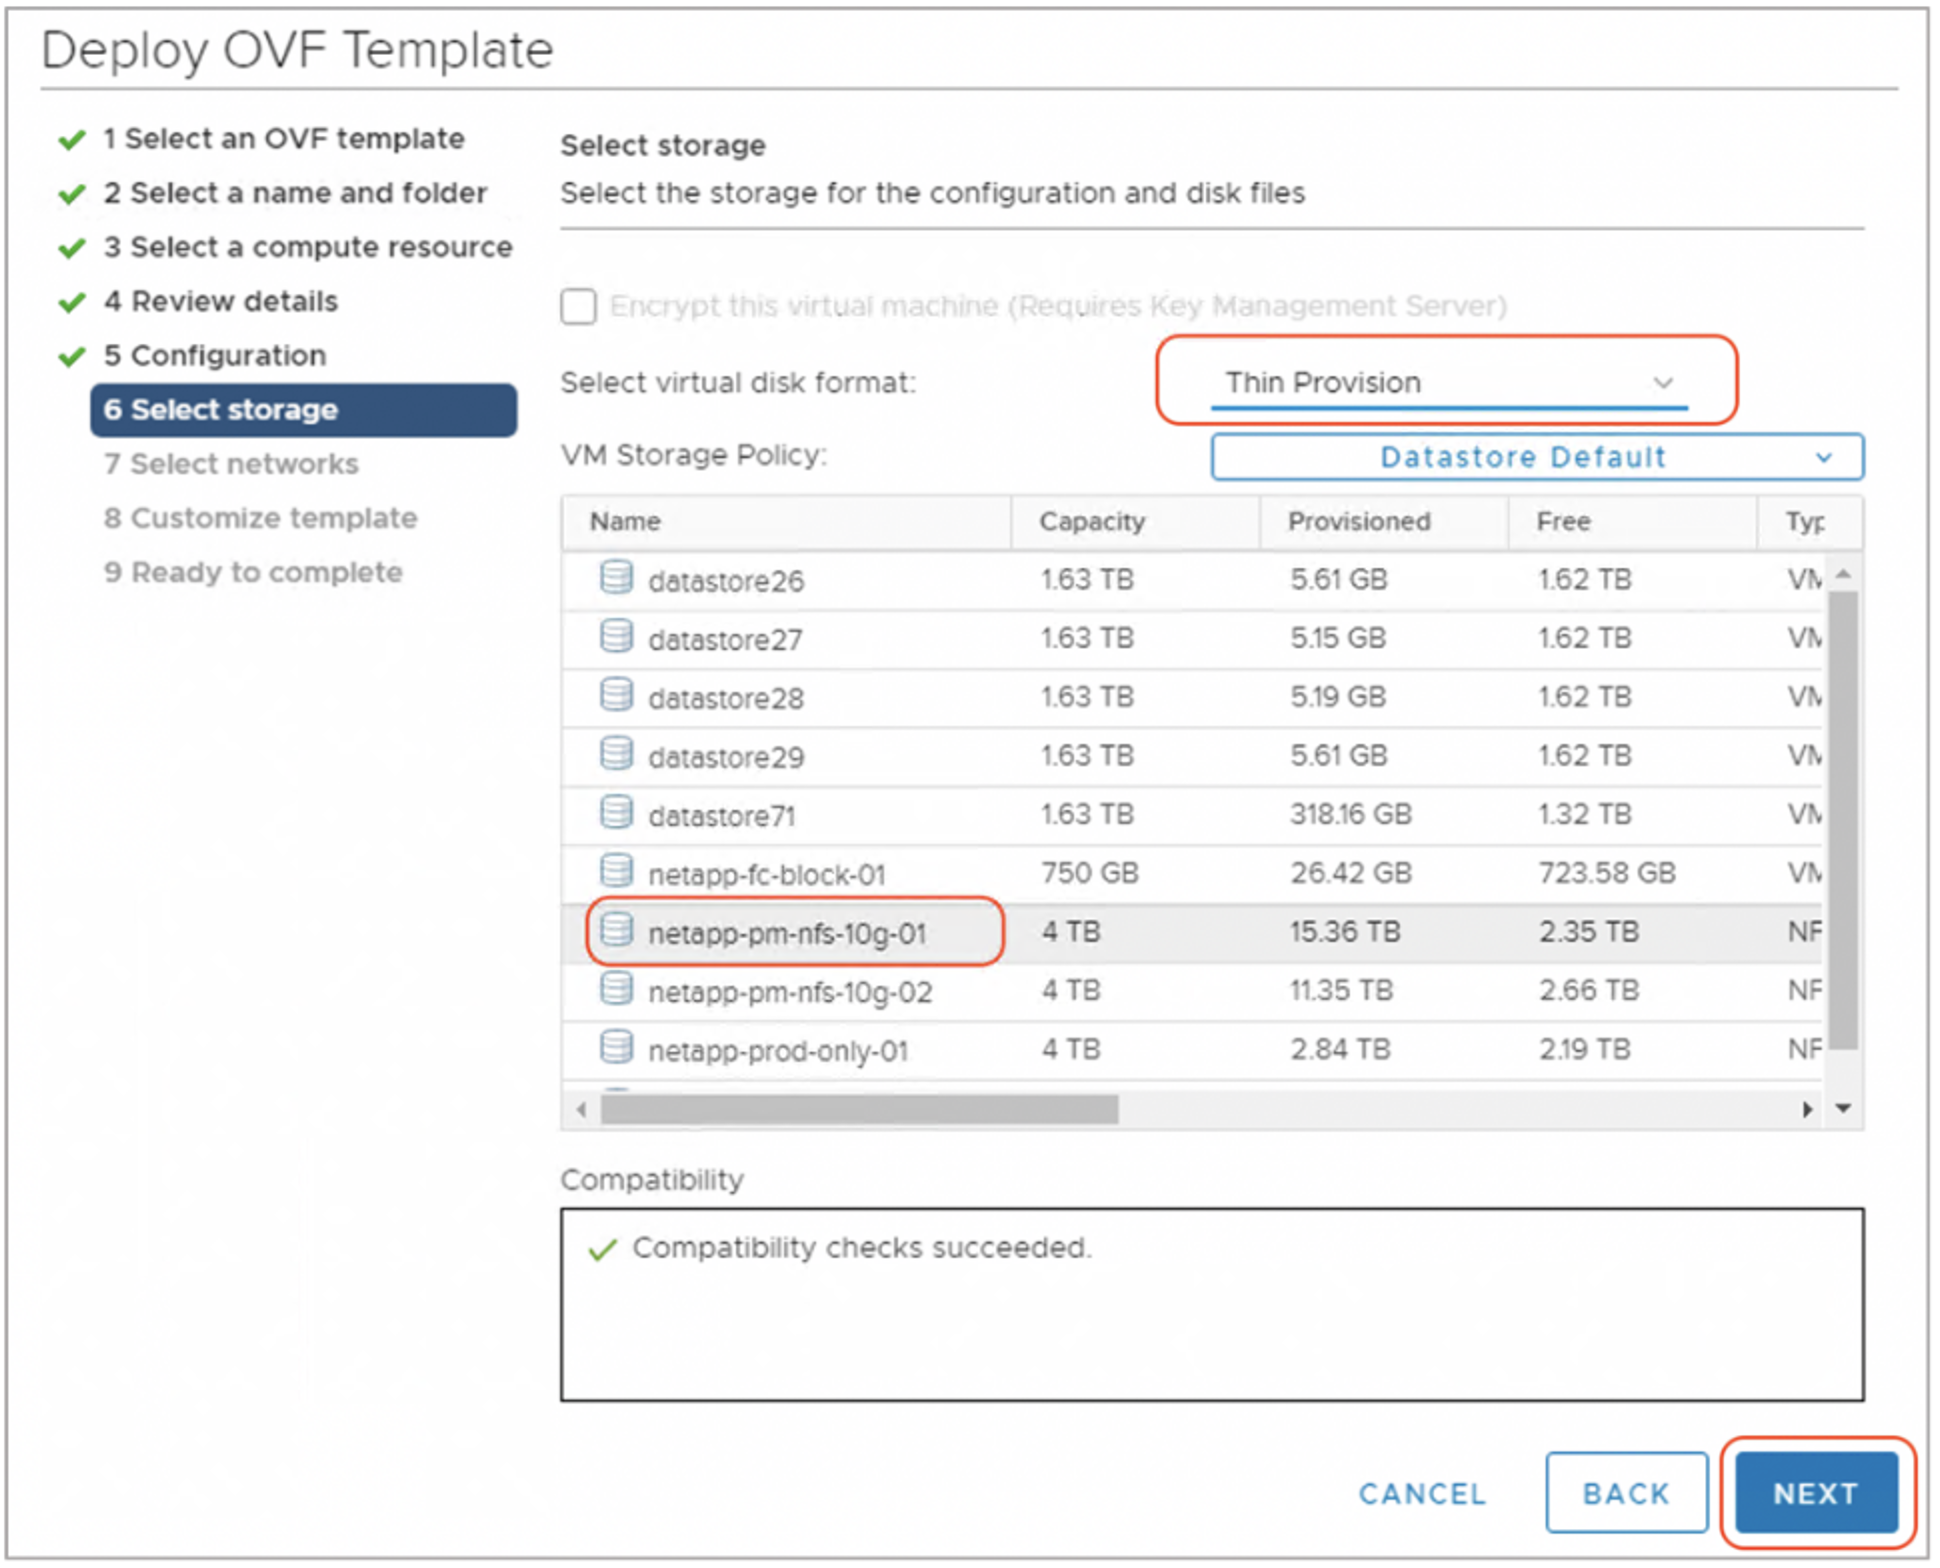
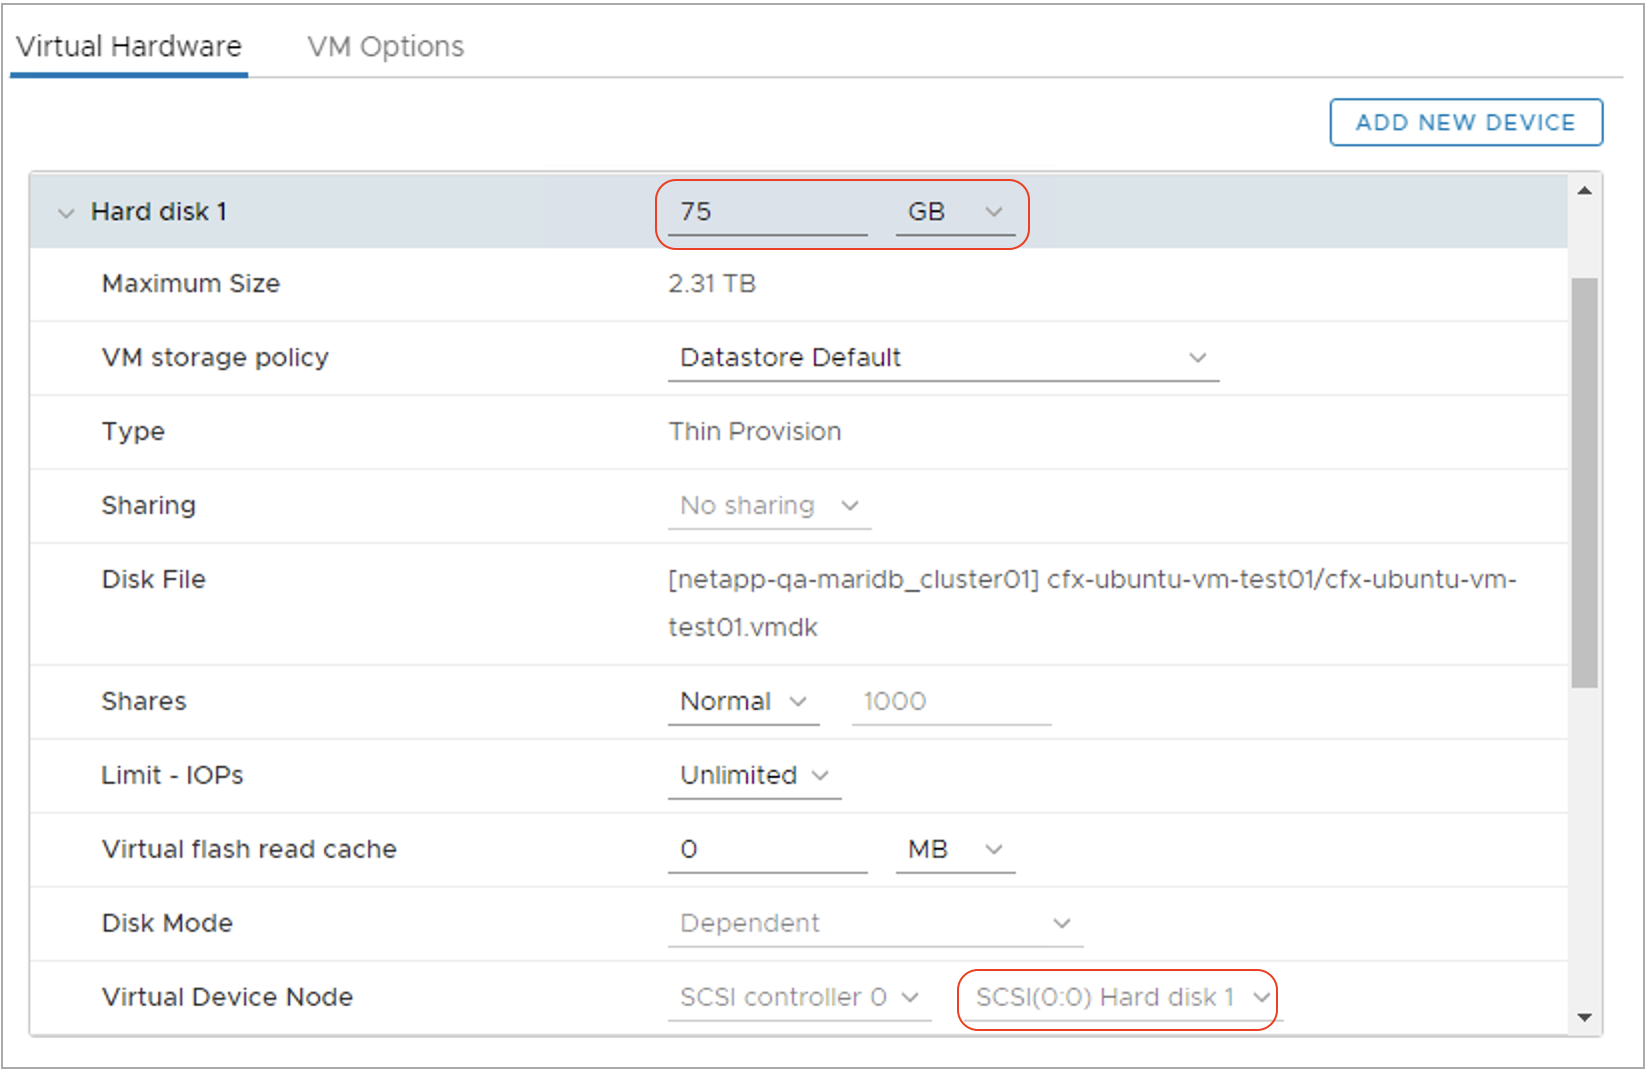
Step-7: Click Next and you are navigated to selecting the Datastore (Virtual Storage). Select Datastore / Datastore Cluster where you want to deploy the VM. Make sure you select 'Thin Provision' option as highlighted in the below screenshot.
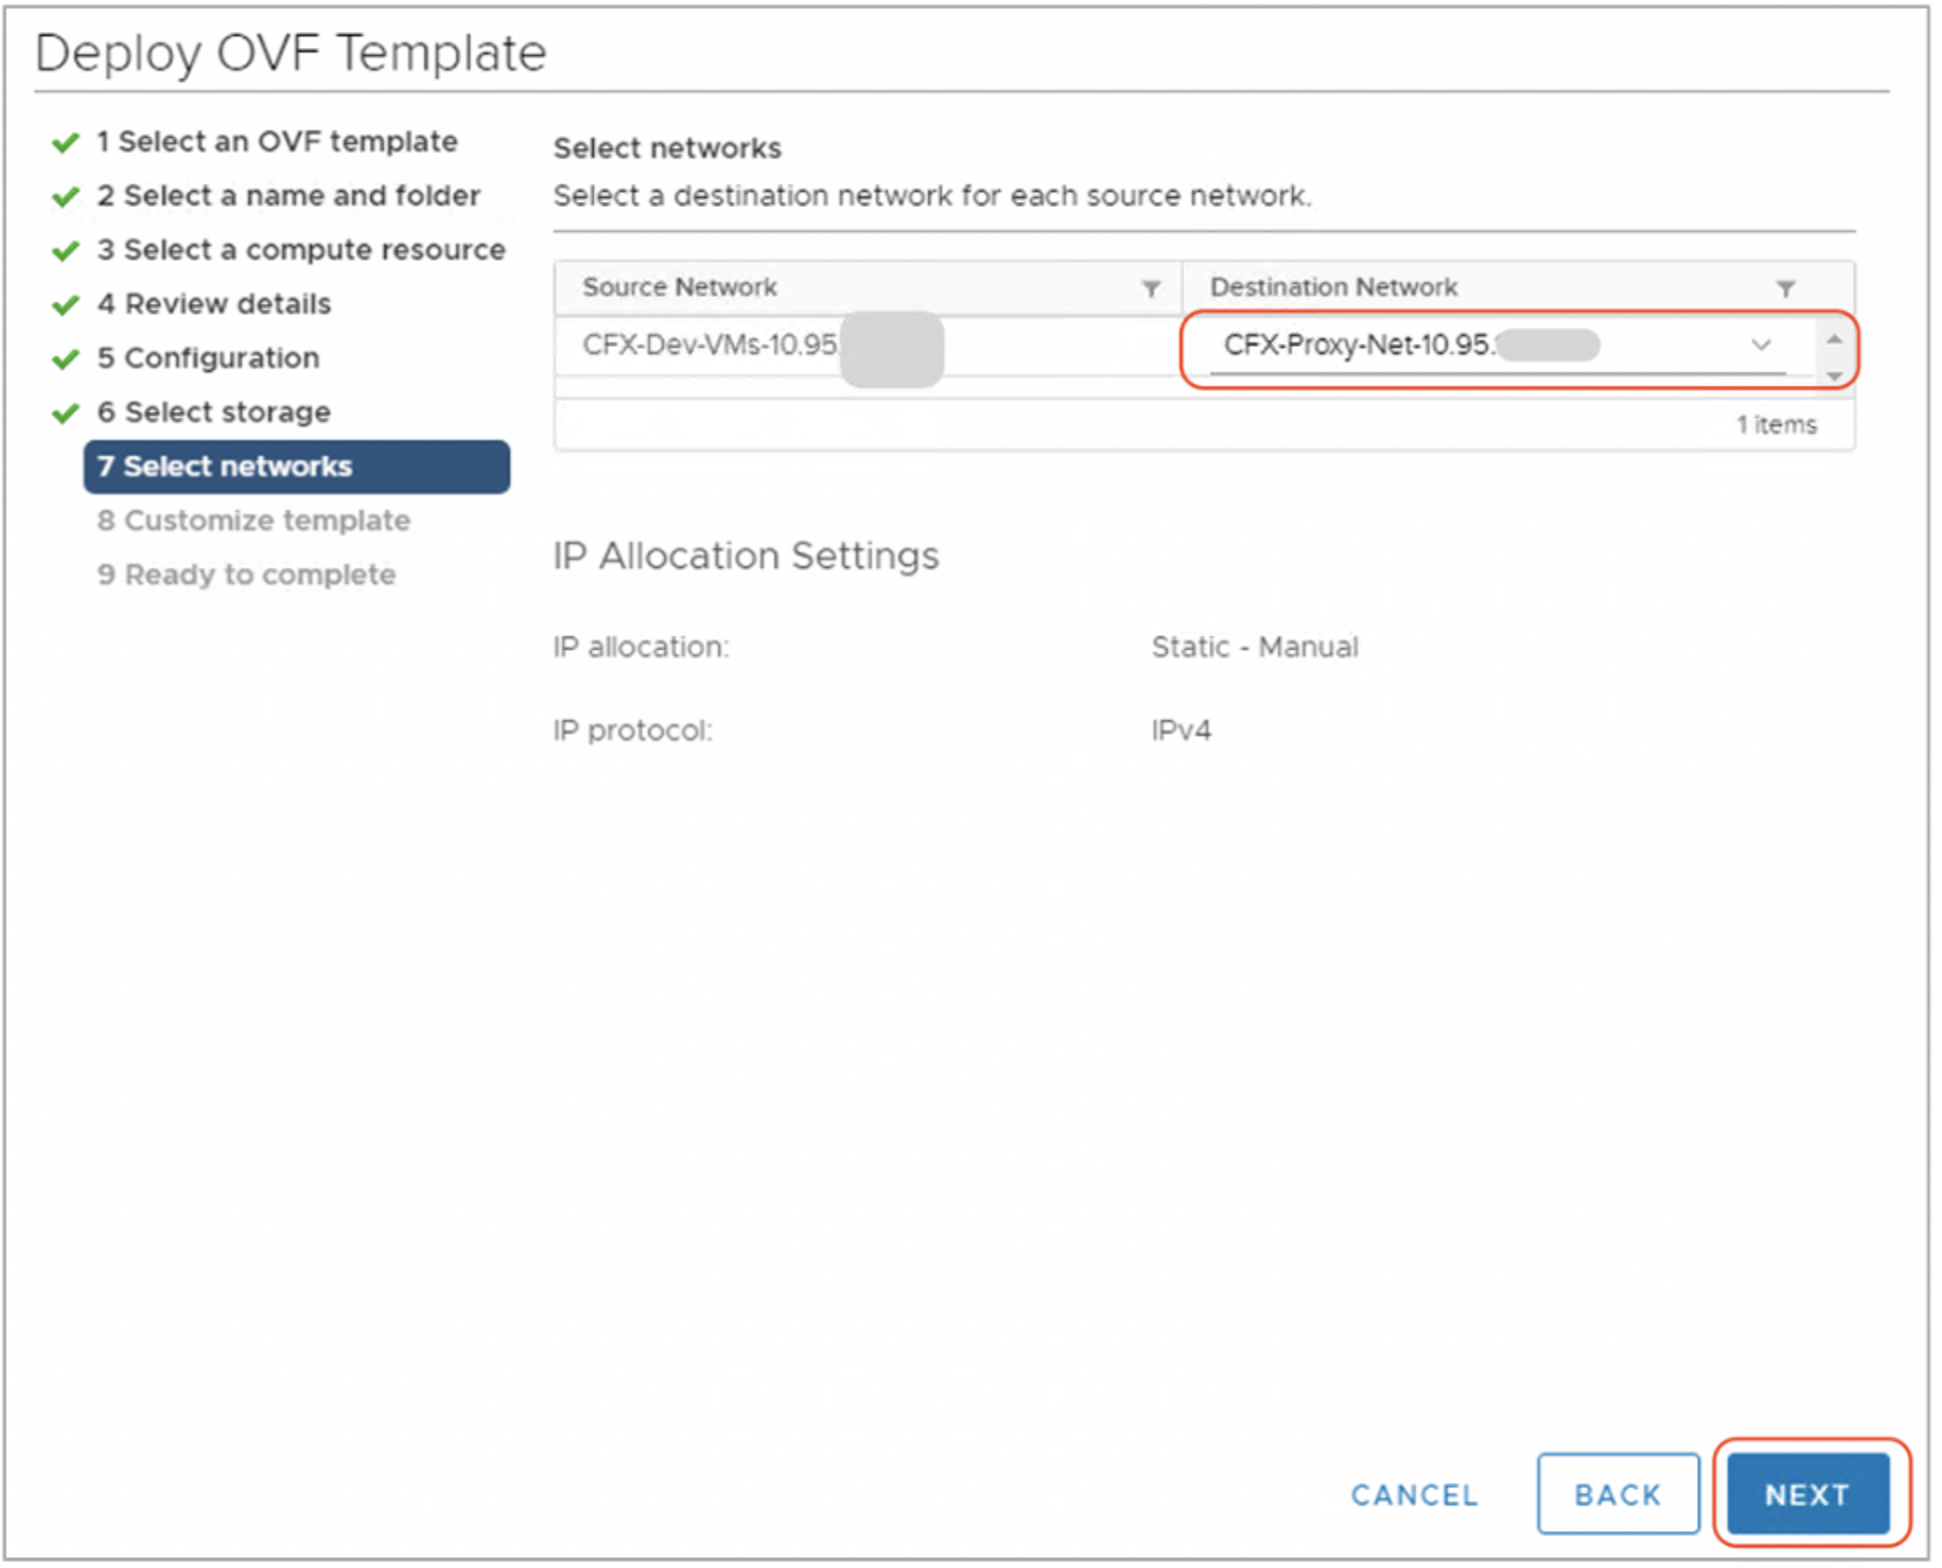
Step-8: Click Next and you are navigated to Network port-group view. Select the appropriate Virtual Network port-group as shown below.
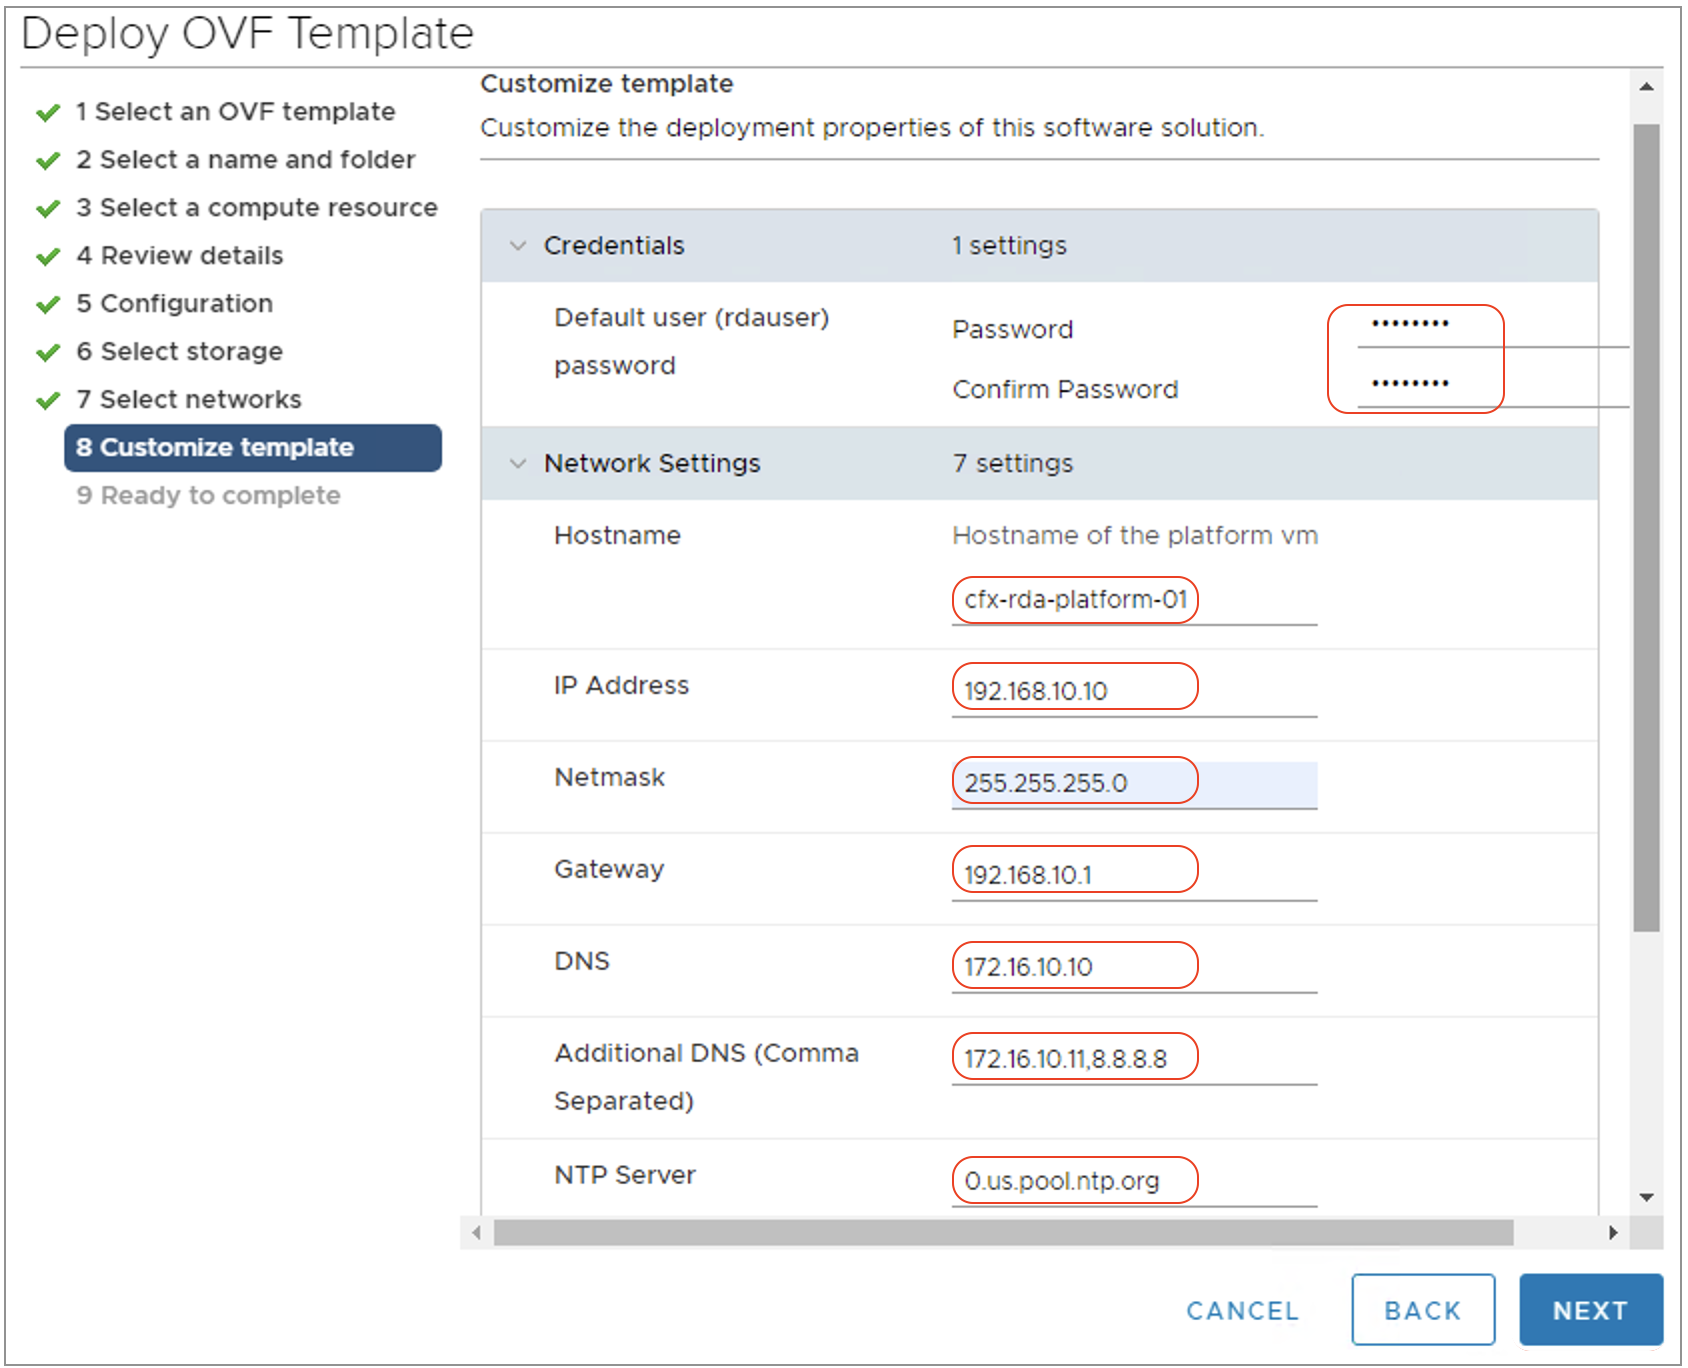
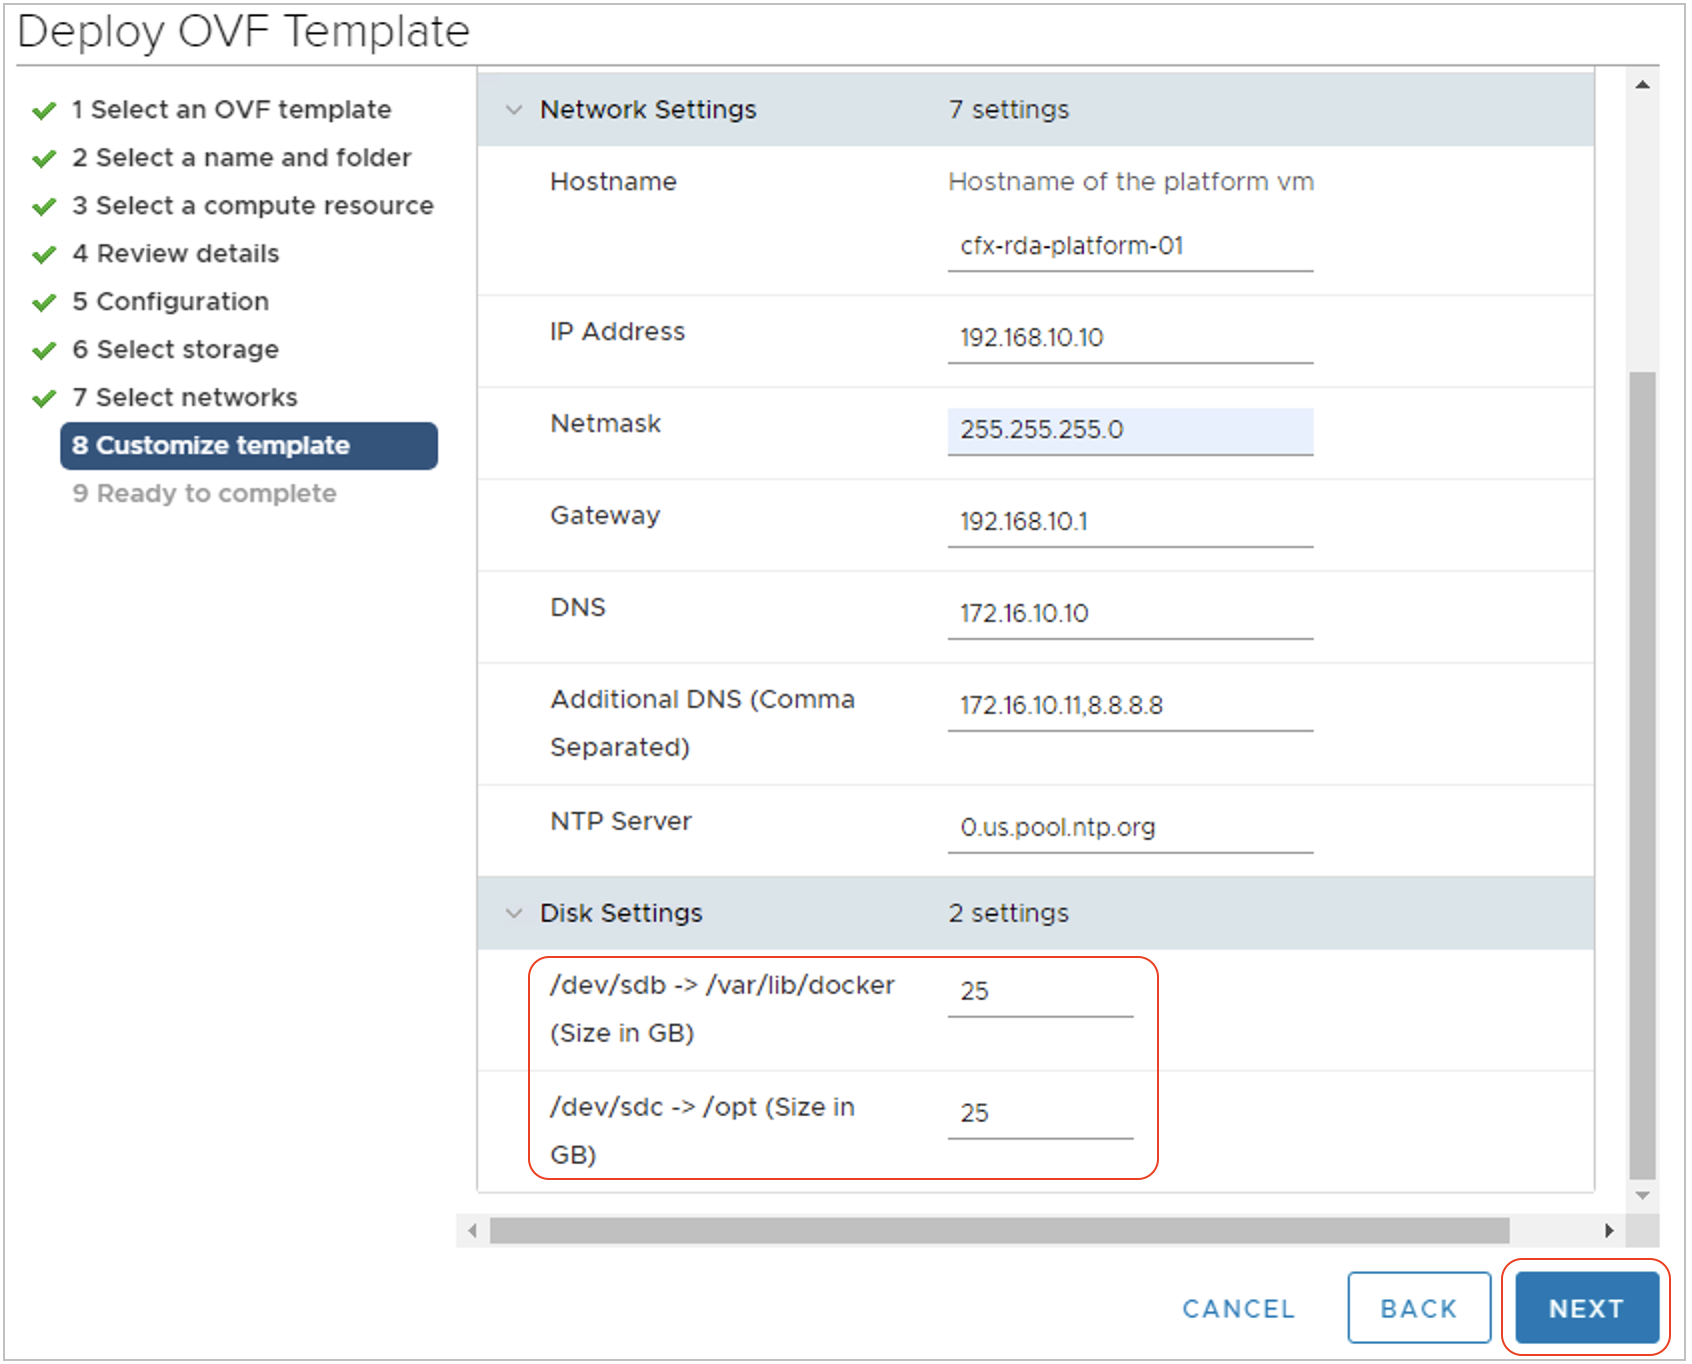
Step-9: Click Next and you are taken to Network Settings/Properties as shown below. Please enter all the necessary details such as password, network settings and disk size as per the requirements.
- Default OVF username and password is rdauser and rdauser1234 (Update the password field to change default password)
Warning
Note: Please make sure to configure same password for rdauser user on all of the RDA Fabric VMs.
Step-10: Adjust the Disk size settings based on the environment size. For production deployments, please adjust the disk size for /var/lib/docker and /opt to 75GB.
Step-11: Click Next to see a summary of OVF deployment settings and Click on Finish to deploy the VM.
Step-12: Before powering ON the deployed VM, Edit the VM settings and adjust the CPU and Memory settings based on the environment size. For any help/guidance on resource sizing, please contact support@cloudfabrix.com.
Step-13: Power ON the Vs and wait until it is completely up with OVF settings. It usually takes around 2 to 5 minutes.
Info
Note: Repeat the above OVF deployment steps (step-1 through step-13) for provisioning additional required VMs for RDA Fabric platform.
5.1 Post OS Image / OVF Deployment Configuration
Below steps are applicable for Ubuntu 24.x environment.
Step 1: Login into RDA Fabric VMs using any SSH client (ex: putty). Default username is rdauser
Step 2: Verify that NTP time is in sync on all of the RDA Fabric Platform, Infrastructure, Application, Worker & On-premise docker service VMs.
Timezone settings: Below are some of the useful commands to view / change / set Timezone on RDA Fabric VMs.
Important
The date & time settings should be in sync across all of RDA Fabric VMs for the application services to function appropriately.
To manually sync VM's time with NTP server, run the below commands.
To configure and update the NTP server settings, please update /etc/chrony/chrony.conf with NTP server details and restart the Chronyd service
Firewall Configuration:
Verify network bandwidth between RDAF VMs:
For production deployment, the network bandwidth between RDAF VMs should be minimum of 10Gbps. CloudFabrix provided OVF comes with iperf utility which can be used to measure the network bandwidth.
To verify network bandwidth between RDAF platform service VM and infrastructure VM, follow the below steps.
Login into RDAF platform service VM as rdauser using SSH client to access the CLI and start iperf utility as a server.
Info
By default iperf listens on port 5001 over tcp
Enable the iperf server port using the below command.
Start the iperf server as shown below.
$ iperf -s

------------------------------------------------------------
Server listening on TCP port 5001
TCP window size: 85.3 KByte (default)
------------------------------------------------------------
Now, login into RDAF infrastructure service VM as rdauser using SSH client to access the CLI and start iperf utility as a client.
operf utility connects to RDAF platform service VM as shown below. It will connect and verify the network bandwidth speed.
------------------------------------------------------------
Client connecting to 192.168.125.143, TCP port 5001
TCP window size: 2.86 MByte (default)
------------------------------------------------------------
[  3] local 192.168.125.141 port 10654 connected with 192.168.125.143 port 5001
[ ID] Interval       Transfer     Bandwidth
[  3]  0.0-10.0 sec  21.2 GBytes  18.2 Gbits/sec
Repeat the above steps between all of the RDAF VMs in both directions to make sure the network bandwidth speed is minimum of 10Gbps.
Note
RHEL is supported only for versions earlier than 8.0. Fresh installations with version 8.0 are not supported.
To verify network bandwidth between RDAF platform service VM and infrastructure VM, follow the below steps.
Login into RDAF platform service VM as rdauser using SSH client to access the CLI and start iperf utility as a server.
Info
By default iperf listens on port 5001 over tcp
Enable the iperf server port using the below command.
Start the iperf server as shown below.
$ iperf -s

------------------------------------------------------------
Server listening on TCP port 5001
TCP window size: 85.3 KByte (default)
------------------------------------------------------------
Now, login into RDAF infrastructure service VM as rdauser using SSH client to access the CLI and start iperf utility as a client.
operf utility connects to RDAF platform service VM as shown below. It will connect and verify the network bandwidth speed.
------------------------------------------------------------
Client connecting to 192.168.125.143, TCP port 5001
TCP window size: 2.86 MByte (default)
------------------------------------------------------------
[  3] local 192.168.125.141 port 10654 connected with 192.168.125.143 port 5001
[ ID] Interval       Transfer     Bandwidth
[  3]  0.0-10.0 sec  21.2 GBytes  18.2 Gbits/sec
Repeat the above steps between all of the RDAF VMs in both directions to make sure the network bandwidth speed is minimum of 10Gbps.
5.2 Adding additional disk for Minio 4th HA node
Info
This step is only applicable for Minio infrastructure service when RDA Fabric VMs are deployed in HA configuration. Minio service requires minimum of 4 nodes to form HA cluster to provide 1 node failure tolerance.
Step-1: Login into VMware vCenter and Shutdown one of the RDA Fabric platform or application services VM.
Step-2: Edit the VM settings of RDA Fabric platform services VM that was shutdown in the above. Add a new disk and allocate the same size as other Minio service nodes. Please refer Minio disk size (/minio-data) for HA configuration
Step-3: Edit the VM settings of RDA Fabric platform services VM again on which new disk was added and note down the SCSI Disk ID as shown below.

Step-4: Power ON the RDA Fabric platform services VM on which a new disk has been added in the above step.
Step-5: Login into RDA Fabric Platform VM using any SSH client (ex: putty). Default username is rdauser
Step-6: Run the below command to list all of the SCSI disks of the VM with their SCSI Disk IDs
Run the below command to see the new disk along with used disks with their mount points
NAME                      MAJ:MIN RM  SIZE RO TYPE MOUNTPOINT
...
sda                         8:0    0   75G  0 disk
├─sda1                      8:1    0    1M  0 part
├─sda2                      8:2    0  1.5G  0 part /boot
└─sda3                      8:3    0 48.5G  0 part
  └─ubuntu--vg-ubuntu--lv 253:0    0 48.3G  0 lvm  /
sdb                         8:16   0   25G  0 disk /var/lib/docker
sdc                         8:32   0   25G  0 disk /opt
sdd                         8:48   0   50G  0 disk
In the above example command outputs, the newly added disk is sdd and it's size is 50GB
Step-7: Run the below command to create a new XFS filesystem and create a mount point directory.
Step-8: Run the below command to get the UUID of the newly created filesystem on /dev/sdd
Step-9: Update /etc/fstab to mount the /dev/sdd disk to /minio-data mount point
/etc/fstab file.
Step-10: Mount the /minio-data mount point and verify the mount point is mounted.
Filesystem                         Size  Used Avail Use% Mounted on
/dev/mapper/ubuntu--vg-ubuntu--lv   48G  8.3G   37G  19% /
...
/dev/sda2                          1.5G  209M  1.2G  16% /boot
/dev/sdb                            25G  211M   25G   1% /var/lib/docker
/dev/sdc                            25G  566M   25G   3% /opt
/dev/sdd                            50G  390M   50G   1% /minio-data
5.3 Extending the Root (/) filesystem
Warning
Note-1: The below provided instructions to extend the Root (/) filesystem are applicable only for the virtual machines that are provisioned using CloudFabrix provided Ubuntu OVF
Note-2: As a precautionary step, please take VMware VM snapshot before making the changes to Root (/) filesystem.
Step-1: Check on which disk the Root (/) filesystem was created using the below command. In the below example, it was created on disk /dev/sda and partition 3 i.e. sda3.
On partition sda3, a logical volume ubuntu--vg-ubuntu--lv was created and mounted as Root (/) filesystem.
NAME                      MAJ:MIN RM  SIZE RO TYPE MOUNTPOINT
loop0                       7:0    0   62M  1 loop
loop1                       7:1    0   62M  1 loop /snap/core20/1593
loop2                       7:2    0 67.2M  1 loop /snap/lxd/21835
loop3                       7:3    0 67.8M  1 loop /snap/lxd/22753
loop4                       7:4    0 44.7M  1 loop /snap/snapd/15904
loop5                       7:5    0   47M  1 loop /snap/snapd/16292
loop7                       7:7    0   62M  1 loop /snap/core20/1611
sda                         8:0    0   75G  0 disk
├─sda1                      8:1    0    1M  0 part
├─sda2                      8:2    0  1.5G  0 part /boot
└─sda3                      8:3    0 48.5G  0 part
└─ubuntu--vg-ubuntu--lv     253:0  0 48.3G  0 lvm  /
sdb                         8:16   0  100G  0 disk /var/lib/docker
sdc                         8:32   0   75G  0 disk /opt
Step-2: Verify the SCSI disk id of the disk on which Root (/) filesystem was created using the below command.
In the below example, the SCSI disk id of root disk sda is 2:0:0:0, i.e. the SCSI disk id is 0 (third digit)
NAME HCTL       TYPE VENDOR   MODEL         REV TRAN
sda  2:0:0:0    disk VMware   Virtual_disk 1.0
sdb  2:0:1:0    disk VMware   Virtual_disk 1.0
sdc  2:0:2:0    disk VMware   Virtual_disk 1.0
Step-3: Edit the virtual machine's properties on vCenter and identify the Root disk sda using the above SCSI disk id 2:0:0:0 as highlighted in the below screenshot.
Increase the disk size from 75GB to higher desired value in GB.
Step-4: Login back to Ubuntu VM CLI using SSH client as rdauser
Switch to sudo user
Execute the below command to rescan the Root disk i.e. sda to reflect the increased disk size.
Execute the below command to see the increased size for Root disk sda
NAME                      MAJ:MIN RM  SIZE RO TYPE MOUNTPOINT
loop0                       7:0    0   62M  1 loop /snap/core20/1611
loop1                       7:1    0 67.8M  1 loop /snap/lxd/22753
loop2                       7:2    0 67.2M  1 loop /snap/lxd/21835
loop3                       7:3    0   62M  1 loop
loop4                       7:4    0   47M  1 loop /snap/snapd/16292
loop5                       7:5    0 44.7M  1 loop /snap/snapd/15904
loop6                       7:6    0   62M  1 loop /snap/core20/1593
sda                         8:0    0  100G  0 disk
├─sda1                      8:1    0    1M  0 part
├─sda2                      8:2    0  1.5G  0 part /boot
└─sda3                      8:3    0 48.5G  0 part
└─ubuntu--vg-ubuntu--lv     253:0  0 48.3G  0 lvm  /
sdb                         8:16   0   25G  0 disk /var/lib/docker
sdc                         8:32   0   25G  0 disk /opt
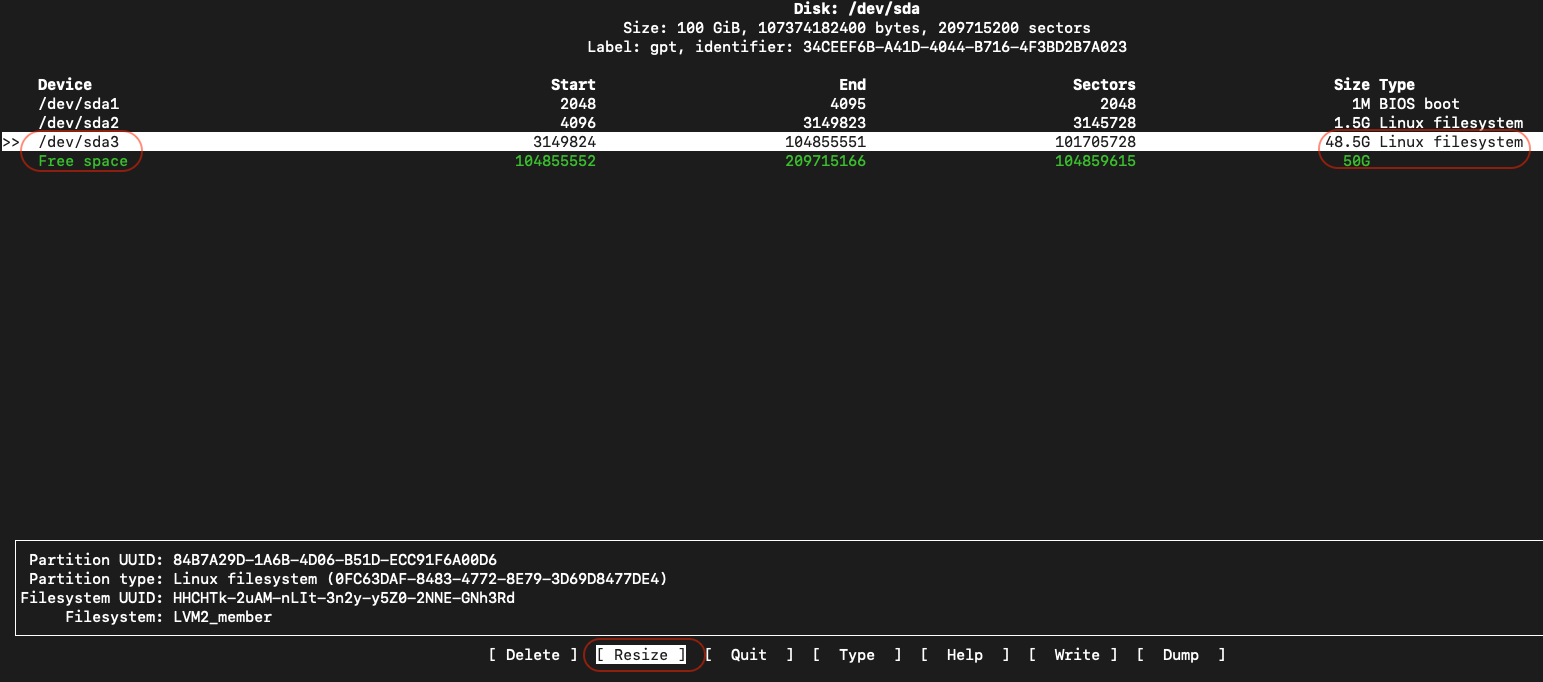
Step-5: In the above command output, identify the Root (/) filesystem's disk partition, i.e. sda3
Run the below command cfdisk to resize the Root (/) filesystem.
- Highlight /dev/sda3 partition using Down arrow on the keyboard as shown in the below screen, use Left/Right arrow to highlight the Resize option and hit Enter
- Adjust the disk Resize in GB as desired.
Warning
The Resize disk value in GB cannot be smaller than the current size of the Root (/) filesystem.
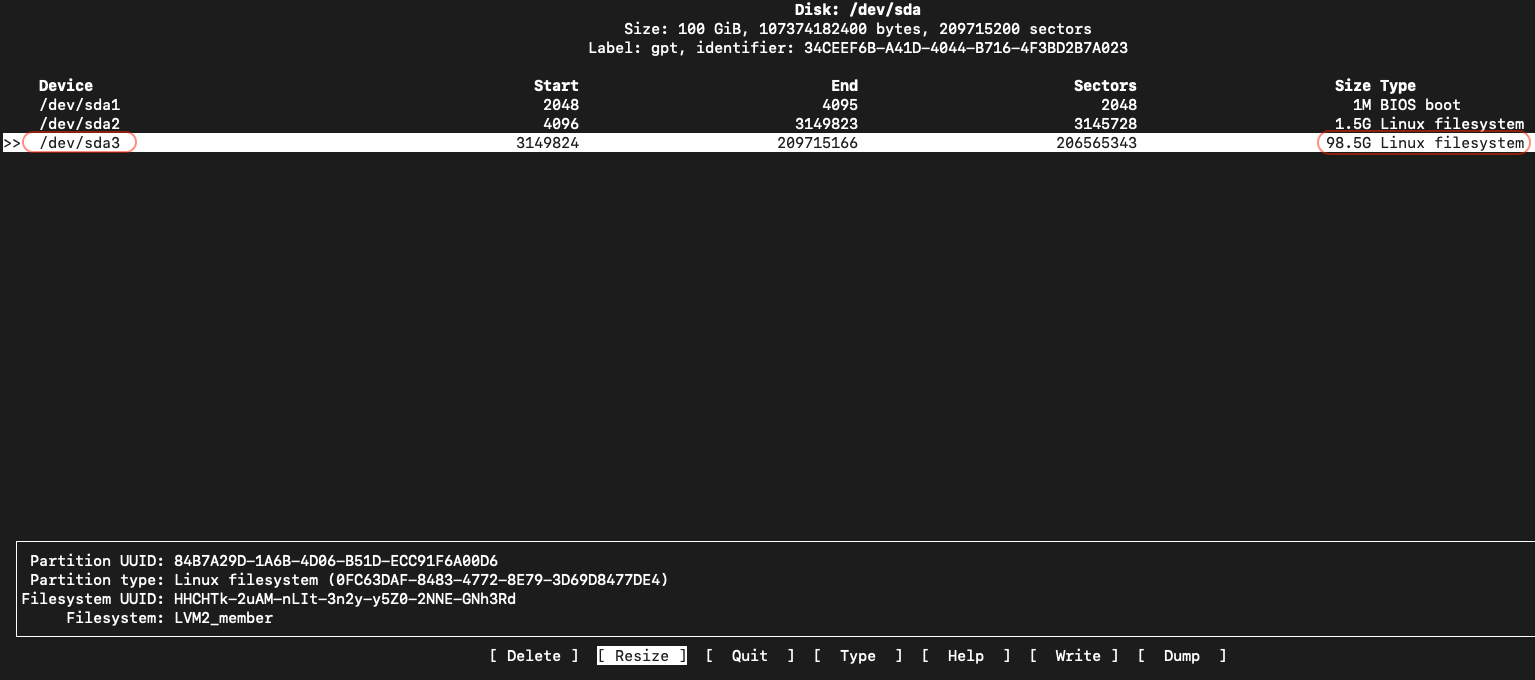
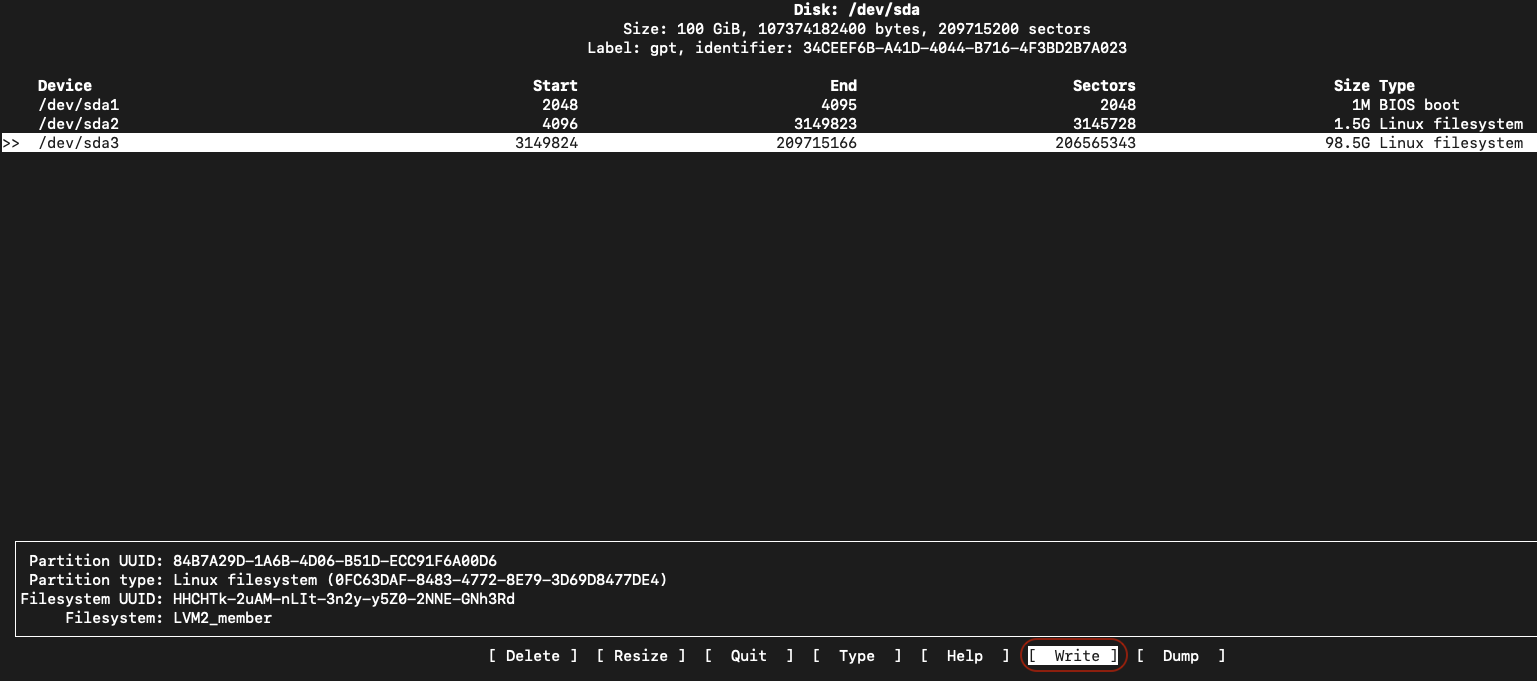
- Once the /dev/sda3 partition is resized, use Left/Right arrow to highlight the Write option and hit Enter
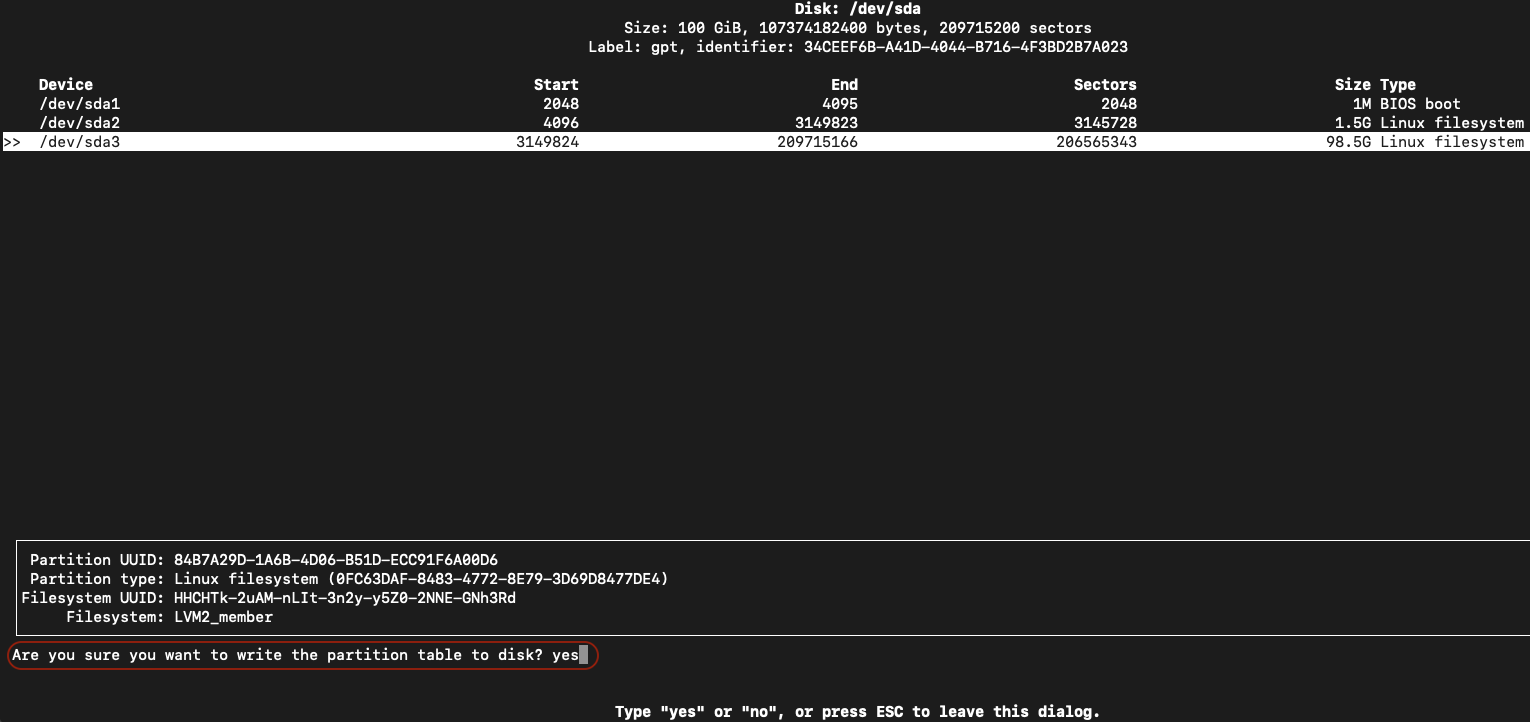
- Confirm the resize by typing yes and hit Enter
- Use Left/Right arrow to highlight the Quit option and hit Enter to quit the Disk resizing utility.
Step-6:
Disable the swap before resizing the Root (/) filesystem using the below command.
Resize the physical volume of Root (/) filesystem i.e. /dev/sda3
Resize the logical volume of Root (/) filesystem i.e. /dev/mapper/ubuntu--vg-ubuntu--lv. In the below example, the logical volume of Root (/) filesystem is increased by 20GB
Resize the Root (/) filesystem
Enable the swap after resizing the Root (/) filesystem
Step-7:
Verify the increased Root (/) filesystem disk's space using the below command.
Filesystem                         Size  Used Avail Use% Mounted on
udev                               3.9G     0  3.9G   0% /dev
tmpfs                              793M   50M  744M   7% /run
/dev/mapper/ubuntu--vg-ubuntu--lv   68G  8.6G   56G  14% /
tmpfs                              3.9G     0  3.9G   0% /dev/shm
tmpfs                              5.0M     0  5.0M   0% /run/lock
tmpfs                              3.9G     0  3.9G   0% /sys/fs/cgroup
/dev/loop2                          68M   68M     0 100% /snap/lxd/21835
/dev/loop4                          47M   47M     0 100% /snap/snapd/16292
/dev/loop1                          68M   68M     0 100% /snap/lxd/22753
/dev/loop5                          45M   45M     0 100% /snap/snapd/15904
/dev/sda2                          1.5G  209M  1.2G  16% /boot
/dev/sdb                            25G  211M   25G   1% /var/lib/docker
/dev/sdc                            25G  566M   25G   3% /opt
5.4 Extending the ZFS Filesystem
Warning
Note-1: The below provided instructions to extend the ZFS filesystem are applicable only for the virtual machines that are provisioned using CloudFabrix provided Ubuntu OVF
Note-2: As a precautionary step, please take VMware VM snapshot before making the changes to ZFS filesystem.
Step-1: Verify the disk on which additional space needs to be added to the ZFS filesystem using the command below.
rdauser@cfx-zfssecondary-1:~$ zpool status
pool: docker
state: ONLINE
scan: scrub repaired 0B in 01:15:08 with 0 errors on Sun Jun 14 01:39:09 2026
config:

        NAME        STATE     READ WRITE CKSUM
        docker      ONLINE       0     0     0
        sdb       ONLINE       0     0     0

errors: No known data errors

pool: graphdb
state: ONLINE
scan: scrub repaired 0B in 00:19:13 with 0 errors on Sun Jun 14 00:43:25 2026
config:

        NAME        STATE     READ WRITE CKSUM
        graphdb     ONLINE       0     0     0
        sdh       ONLINE       0     0     0

errors: No known data errors

pool: kafka-logs
state: ONLINE
scan: scrub repaired 0B in 00:17:23 with 0 errors on Sun Jun 14 00:41:46 2026
config:

        NAME        STATE     READ WRITE CKSUM
        kafka-logs  ONLINE       0     0     0
        sdd       ONLINE       0     0     0

errors: No known data errors

pool: minio-data
state: ONLINE
scan: scrub repaired 0B in 00:16:45 with 0 errors on Sun Jun 14 00:41:17 2026
config:

        NAME        STATE     READ WRITE CKSUM
        minio-data  ONLINE       0     0     0
        sdf       ONLINE       0     0     0

errors: No known data errors

pool: mysql
state: ONLINE
scan: scrub repaired 0B in 00:10:27 with 0 errors on Sun Jun 14 00:35:21 2026
config:

        NAME        STATE     READ WRITE CKSUM
        mysql       ONLINE       0     0     0
        sde       ONLINE       0     0     0

errors: No known data errors

pool: opensearch
state: ONLINE
scan: scrub repaired 0B in 00:59:40 with 0 errors on Sun Jun 14 01:25:04 2026
config:

        NAME        STATE     READ WRITE CKSUM
        opensearch  ONLINE       0     0     0
        sdg       ONLINE       0     0     0

errors: No known data errors

pool: opt
state: ONLINE
scan: scrub repaired 0B in 00:22:34 with 0 errors on Sun Jun 14 00:48:52 2026
config:

        NAME        STATE     READ WRITE CKSUM
        opt         ONLINE       0     0     0
        sdc       ONLINE       0     0     0

errors: No known data errors
rdauser@cfx-zfssecondary-1:~$
Step-2: Verify the SCSI disk id of the disk on which ZFS filesystem was created using the below command.
In the below example, the SCSI disk id of ZFS disk sdb is 2:0:1:0, i.e. the SCSI disk id is 0 (third digit)
NAME HCTL       TYPE VENDOR   MODEL         REV SERIAL TRAN
sda 2:0:0:0    disk VMware   Virtual disk  1.0
sdb 2:0:1:0    disk VMware   Virtual disk  1.0
sdc 2:0:2:0    disk VMware   Virtual disk  1.0
sdd 2:0:3:0    disk VMware   Virtual disk  1.0
sde 2:0:4:0    disk VMware   Virtual disk  1.0
sdf 2:0:5:0    disk VMware   Virtual disk  1.0
sdg 2:0:6:0    disk VMware   Virtual disk  1.0
sdh 2:0:8:0    disk VMware   Virtual disk  1.0
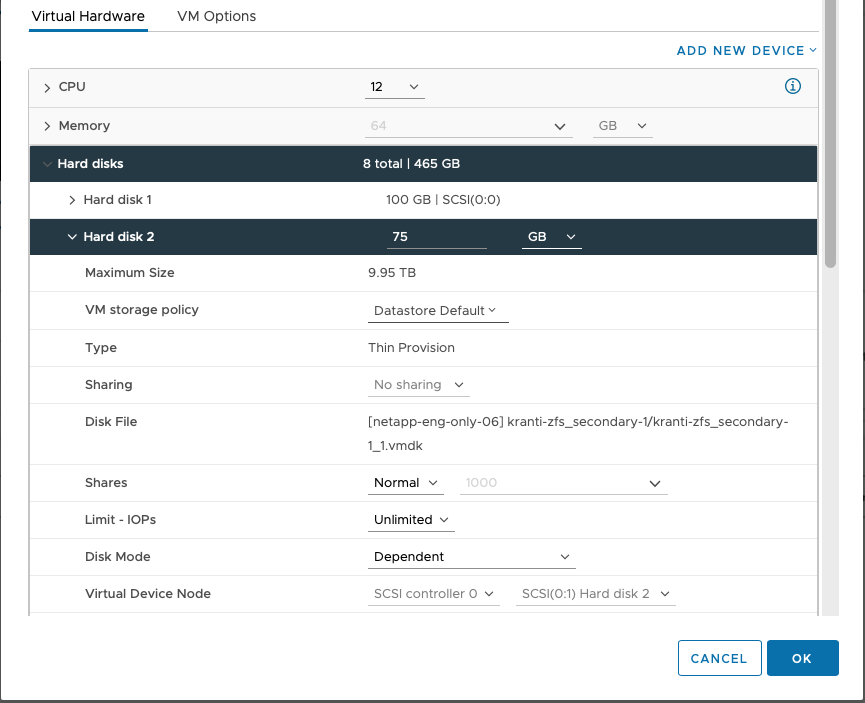
Step-3: Edit the virtual machine's properties on vCenter and identify the ZFS disk sdb using the above SCSI disk id 2:0:1:0 as highlighted in the below screenshot.
Increase the disk size from 75GB to higher desired value in GB.
Step-4: Login back to Ubuntu VM CLI using SSH client as rdauser
Switch to sudo user
Execute the below command to rescan the ZFS disk i.e. sdb to reflect the increased disk size.
Execute the below command to see the increased size for ZFS disk sdb
NAME                      MAJ:MIN RM  SIZE RO TYPE MOUNTPOINTS
sda                         8:0    0  100G  0 disk
|-sda1                      8:1    0    1M  0 part
|-sda2                      8:2    0    2G  0 part /boot
`-sda3                      8:3    0   98G  0 part
`-ubuntu--vg-ubuntu--lv 252:0    0 56.5G  0 lvm  /
sdb                         8:16   0   75G  0 disk
|-sdb1                      8:17   0   50G  0 part
`-sdb9                      8:25   0    8M  0 part
sdc                         8:32   0   50G  0 disk
|-sdc1                      8:33   0   50G  0 part
`-sdc9                      8:41   0    8M  0 part
sdd                         8:48   0   15G  0 disk
|-sdd1                      8:49   0   15G  0 part
`-sdd9                      8:57   0    8M  0 part
sde                         8:64   0   50G  0 disk
|-sde1                      8:65   0   50G  0 part
`-sde9                      8:73   0    8M  0 part
sdf                         8:80   0   50G  0 disk
|-sdf1                      8:81   0   50G  0 part
`-sdf9                      8:89   0    8M  0 part
sdg                         8:96   0  100G  0 disk
|-sdg1                      8:97   0  100G  0 part
`-sdg9                      8:105  0    8M  0 part
sdh                         8:112  0   25G  0 disk
|-sdh1                      8:113  0   25G  0 part
`-sdh9                      8:121  0    8M  0 part
Step-4: Tell ZFS to Expand the Pool Now that the operating system sees the larger block device/partition, you just need to signal ZFS to expand the pool (zpool) into the newly available space.
1. Turn on auto-expand for the pool
2. Force ZFS to re-examine the disk and expand
Step-5:
Verify the increased ZFS filesystem disk's space using the below command.
Filesystem                         Size  Used Avail Use% Mounted on
tmpfs                              6.3G  138M  6.2G   3% /run
/dev/mapper/ubuntu--vg-ubuntu--lv   56G  9.8G   43G  19% /
tmpfs                               32G     0   32G   0% /dev/shm
tmpfs                              5.0M     0  5.0M   0% /run/lock
/dev/sda2                          2.0G  200M  1.6G  11% /boot
opensearch                          96G   24G   72G  25% /opensearch
kafka-logs                          15G  116M   14G   1% /kafka-logs
graphdb                             24G  178M   24G   1% /graphdb
docker                              97G   29G   69G  30% /var/lib/docker
opt                                 48G  374M   48G   1% /opt
minio-data                          48G   17M   48G   1% /minio-data
mysql                               48G   40M   48G   1% /var/mysql
6. RDAF Platform VMs deployment on RHEL/Ubuntu OS/Rocky Linux
Note
We currently support Linux x86_64 Architecture. Support for ARM64 architecture will be available in future releases.
Below steps outlines the required pre-requisites and the configuration to be applied on RHEL or Ubuntu OS VM instances when CloudFabrix provided OVF is not used, to deploy and install RDA Fabric platform, infrastructure, application, worker and on-premise docker registry services.
Software Pre-requisites:
- RHEL: RHEL 8.3 or above
- Ubuntu: Ubuntu 24.04.x or above
- Python: 3.12 or above
- Docker: 27.1.x or above
- Docker-compose: 1.29.x or above
For resource requirements such as CPU, Memory, Network and Storage, please refer RDA Fabric VMs resource requirements
Note
RHEL is supported only for versions earlier than 8.0. Fresh installations with version 8.0 are not supported.
- Once RHEL 8.3 or above OS version is deployed, register and apply the OS licenses using the below commands
- Create a new user called rdauser and configure the password.
sudo adduser rdauser
sudo passwd rdauser
sudo chown -R rdauser:rdauser /home/rdauser
sudo groupadd docker
sudo usermod -aG docker rdauser
- Add rdauser to /etc/sudoers file. Add the below line at the end of the sudoers file.
- Modify the SSH service configuration with the below settings. Edit /etc/ssh/sshd_config file and update the below settings as shown below.
- Restart the SSH service
-
Logout and Login back as newly created user rdauser
-
Format the disks with xfs filesystem and mount the disks as per the disk requirements outlined in RDA Fabric VMs resource requirements section.
-
Make sure disk mounts are updated in
/etc/fstabto make them persistent across VM reboots. -
In
/etc/fstab, use filesystem's UUID instead of using SCSI disk names. Below command provides UUID of filesystem created on a disk or disk partition.
Sample disk mount point entry on /etc/fstab file.
Installing OS utilities and Python
- Run the below commands to install the required software packages.
- Download and install the below software packages.
- Download and install Python 3.7 or above. Skip this step if Python is already installed as part of the OS install.
Installing Docker and Docker-compose
- Run the below commands to install docker runtime environment
- Configure docker service configuration updating /etc/docker/daemon.json as shown below.
- Download and execute macaw-docker.py script to configure TLS for docker service.
(Note: Make sure python2.7 is installed)
- Edit /lib/systemd/system/docker.service file and update the below line and restart the docker service
From:
ExecStart=/usr/bin/dockerd -H fd:// --containerd=/run/containerd/containerd.sock
To:
ExecStart=/usr/bin/dockerd
- Restart docker service and verify the status
- Update
/etc/sysctl.conffile with below performance tuning settings.
#Performance Tuning.
net.ipv4.tcp_rmem = 4096 87380 16777216
net.ipv4.tcp_wmem = 4096 65536 16777216
net.core.rmem_max = 16777216
net.core.wmem_max = 16777216
net.core.netdev_max_backlog = 2500
net.core.somaxconn = 65000
net.ipv4.tcp_ecn = 0
net.ipv4.tcp_window_scaling = 1
net.ipv4.ip_local_port_range = 10000 65535
vm.max_map_count = 1048575
net.core.wmem_default=262144
net.core.wmem_max=4194304
net.core.rmem_default=262144
net.core.rmem_max=4194304
#file max
fs.file-max=518144
#swapiness
vm.swappiness = 1
#Set runtime for kernel.randomize_va_space
kernel.randomize_va_space = 2
net.ipv4.ip_forward = 1
net.ipv4.ip_nonlocal_bind=1
- Install JAVA software package
- Add the JAVA software binary to PATH variable
- Reboot the host
After deploying Ubuntu 24.04 or a later OS version, proceed with the following steps.
User can follow any of the two installation methods as mentioned below to install python and Docker as required for RDAF Installation
Pre-requisites:
-
Users performing a Manual Installation must have internet connectivity.
-
User performaing a Scripted Installation internet connectivity is optional.
-
For Proxy Settings please refer this Document
Note
Use Proxy Settings only if required as part of the deployment
-
Once Ubuntu 24.04.x or above OS version is deployed, please apply the below configuration.
-
Create a new user called rdauser and configure the password.
- Add rdauser to /etc/sudoers file. Add the below line at the end of the sudoers file.
- Modify the SSH service configuration with the below settings. Edit /etc/ssh/sshd_config file and update as shown below.
- Restart the SSH service
-
Logout and Login back as newly created user rdauser
-
Format the disks with xfs filesystem and mount the disks as per the disk requirements outlined in RDA Fabric VMs resource requirements section.
-
Make sure disk mounts are updated in
/etc/fstabto make them persistent across VM reboots. -
In
/etc/fstab, use filesystem's UUID instead of using SCSI disk names. Below command provides UUID of filesystem created on a disk or disk partition.
Sample disk mount point entry on /etc/fstab file.
Installing OS utilities and Python
- Run the below commands to install the required software packages.
- Download and install Python 3.12.x or above. Skip this step if Python 3.12.x or above is already installed as part of the OS install.
Installing Docker and Docker-compose
- Run the below commands to install docker runtime environment
- Edit /lib/systemd/system/docker.service file and update the below line and restart the docker service
sudo vi /lib/systemd/system/docker.service
From:
ExecStart=/usr/bin/dockerd -H fd:// --containerd=/run/containerd/containerd.sock
To:
ExecStart=/usr/bin/dockerd
- Configure docker service configuration updating /etc/docker/daemon.json as shown below.
Note
Docker Cert files will get generated as part of macaw-docker.py file, which user is executing in the next steps.
- Start and verify the docker service
- Update
/etc/sysctl.conffile with below performance tuning settings.
#Performance Tuning.
net.ipv4.tcp_rmem = 4096 87380 16777216
net.ipv4.tcp_wmem = 4096 65536 16777216
net.core.rmem_max = 16777216
net.core.wmem_max = 16777216
net.core.netdev_max_backlog = 2500
net.core.somaxconn = 65000
net.ipv4.tcp_ecn = 0
net.ipv4.tcp_window_scaling = 1
net.ipv4.ip_local_port_range = 10000 65535
vm.max_map_count = 1048575
net.core.wmem_default=262144
net.core.wmem_max=4194304
net.core.rmem_default=262144
net.core.rmem_max=4194304
#file max
fs.file-max=518144
#swapiness
vm.swappiness = 1
#Set runtime for kernel.randomize_va_space
kernel.randomize_va_space = 2
net.ipv4.ip_forward = 1
net.ipv4.ip_nonlocal_bind=1
- Download and execute macaw-docker.py script to configure TLS for docker service.
Here the certificate files are getting generated as part of macaw-docker.py
- Install JAVA software package
- Add the JAVA software binary to PATH variable
- Reboot the host
- Download the tar file using the provided link.
wget https://macaw-amer.s3.us-east-1.amazonaws.com/releases/RDA/8.0.0/rockylinux-ubuntu_python-docker_install.tar.gz
- Extract the tarball using the following command:
-
Ensure the following shell scripts are available after extracting the
tarfile:-
fabrixai_linux_installpython.sh-
fabrixai_linux_formatdisksmountfs.sh-
fabrixai_linux_installdocker.sh-
binaries-
README.txt -
The tarball should include a directory named binaries containing the following required packages for Ubuntu:
In the Ubuntu Binaries Directory the following files should be present
rdauser@cfx-ubuntu-rdaf-1:~/binaries$ ls Python-3.12.3.tgz RHEL-bin-files.tar.gz rockyrhel sshpass ubuntu rdauser@cfx-ubuntu-rdaf-1:~/binaries$ cd ubuntu/ rdauser@cfx-ubuntu-rdaf-1:~/binaries/ubuntu$ ls containerd.io_1.7.25-1_amd64.deb docker-ce-rootless-extras_28.0.2-1_ubuntu.24.04_noble_amd64.deb docker-compose docker-ce-cli_28.0.2-1_ubuntu.24.04_noble_amd64.deb docker-ce_28.0.2-1_ubuntu.24.04_noble_amd64.deb wget_1.21.4-1ubuntu4.1_amd64.debBelow are the Ubuntu binary files
-
containerd.io-1.6.9-3.1.el8.x86_64.rpm-
docker-ce-20.10.5-3.el8.x86_64.rpm-
docker-ce-cli-20.10.5-3.el8.x86_64.rpm-
docker-ce-rootless-extras-20.10.5-3.el8.x86_64.rpm-
docker-compose-
Python-3.12.3.tgz-
RHEL-bin-files.tar.gz-
sshpass-
wget
Note
-
Java related config files are installed as a part of the
fabrixai_linux_installdocker.shscript. The README.txt file, found after extracting thetarfile(rockylinux-ubuntu_python-docker_install.tar.gz), contains more helpful information. -
In the Binaries Directory User would find the files for both Ubuntu and Rocky Linux
-
User can ignore Rocky Linux Binary Files.
- Use the following command to make the scripts executable.
chmod +x fabrixai_linux_installpython.sh fabrixai_linux_formatdisksmountfs.sh fabrixai_linux_installdocker.sh
- Run the below command to show all the Raw disks available
NAME MAJ:MIN RM SIZE RO TYPE MOUNTPOINT
sda 8:0 0 50G 0 disk
├─sda1 8:1 0 600M 0 part /boot/efi
├─sda2 8:2 0 1G 0 part /boot
└─sda3 8:3 0 48.4G 0 part
├─rl-root 253:0 0 43.4G 0 lvm /
└─rl-swap 253:1 0 5G 0 lvm [SWAP]
sdb 8:16 0 75G 0 disk
sdc 8:32 0 75G 0 disk
sdd 8:48 0 50G 0 disk
sde 8:64 0 50G 0 disk
sdf 8:80 0 50G 0 disk
sdg 8:96 0 50G 0 disk
sdh 8:112 0 50G 0 disk
sr0 11:0 1 1024M 0 rom
- Execute the following command to format all disk mount points.
Infra Node:
sudo ./fabrixai_linux_formatdisksmountfs.sh /opt /var/lib/docker /opensearch /minio-data /kafka-logs /var/mysql /graphdb
Platform Node:
Note
If user needs to create specific mount points (whether missing or for any other reason), make sure the number of new disks matches the number of mount points required. Then, run the following command using the designated mount point names.
For creating specific mount points, verify the number of disks matches the required mount points. Next, execute the command below with your chosen mount point names.
(to create /opt, /var/mysql and /graphdb mount points)Once all mount points are configured, users should validate their setup by executing the following command.
NAME MAJ:MIN RM SIZE RO TYPE MOUNTPOINT
sda 8:0 0 50G 0 disk
├─sda1 8:1 0 600M 0 part /boot/efi
├─sda2 8:2 0 1G 0 part /boot
└─sda3 8:3 0 48.4G 0 part
├─rl-root 253:0 0 43.4G 0 lvm /
└─rl-swap 253:1 0 5G 0 lvm [SWAP]
sdb 8:16 0 100G 0 disk /var/lib/docker
sdc 8:32 0 50G 0 disk /kafka-logs
sdd 8:48 0 75G 0 disk /opt
sde 8:64 0 50G 0 disk /var/mysql
sdf 8:80 0 50G 0 disk /minio-data
sdg 8:96 0 50G 0 disk /opensearch
sdh 8:112 0 25G 0 disk /graphdb
sr0 11:0 1 1024M 0 rom
- Ensure the following mount points are available on the server.
Mount Points For Infra Node
Mount Points For Platform Node
- Rdauser Permissions Check:
Ensure rdauser is added to the sudoers file to grant the ability to run commands with root privileges. Add the following entry to the /etc/sudoers file.
Once the user has confirmed that all required mount points are in place, execute the following scripts in the specified order. For detailed instructions on script execution, refer to the README.txtfile included in the tarball.
Reload the bash profile using the below given command
- Reboot the Host
Rocky Linux is an open-source, enterprise-grade Linux distribution designed as a downstream, bug-for-bug compatible alternative to Red Hat Enterprise Linux (RHEL). It was created after CentOS shifted its focus to CentOS Stream, leaving users in need of a stable, RHEL-compatible OS.
Once Rocky Linux 8.10 or above OS version is deployed, please follow below steps.
User can follow any one of the below two methods to deploy python and docker as required for RDAF installation:
- Create a new user called
rdauserand configure the password.
sudo adduser rdauser
sudo passwd rdauser
sudo chown -R rdauser:rdauser /home/rdauser
sudo groupadd docker
sudo usermod -aG docker rdauser
- Add rdauser to /etc/sudoers file. Add the below line at the end of the sudoers file.
- Modify the SSH service configuration with the below settings. Edit
/etc/ssh/sshd_configfile and update the below settings as shown below.
- Restart the ssh service.
- Logout and Login back as newly created user rdauser.
Steps to Create the Mount Points
- Run the below command to show all the Raw disks available
NAME MAJ:MIN RM SIZE RO TYPE MOUNTPOINT
sda 8:0 0 50G 0 disk
├─sda1 8:1 0 600M 0 part /boot/efi
├─sda2 8:2 0 1G 0 part /boot
└─sda3 8:3 0 48.4G 0 part
├─rl-root 253:0 0 43.4G 0 lvm /
└─rl-swap 253:1 0 5G 0 lvm [SWAP]
sdb 8:16 0 75G 0 disk
sdc 8:32 0 75G 0 disk
sdd 8:48 0 50G 0 disk
sde 8:64 0 50G 0 disk
sdf 8:80 0 50G 0 disk
sdg 8:96 0 50G 0 disk
sdh 8:112 0 50G 0 disk
sr0 11:0 1 1024M 0 rom
Step 1. After ensuring /dev/sdb is a raw disk, run below commands. Else, select a raw disk instead
Step 2 Run the below command to get the uuid
Note
It's recommended to backup FSTAB file before making changes. Use the following command to create a backup.
Step 3 Run the below command to add UUID
Important
Repeat the above steps (Step 1 to Step 3) for configuring other Mount Points for other disks sdc,sdd,sde,sdf,sdg,sdh. /dev/sdb is used as an example. Repeat these steps for all other disks.
-
Once all the Mount Points are Configured the User should verify by running the below command
NAME MAJ:MIN RM SIZE RO TYPE MOUNTPOINT sda 8:0 0 50G 0 disk ├─sda1 8:1 0 600M 0 part /boot/efi ├─sda2 8:2 0 1G 0 part /boot └─sda3 8:3 0 48.4G 0 part ├─rl-root 253:0 0 43.4G 0 lvm / └─rl-swap 253:1 0 5G 0 lvm [SWAP] sdb 8:16 0 100G 0 disk /var/lib/docker sdc 8:32 0 50G 0 disk /kafka-logs sdd 8:48 0 75G 0 disk /opt sde 8:64 0 50G 0 disk /var/mysql sdf 8:80 0 50G 0 disk /minio-data sdg 8:96 0 50G 0 disk /opensearch sdh 8:112 0 25G 0 disk /graphdb sr0 11:0 1 1024M 0 rom
Installing OS utilities and packages
- Run the below commands to install the required software packages.
sudo yum install -y gcc openssl-devel bzip2-devel sqlite-devel xz-devel ncurses-devel readline readline-devel gdbm-devel tcl-devel tk-devel make libffi-devel

or

sudo dnf install -y gcc openssl-devel bzip2-devel sqlite-devel xz-devel ncurses-devel readline readline-devel gdbm-devel tcl-devel tk-devel make libffi-devel
sudo yum install -y wget telnet net-tools unzip tar sysstat bind-utils iperf3 xinetd jq yum-utils dev
or
sudo dnf install -y wget telnet net-tools unzip tar sysstat bind-utils iperf3 xinetd jq yum-utils device-mapper-persistent-data lvm2 mysql
- Download and install the below software packages.
Wget https://download-ib01.fedoraproject.org/pub/epel/8/Everything/x86_64/Packages/s/sshpass-1.06-9.el8.x86_64.rpm
sudo rpm -ivh sshpass-1.06-9.el8.x86_64.rpm
wget https://download-ib01.fedoraproject.org/pub/epel/8/Everything/x86_64/Packages/n/nload-0.7.4-16.el8.x86_64.rpm

sudo rpm -ivh nload-0.7.4-16.el8.x86_64.rpm
Download and Install Python
Download and install Python 3.12.X or above.
cd /opt
sudo https://www.python.org/ftp/python/3.12.3/Python-3.12.3.tgz
sudo tar xvf Python-3.12.3.tgz
sudo chown -R rdauser:rdauser Python-3.12.3
cd /opt/Python-3.12.3
./configure --enable-optimizations
sudo make -j8 build_all
sudo make altinstall
sudo /usr/local/bin/python3.12 -m venv /opt/PYTHON312
sudo chown -R rdauser:rdauser /opt/PYTHON312
sudo rm -f /opt/Python-3.12.3.tgz
sudo alternatives --set python /usr/bin/python3.12
sudo ln -s /usr/local/bin/python3.12 /usr/bin/python
sudo ln -s /usr/local/bin/pip3.12 /usr/bin/pip
Note
Alternatively, we can install python3.12 using the below shell script without Internet https://macaw-amer.s3.us-east-1.amazonaws.com/releases/rdaf-platform/1.4.0/install_python3.12_withoutinternet.sh
Installing Docker and Docker-compose
- Run the below commands to install docker runtime environment
sudo yum config-manager --add-repo=https://download.docker.com/linux/centos/docker-ce.repo

or

sudo dnf config-manager --add-repo=https://download.docker.com/linux/centos/docker-ce.repo
sudo yum install -y --nobest --allowerasing docker-ce-28.0.4-1.el8 docker-ce-cli-28.0.4-1.el8 containerd.io
or
sudo dnf install -y --nobest --allowerasing docker-ce-28.0.4-1.el8 docker-ce-cli-28.0.4-1.el8 containerd.io
- Configure docker service configuration updating
/etc/docker/daemon.jsonas shown below.
{
"tls": true,
"tlscacert": "/etc/tlscerts/ca/ca.pem",
"tlsverify": true,
"storage-driver": "overlay2",
"hosts": [
"unix:///var/run/docker.sock",
"tcp://0.0.0.0:2376"
],
"tlskey": "/etc/tlscerts/server/server.key",
"debug": false,
"tlscert": "/etc/tlscerts/server/server.pem",
"experimental": false,
"live-restore": true
}
- Download and execute macaw-docker.py script to configure TLS for docker service.
Note
Make sure python 3.12.x is already installed
mkdir ~/cfx-config-files
cd ~/cfx-config-files
wget https://macaw-amer.s3.us-east-1.amazonaws.com/images/misc/Linux-bin-files.tar.gz
tar -xzvf Linux-bin-files.tar.gz
sudo python3.12 macaw-docker.py
- Edit
/lib/systemd/system/docker.servicefile and update the below line and restart the docker service.
From:
ExecStart=/usr/bin/dockerd -H fd:// --containerd=/run/containerd/containerd.sock

To:
ExecStart=/usr/bin/dockerd
- Restart docker service and verify the status.
- Update
/etc/sysctl.conffile with below performance tuning settings.
#Performance Tuning.
net.ipv4.tcp_rmem = 4096 87380 16777216
net.ipv4.tcp_wmem = 4096 65536 16777216
net.core.rmem_max = 16777216
net.core.wmem_max = 16777216
net.core.netdev_max_backlog = 2500
net.core.somaxconn = 65000
net.ipv4.tcp_ecn = 0
net.ipv4.tcp_window_scaling = 1
net.ipv4.ip_local_port_range = 10000 65535
vm.max_map_count = 1048575
net.core.wmem_default=262144
net.core.wmem_max=4194304
net.core.rmem_default=262144
net.core.rmem_max=4194304

#file max
fs.file-max=518144

#swapiness
vm.swappiness = 1
#Set runtime for kernel.randomize_va_space
kernel.randomize_va_space = 2

net.ipv4.ip_forward = 1
net.ipv4.ip_nonlocal_bind=1
- Install JAVA software package
- Add the JAVA software binary to PATH variable
- Reboot the Host
- Download the tar file using the provided link.
https://macaw-amer.s3.us-east-1.amazonaws.com/releases/RDA/8.0.0/rockylinux-ubuntu_python-docker_install.tar.gz
- Extract the tarball using the following command:
-
Ensure the following shell scripts are available after extracting the
tarfile:-
fabrixai_linux_installpython.sh-
fabrixai_linux_formatdisksmountfs.sh-
fabrixai_linux_installdocker.sh-
binaries-
README.txt -
The tarball should include a directory named binaries containing the following required packages for Rocky Linux:
In the rocky linux binaries Directory the following files should be present
rdauser@cfx-ubuntu-rdaf-1:~$ cd binaries/ rdauser@cfx-ubuntu-rdaf-1:~/binaries$ ls Python-3.12.3.tgz RHEL-bin-files.tar.gz rockyrhel sshpass ubuntu rdauser@cfx-ubuntu-rdaf-1:~/binaries$ cd rockyrhel/ rdauser@cfx-ubuntu-rdaf-1:~/binaries/rockyrhel$ ls containerd.io-1.7.25-3.1.el8.x86_64.rpm docker-ce-cli-28.0.2-1.el8.x86_64.rpm docker-compose docker-ce-28.0.2-1.el8.x86_64.rpm docker-ce-roBelow are the Ubuntu binary files
-
containerd.io-1.6.9-3.1.el8.x86_64.rpm-
docker-ce-20.10.5-3.el8.x86_64.rpm-
docker-ce-cli-20.10.5-3.el8.x86_64.rpm-
docker-ce-rootless-extras-20.10.5-3.el8.x86_64.rpm-
docker-compose-
Python-3.12.3.tgz-
RHEL-bin-files.tar.gz-
sshpass-
wget
Note
-
Java related config files are installed as a part of the
fabrixai_linux_installdocker.shscript. The README.txt file, found after extracting thetarfile(rockylinux-ubuntu_python-docker_install.tar.gz), contains more helpful information. -
In the Binaries Directory User would find the files for both Ubuntu and Rocky Linux
-
User can ignore Ubuntu Binary Files.
- Use the following command to make the scripts executable.
chmod +x fabrixai_linux_installpython.sh fabrixai_linux_formatdisksmountfs.sh fabrixai_linux_installdocker.sh
- Run the below command to show all the Raw disks available
NAME        MAJ:MIN RM  SIZE RO TYPE MOUNTPOINT
sda           8:0    0   50G  0 disk
├─sda1        8:1    0  600M  0 part /boot/efi
├─sda2        8:2    0    1G  0 part /boot
└─sda3        8:3    0 48.4G  0 part
├─rl-root 253:0    0 43.4G  0 lvm  /
└─rl-swap 253:1    0    5G  0 lvm  [SWAP]
sdb           8:16   0   75G  0 disk
sdc           8:32   0   75G  0 disk
sdd           8:48   0   50G  0 disk
sde           8:64   0   50G  0 disk
sdf           8:80   0   50G  0 disk
sdg           8:96   0   50G  0 disk
sdh           8:112  0   50G  0 disk
sr0          11:0    1 1024M  0 rom
- Execute the following command to format all disk mount points.
Infra Node:
sudo ./fabrixai_linux_formatdisksmountfs.sh /opt /var/lib/docker /opensearch /minio-data /kafka-logs /var/mysql /graphdb
Platform Node:
Note
If user needs to create specific mount points (whether missing or for any other reason), make sure the number of new disks matches the number of mount points required. Then, run the following command using the designated mount point names.
For creating specific mount points, verify the number of disks matches the required mount points. Next, execute the command below with your chosen mount point names.
(to create /opt, /var/mysql and /graphdb mount points)Once all mount points are configured, users should validate their setup by executing the following command.
NAME        MAJ:MIN RM  SIZE RO TYPE MOUNTPOINT
sda           8:0    0   50G  0 disk
├─sda1        8:1    0  600M  0 part /boot/efi
├─sda2        8:2    0    1G  0 part /boot
└─sda3        8:3    0 48.4G  0 part
├─rl-root 253:0    0 43.4G  0 lvm  /
└─rl-swap 253:1    0    5G  0 lvm  [SWAP]
sdb           8:16   0  100G  0 disk /var/lib/docker
sdc           8:32   0   50G  0 disk /kafka-logs
sdd           8:48   0   75G  0 disk /opt
sde           8:64   0   50G  0 disk /var/mysql
sdf           8:80   0   50G  0 disk /minio-data
sdg           8:96   0   50G  0 disk /opensearch
sdh           8:112  0   25G  0 disk /graphdb
sr0           11:0   1 1024M  0 rom
- Ensure the following mount points are available on the server.
Mount Points For Infra Node
Mount Points For Platform Node
- Rdauser Permissions Check:
Ensure rdauser is added to the sudoers file to grant the ability to run commands with root privileges. Add the following entry to the /etc/sudoers file.
Once the user has confirmed that all required mount points are in place, execute the following scripts in the specified order. For detailed instructions on script execution, refer to the README.txtfile included in the tarball.
Reload the bash profile using the below given command
- Reboot the Host
7. RDAF Platform deployment on Cloud
-
To setup and configure RDAF Platform on AWS EC2 environment for Non-K8s using terraform scripts, Please refer RDAF Platform on AWS
-
To setup and configure RDAF Platform on AWS EC2 environment for Non-K8s using standalone container services, Please refer
8. RDAF Platform Installation
This section provides information about end to end deployment steps for RDA Fabric Platform on both Kubernetes and Non-Kubernetes environments.
Note
Please make sure to complete the below pre-requisites before proceeding to next steps to deploy RDAF Platform.
- RDAF Platform Resource Requirements
- Deploy VMs for RDAF Platform using CloudFabric provided OVFs
- Deploy VMs for RDAF Platform using Custom RHEL or Ubuntu OS Images
- Network layout and Port requirements
- Configure HTTP Proxy (if applicable)
8.1 Install RDAF deployment CLI for K8s & Non-K8s Environments
Software Versions:
Below are the required container image tags for RDAF platform deployment
-
RDAF Deployment CLI: 1.5.1
-
RDAF Registry service: 1.0.4
-
RDAF Infra services: 1.0.4
-
RDAF Platform: 8.2.1
-
RDAF Worker: 8.2.1
-
RDAF Client (rdac) CLI: 8.2.1
-
RDAF OIA (AIOps) Application: 8.2.1
-
RDAF Studio: 8.2.1
Below are the required container image tags for RDAF platform deployment
-
RDAF Deployment CLI: 1.5.1
-
RDAF Registry service: 1.0.4
-
RDAF Infra services: 1.0.4
-
RDAF Platform: 8.2.1
-
RDAF Worker: 8.2.1
-
RDAF Client (rdac) CLI: 8.2.1
-
RDAF OIA (AIOps) Application: 8.2.1
-
RDAF Studio: 8.2.1
8.2 RDAF Deployment CLI Installation
Please follow the below given steps to install RDAF deployment CLI.
Note
Please install RDAF Deployment CLI on both the on-premise docker registry VM and the RDAF Platform's management VM if provisioned separately. In most cases, on-premise docker registry service and RDAF platform's setup and configuration are maintained on the same VM.
Login into the VM as rdauser where RDAF deployment CLI to be installed for docker on-premise registry service and managing Kubernetes or Non-kubernetes deployments.
- Download the RDAF Deployment CLI's newer version 1.5.1 bundle.
wget https://macaw-amer.s3.us-east-1.amazonaws.com/releases/rdaf-platform/1.5.1/rdafcli-1.5.1.tar.gz
- Install the
rdaf & rdafk8sCLI to version 1.5.1
- Verify the installed
rdaf & rdafk8sCLI version is upgraded to 1.5.1
- Download the RDAF Deployment CLI's newer version 1.5.1 bundle and copy it to RDAF management VM on which
rdaf & rdafk8sdeployment CLI was installed.
- Download the RDAF Deployment CLI's newer version 1.5.1 bundle
wget https://macaw-amer.s3.us-east-1.amazonaws.com/releases/rdaf-platform/1.5.1/rdafcli-1.5.1.tar.gz
- Install the
rdafCLI to version 1.5.1
- Verify the installed
rdafCLI version is upgraded to 1.5.1
- Download the RDAF Deployment CLI's newer version 1.5.1 bundle and copy it to RDAF management VM on which
rdaf & rdafk8sdeployment CLI was installed.
8.3 RDAF On-Premise Docker Registry Setup
CloudFabrix support hosting an on-premise docker registry which will download and synchronize RDA Fabric's platform, infrastructure and application services from CloudFabrix's public docker registry that is securely hosted on AWS and from other public docker registries as well. For more information on on-premise docker registry, please refer Docker registry access for RDAF platform services.
rdaf registry setup
Run the below command to setup and configure on-premise docker registry service. In the below command example, 10.99.120.140 is the machine on which on-premise registry service is going to installed.
docker2.cloudfabrix.io is the CloudFabrix's public docker registry hosted on AWS from which RDA Fabric docker images are going to be downloaded.
Run the below command to install the on-premise docker registry service.
Info
- For latest tag version, please contact support@cloudfabrix.com
- On-premise docker registry service runs on port TCP/5000. This port may need to be enabled on firewall device if on-premise docker registry service and RDA Fabric service VMs are deployed in different network environments.
To check the status of the on-premise docker registry service, run the below command.
rdaf registry fetch
Once on-premise docker registry service is installed, run the below command to download one or more tags to pre-stage the docker images for RDA Fabric services deployment for fresh install.
Minio object storage service image need to be downloaded explicitly using the below command.
Info
Note: It may take few minutes to few hours depends on the outbound internet access bandwidth and the number of docker images to be downloaded. The default location path for the downloaded docker images is /opt/rdaf-registry/data/docker/registry. This path can be overridden/changed during rdaf registry setup command using --install-root option if needed.
rdaf registry list-tags
Run the below command to list the downloaded images and their corresponding tags / versions.
Please make sure 1.0.4 image tag is downloaded for the below RDAF Infra service.
- rda-platform-kafka
- rda-platform-mariadb
- rda-platform-haproxy
- rda-platform-opensearch
- rda-platform-nats
- rda-platform-busybox
- rda-platform-nats-box
- rda-platform-nats-boot-config
- rda-platform-nats-server-config-reloader
- rda-platform-prometheus-nats-exporter
- rda-platform-arangodb-starter
- rda-platform-kube-arangodb
- rda-platform-arangodb
- rda-platform-kubectl
- rda-platform-logstash
- rda-platform-filebeat
- rda-platform-telegraf
Please make sure RELEASE.2024-12-18T13-15-44Z image tag is downloaded for the below RDAF Infra service.
- minio
Please make sure 8.2.1 image tag is downloaded for the below RDAF Platform services.
- rda-client-api-server
- rda-registry
- rda-scheduler
- rda-collector
- rda-identity
- rda-fsm
- rda-asm
- rda-access-manager
- rda-resource-manager
- rda-user-preferences
- onprem-portal
- onprem-portal-nginx
- rda-worker-all
- onprem-portal-dbinit
- cfxdx-nb-nginx-all
- rda-event-gateway
- rda-chat-helper
- rdac
- rdac-full
- cfxcollector
- bulk_stats
Please make sure 8.2.1 image tag is downloaded for the below RDAF OIA Application services.
- cfx-rda-app-controller
- cfx-rda-alert-processor
- cfx-rda-file-browser
- cfx-rda-smtp-server
- cfx-rda-ingestion-tracker
- cfx-rda-reports-registry
- cfx-rda-ml-config
- cfx-rda-event-consumer
- cfx-rda-webhook-server
- cfx-rda-irm-service
- cfx-rda-alert-ingester
- cfx-rda-collaboration
- cfx-rda-notification-service
- cfx-rda-configuration-service
- cfx-rda-alert-processor-companion
- cfx-rda-alert-correlator
8.4 RDAF Platform Setup
Important
When on-premise docker repository service is used, please make sure to add the insecure-registries parameter to /etc/docker/daemon.json file and restart the docker daemon as shown below on all of RDA Fabric VMs before the deployment. This is to bypass SSL certificate validation as on-premise docker repository will be installed with self-signed certificates.
Edit /etc/docker/daemon.json to configure the on-premise docker repository as shown below.
...
...
rdauser@k8mater108112:~$ docker info
Client: Docker Engine - Community
Version:    27.1.2
Context:    default
Debug Mode: false
Plugins:
buildx: Docker Buildx (Docker Inc.)
    Version:  v0.16.2
    Path:     /usr/libexec/docker/cli-plugins/docker-buildx
compose: Docker Compose (Docker Inc.)
    Version:  v2.29.1
    Path:     /usr/libexec/docker/cli-plugins/docker-compose

Server:
Containers: 23
Running: 12
Paused: 0
Stopped: 11
Images: 9
Server Version: 27.1.2
Storage Driver: overlay2
Backing Filesystem: xfs
Supports d_type: true
Using metacopy: false
Native Overlay Diff: true
userxattr: false
Logging Driver: json-file
Cgroup Driver: cgroupfs
Cgroup Version: 2
Plugins:
Volume: local
Network: bridge host ipvlan macvlan null overlay
Log: awslogs fluentd gcplogs gelf journald json-file local splunk syslog
Swarm: inactive
Runtimes: io.containerd.runc.v2 runc
Default Runtime: runc
Init Binary: docker-init
containerd version: 8fc6bcff51318944179630522a095cc9dbf9f353
runc version: v1.1.13-0-g58aa920
init version: de40ad0
Security Options:
apparmor
seccomp
Profile: builtin
Kernel Version: 6.8.0-48-generic
Operating System: Ubuntu 24.04 LTS
OSType: linux
Architecture: x86_64
CPUs: 4
Total Memory: 15.57GiB
Name: k8mater108112
ID: d9a59caa-e3a8-4e50-87a9-c358ab115bae
Docker Root Dir: /var/lib/docker
Debug Mode: false
Experimental: true
Insecure Registries:
127.0.0.0/8
Live Restore Enabled: true

rdauser@k8mater108112:~$
rdafk8s setregistry
When on-premise docker registry is deployed, set the default docker registry configuration to on-premise docker registry host to pull and install the RDA Fabric platform services.
- Before proceeding, please copy the
/opt/rdaf-registry/cert/ca/ca.crtfile from on-premise registry VM.
scp rdauser@<on-premise-registry-ip>:/opt/rdaf-registry/cert/ca/ca.crt /opt/rdaf-registry/registry-ca-cert.crt
Tip
The location of the on-premise docker registry's CA certificate file ca.crt is located under /opt/rdaf-registry/cert/ca. This file ca.crt need to be copied to the machine on which RDAF CLI is used to setup, configure and install RDA Fabric platform and all of the required services using on-premise docker registry. This step is not applicable when cloud hosted docker registry docker2.cloudfabrix.io is used. Also, this step is not needed, when on-premise docker registry service VM is used to setup, configure and deploy RDAF platform as well.
- Run the below command to set the docker-registry to on-premise one.
rdafk8s setregistry --host <on-premise-docker-registry-ip-or-dns> --port 5000 --cert-path /opt/rdaf-registry/registry-ca-cert.crt
Tip
Please verify if on-premise registry is accessible on port 5000 using either of the below commands.
- telnet
<on-premise-docker-registry-ip-or-dns>5000 - curl -vv telnet://
<on-premise-docker-registry-ip-or-dns>:5000
rdafk8s setup
Run the below rdafk8s setup command to create the RDAF platform's deployment configuration. It is a pre-requisite before RDAF infrastructure, platform and application services can be installed on Kubernetes Cluser.
It will prompt for all the necessary configuration details.
- Accept the EULA
- Enter the rdauser SSH password for all of the Kubernetes worker nodes on which RDAF services are going to be installed.
What is the SSH password for the SSH user used to communicate between hosts
SSH password:
Re-enter SSH password:
Tip
Please make sure rdauser's SSH password on all of the Kubernetes cluster worker nodes is same during the rdafk8s setup command.
- Enter additional IP address(es) or DNS names (e.g., *.acme.com) that can be as SANs (Subject alt names) while generating self-signed certificates. It is important to include any public facing IP addresse(s) (e.g., AWS, Azure and GCP environments) that is/are different from RDAF platform instance VM's ip addresses which are specified as part of the
rdafk8s setupcommand. Also, include the IP addresses of secondary NIC (if configured) of all RDAF platform VMs.
Tip
SANs (Subject alt names) also known as multi-domain certificates which allows to create a single unified SSL certificate which includes more than one Common Name (CN). Common Name can be an IP Address or DNS Name or a wildcard DNS Name (ex: *.acme.com)
Provide any Subject alt name(s) to be used while generating SAN certs
Subject alt name(s) for certs[]: 100.30.10.10
- Enter Kubernetes worker node IPs on which RDAF Platform services need to be installed. For HA configuration, please enter comma separated values. Minimum of 2 worker nodes are required for the HA configuration. If it is a non-HA deployment, only one Kubernetes worker node's ip address or DNS name is required.
What are the host(s) on which you want the RDAF platform services to be installed?
Platform service host(s)[rda-platform-vm01]: 192.168.125.141,192.168.125.142
- Answer if the RDAF application services are going to be deployed in HA mode or standalone.
- Enter Kubernetes worker node IPs on which RDAF Application services (OIA) need to be installed. For HA configuration, please enter comma separated values. Minimum of 2 hosts or more are required for the HA configuration. If it is a non-HA deployment, only one Kubernetes worker node's ip address or DNS name is required.
What are the host(s) on which you want the application services to be installed?
Application service host(s)[rda-platform-vm01]: 192.168.125.143,192.168.125.144
- Enter the name of the Organization. In the below example,
ACME_IT_Servicesis used as the Organization name. It is for a reference only.
What is the organization you want to use for the admin user created?
Admin organization[CloudFabrix]: ACME_IT_Services
What is the ca cert to use to communicate to on-prem docker registry
Docker Registry CA cert path[]:
- Enter Kubernetes worker node IPs on which RDAF Worker services need to be installed. For HA configuration, please enter comma separated values. Minimum of 2 hosts or more are required for the HA configuration. If it is a non-HA deployment, only one Kubernetes worker node's ip address or DNS name is required.
What are the host(s) on which you want the Worker to be installed?
Worker host(s)[rda-platform-vm01]: 192.168.125.145
- Enter Kubernetes worker node IPs on which RDAF NATs infrastructure service need to be installed. For HA configuration, please enter comma separated values. Minimum of 2 Kubernetes worker nodes are required for the
NATsHA configuration. If it is a non-HA deployment, only one Kubernetes worker node's IP or DNS Name is required.
What is the "host/path-on-host" on which you want the Nats to be deployed?
Nats host/path[192.168.125.141]: 192.168.125.145,192.168.125.146
- Enter Kubernetes worker node IPs on which RDAF Minio infrastructure service need to be installed. For HA configuration, please enter comma separated values. Minimum of 4 Kubernetes worker nodes are required for the
MinioHA configuration. If it is a non-HA deployment, only one Kubernetes worker node's IP or DNS Name is required.
What is the "host/path-on-host" where you want Minio to be provisioned?
Minio server host/path[192.168.125.141]: 192.168.125.145,192.168.125.146,192.168.125.147,192.168.125.148
- Change the default
Miniouser credentials if needed or press Enter to accept the defaults.
What is the user name you want to give for Minio root user that will be created and used by the RDAF platform?
Minio user[rdafadmin]:
What is the password you want to use for the newly created Minio root user?
Minio password[Q8aJ63PT]:
- Enter Kubernetes worker node IPs on which RDAF MariaDB infrastructure service need to be installed. For HA configuration, please enter comma separated values. Minimum of 3 Kubernetes worker nodes are required for the
MariDBdatabase HA configuration. If it is a non-HA deployment, only one Kubernetes worker node's IP or DNS Name is required.
What is the "host/path-on-host" on which you want the MariaDB server to be provisioned?
MariaDB server host/path[192.168.125.141]: 192.168.125.145,192.168.125.146,192.168.125.147
- Change the default
MariaDBuser credentials if needed or press Enter to accept the defaults.
What is the user name you want to give for MariaDB admin user that will be created and used by the RDAF platform?
MariaDB user[rdafadmin]:
What is the password you want to use for the newly created MariaDB root user?
MariaDB password[jffqjAaZ]:
- Enter Kubernetes worker node IPs on which RDAF Opensearch infrastructure service need to be installed. For HA configuration, please enter comma separated values. Minimum of 3 Kubernetes worker nodes are required for the
OpensearchHA configuration. If it is a non-HA deployment, only one Kubernetes worker node's IP or DNS Name is required.
What is the "host/path-on-host" on which you want the opensearch server to be provisioned?
opensearch server host/path[192.168.125.141]: 192.168.125.145,192.168.125.146,192.168.125.147
- Change the default
Opensearchuser credentials if needed or press Enter to accept the defaults.
What is the user name you want to give for Opensearch admin user that will be created and used by the RDAF platform?
Opensearch user[rdafadmin]:
What is the password you want to use for the newly created Opensearch admin user?
Opensearch password[sLmr4ICX]:
- Enter Kubernetes worker node IPs on which RDAF Kafka infrastructure service need to be installed. For HA configuration, please enter comma separated values. Minimum of 3 Kubernetes worker nodes are required for the
KafkaHA configuration. If it is a non-HA deployment, only one Kubernetes worker node's IP or DNS Name is required.
What is the "host/path-on-host" on which you want the Kafka server to be provisioned?
Kafka server host/path[192.168.125.141]: 192.168.125.145,192.168.125.146,192.168.125.147
- Enter RDAF infrastructure service
HAProxy(load-balancer) host(s) ip address or DNS name. For HA configuration, please enter comma separated values. Minimum of 2 hosts are required for theHAProxyHA configuration. If it is a non-HA deployment, only one RDAFHAProxyservice host's ip address or DNS name is required.
What is the host on which you want HAProxy to be provisioned?
HAProxy host[192.168.125.141]: 192.168.125.145,192.168.125.146
- Select the network interface name which is used for UI portal access. Ex:
eth0orens160etc.
What is the network interface on which you want the rdaf to be accessible externally?
Advertised external interface[eth0]: ens160
- Enter the
HAProxyservice's virtual IP address when it is configured in HA configuration. Virtual IP address should be an unused IP address. This step is not applicable whenHAProxyservice is deployed in non-HA configuration.
What is the host on which you want the platform to be externally accessible?
Advertised external host[192.168.125.143]: 192.168.125.149
After entering the required inputs as above, rdaf setup generates self-signed SSL certificates, creates the required directory structure, configures SSH key based authentication on all of the RDAF hosts and generates rdaf.cfg configuration file under /opt/rdaf directory.
It creates the below director structure on all of the RDAF hosts.
- /opt/rdaf/cert: It contains the generated self-signed SSL certificates for all of the RDAF hosts.
- /opt/rdaf/config: It contains the required configuration file for each deployed RDAF service where applicable.
- /opt/rdaf/data: It contains the persistent data for some of the RDAF services.
- /opt/rdaf/deployment-scripts: It contains the docker-compose
.ymlfile of the services that are configured to be provisioned on RDAF host. - /opt/rdaf/logs: It contains the RDAF services log files.
Note
This step is optional and only required if HostAliases need to be configured in Kubernetes.
If the environment is configured with hostnames make sure the host alias section added in values.yaml file for the needed services.
tha path of the values.yaml is /opt/rdaf/deployment-scripts
rda_fsm:
hostAliases:
- ip: "127.0.0.1"
    hostnames:
    - "foo.local"
    - "bar.local"
- ip: "10.1.2.3"
    hostnames:
    - "foo.remote"
    - "bar.remote"
replicas: 2
privileged: 'true'
capabilities:
    add:
    - SYS_PTRACE
resources:
    requests:
    memory: 100Mi
    limits:
    memory: 4Gi
env:
    RDA_ENABLE_TRACES: 'no'
    DISABLE_REMOTE_LOGGING_CONTROL: 'no'
    RDA_SELF_HEALTH_RESTART_AFTER_FAILURES: 3
    PURGE_COMPLETED_INSTANCES_DAYS: 1
    PURGE_STALE_INSTANCES_DAYS: 90
    FSM_INSTANCE_CACHE_SIZE: 2000
    KAFKA_CONSUMER_BATCH_MAX_SIZE: 100
    KAFKA_CONSUMER_BATCH_MAX_TIME_SECONDS: 1
deployment: true
rdauser@k8smaster-109-27:~$ kubectl get po rda-fsm-c58556947-fds56 -n rda-fabric -o yaml | grep -A20 hostAliases
hostAliases:
- hostnames:
    - foo.local
    - bar.local
    ip: 127.0.0.1
- hostnames:
    - foo.remote
    - bar.remote
    ip: 10.1.2.3
imagePullSecrets:
- name: cfxregistry-cred
nodeName: k8smaster-109-28
nodeSelector:
    rdaf_platform_services: allow
preemptionPolicy: PreemptLowerPriority
priority: 0
restartPolicy: Always
schedulerName: default-scheduler
securityContext:
    fsGroup: 1000
    supplementalGroups:
Important
When on-premise docker repository service is used, please make sure to add the insecure-registries parameter to /etc/docker/daemon.json file and restart the docker daemon as shown below on all of RDA Fabric VMs before the deployment. This is to bypass SSL certificate validation as on-premise docker repository will be installed with self-signed certificates.
Edit /etc/docker/daemon.json to configure the on-premise docker repository as shown below.
...
...
Kernel Version: 5.4.0-110-generic
Operating System: Ubuntu 24.04.x LTS
OSType: linux
Architecture: x86_64
CPUs: 2
Total Memory: 7.741GiB
Name: rdaf-onprem-docker-repo
ID: OLZF:ZKWN:TIQJ:ZMNV:2STT:JHR3:3RAT:TAL5:TF47:OGVQ:LHY7:RMHH
Docker Root Dir: /var/lib/docker
Debug Mode: false
Registry: https://index.docker.io/v1/
Labels:
Experimental: false
Insecure Registries:
  10.99.120.140:5000
  127.0.0.0/8
Live Restore Enabled: true
rdaf setregistry
When on-premise docker registry is deployed, set the default docker registry configuration to on-premise docker registry host to pull and install the RDA Fabric platform services.
- Before proceeding, please copy the
/opt/rdaf-registry/cert/ca/ca.crtfile from on-premise registry VM.
scp rdauser@<on-premise-registry-ip>:/opt/rdaf-registry/cert/ca/ca.crt /opt/rdaf-registry/registry-ca-cert.crt
Tip
The location of the on-premise docker registry's CA certificate file ca.crt is located under /opt/rdaf-registry/cert/ca. This file ca.crt need to be copied to the machine on which RDAF CLI is used to setup, configure and install RDA Fabric platform and all of the required services using on-premise docker registry. This step is not applicable when cloud hosted docker registry docker2.cloudfabrix.io is used. Also, this step is not needed, when on-premise docker registry service VM is used to setup, configure and deploy RDAF platform as well.
- Run the below command to set the docker-registry to on-premise one.
rdaf setregistry --host <on-premise-docker-registry-ip-or-dns> --port 5000 --cert-path /opt/rdaf-registry/registry-ca-cert.crt
Tip
Please verify if on-premise registry is accessible on port 5000 using either of the below commands.
- telnet
<on-premise-docker-registry-ip-or-dns>5000 - curl -vv telnet://
<on-premise-docker-registry-ip-or-dns>:5000
- RDAF Setup
Please use the below command for Silent Installation
Note
Create a file with name input.json and use the below sample content for input.json file
{
"accept_eula": true,
"alt_names": "",
"app_service_ha": true,
"platform_service_ha": true,
"admin_organization": "cfx",
"docker_registry_ca": "/opt/rdaf-registry/cert/ca/ca.crt",
"nats_host": ["192.168.108.50","192.168.108.56"],
"minio_server_host": ["192.168.108.50","192.168.108.56","192.168.108.58","192.168.108.51"],
"minio_user": "rdafadmin",
"minio_password": "rdaf1234",
"mariadb_server_host": ["192.168.108.50","192.168.108.56","192.168.108.58"],
"mariadb_user": "rdafadmin",
"mariadb_password": "rdaf1234",
"kafka_server_host": ["192.168.108.50","192.168.108.56","192.168.108.58"],
"opensearch_server_host": ["192.168.108.50","192.168.108.56","192.168.108.58"],
"opensearch_user": "rdafadmin",
"opensearch_password": "rdaf1234",
"graphdb_host": ["192.168.108.50","192.168.108.56","192.168.108.58"],
"graphdb_password": "rdaf1234",
"graphdb_user": "rdafadmin",
"haproxy_host": ["192.168.108.50","192.168.108.56"],
"advertised_ext_host": "192.168.108.59",
"advertised_ext_interface": "ens160",
"bind_internal_inf": false,
"advertised_int_host": "",
"advertised_int_interface": "",
"platform_service_host": ["192.168.108.51","192.168.108.52"],
"service_host": ["192.168.108.51","192.168.108.52"],
"worker_host": ["192.168.108.53","192.168.108.54"],
"rda_event_gateway_host": ["192.168.108.53","192.168.108.54"],
"ssh_password": "Rda$4301!",
"ssh_user": "rdauser",
"no_prompt": true
}
Run the below rdaf setup command to create the RDAF platform's deployment configuration. It is a pre-requisite to deploy RDAF infrastructure, platform and application services.
It will prompt for all the necessary configuration details.
- Accept the EULA
- Enter the rdauser SSH password for all of the RDAF hosts.
What is the SSH password for the SSH user used to communicate between hosts
SSH password:
Re-enter SSH password:
Tip
Please make sure rdauser's SSH password on all of the RDAF hosts is same during the rdaf setup command.
- Enter additional IP address(es) such as VIPs (virtual ip addresses) or DNS names (e.g., *.acme.com) that need to be used as SANs (Subject alt names) while generating self-signed certificates. It is important to include any public facing IP addresse(s) (e.g., AWS, Azure and GCP environments) that is/are different from RDAF platform instance VM's ip addresses which are specified as part of the
rdaf setupcommand. Also, include the IP addresses of secondary NIC (if configured) of all RDAF platform VMs.
Tip
SANs (Subject alt names) also known as multi-domain certificates which allows to create a single unified SSL certificate which includes more than one Common Name (CN). Common Name can be an IP Address or DNS Name or a wildcard DNS Name (ex: *.acme.com)
Provide any Subject alt name(s) to be used while generating SAN certs
Subject alt name(s) for certs[]:
- Enter RDAF Platform host(s) ip address or DNS name. For HA configuration, please enter comma separated values. Minimum of 2 hosts are required for the HA configuration. If it is a non-HA deployment, only one RDAF platform host's ip address or DNS name is required.
What are the host(s) on which you want the RDAF platform services to be installed?
Platform service host(s)[rda-platform-vm01]: 192.168.125.141,192.168.125.142
- Answer if the RDAF application services are going to be deployed in HA mode or standalone.
- Enter RDAF Application services host(s) ip address or DNS name. For HA configuration, please enter comma separated values. Minimum of 2 hosts or more are required for the HA configuration. If it is a non-HA deployment, only one RDAF application service host's ip address or DNS name is required.
What are the host(s) on which you want the application services to be installed?
Application service host(s)[rda-platform-vm01]: 192.168.125.143,192.168.125.144
- Enter the name of the Organization. In the below example,
ACME_IT_Servicesis used as the Organization name. It is for a reference only.
What is the organization you want to use for the admin user created?
Admin organization[CloudFabrix]: ACME_IT_Services
What is the ca cert to use to communicate to on-prem docker registry
Docker Registry CA cert path[]:
- Enter RDAF Worker service host(s) ip address or DNS name. For HA configuration, please enter comma separated values. Minimum of 2 hosts or more are required for the HA configuration. If it is a non-HA deployment, only one RDAF worker service host's ip address or DNS name is required.
What are the host(s) on which you want the Worker to be installed?
Worker host(s)[rda-platform-vm01]: 192.168.125.145
- Enter ip address on which RDAF Event Gateway needs to be Installed, For HA configuration please enter comma separated values. Minimum of 2 hosts or more are required for the HA configuration. If it is a non-HA deployment, only one RDAF Event Gateway host's ip address or DNS name is required.
What are the host(s) on which you want the Event Gateway to be installed?
Event Gateway host(s)[rda-platform-vm01]: 192.168.125.67
- Enter RDAF infrastructure service
NATshost(s) ip address or DNS name. For HA configuration, please enter comma separated values. Minimum of 2 hosts are required for theNATsHA configuration. If it is a non-HA deployment, only one RDAFNATsservice host's ip address or DNS name is required.
What is the "host/path-on-host" on which you want the Nats to be deployed?
Nats host/path[192.168.125.141]: 192.168.125.145,192.168.125.146
- Enter RDAF infrastructure service
Miniohost(s) ip address or DNS name. For HA configuration, please enter comma separated values. Minimum of 4 hosts are required for theMinioHA configuration. If it is a non-HA deployment, only one RDAFMinioservice host's ip address or DNS name is required.
What is the "host/path-on-host" where you want Minio to be provisioned?
Minio server host/path[192.168.125.141]: 192.168.125.145,192.168.125.146,192.168.125.147,192.168.125.148
- Change the default
Miniouser credentials if needed or press Enter to accept the defaults.
What is the user name you want to give for Minio root user that will be created and used by the RDAF platform?
Minio user[rdafadmin]:
What is the password you want to use for the newly created Minio root user?
Minio password[Q8aJ63PT]:
- Enter RDAF infrastructure service
MariDBdatabase host(s) ip address or DNS name. For HA configuration, please enter comma separated values. Minimum of 3 hosts are required for theMariDBdatabase HA configuration. If it is a non-HA deployment, only one RDAFMariaDBservice host's ip address or DNS name is required.
What is the "host/path-on-host" on which you want the MariaDB server to be provisioned?
MariaDB server host/path[192.168.125.141]: 192.168.125.145,192.168.125.146,192.168.125.147
- Change the default
MariaDBuser credentials if needed or press Enter to accept the defaults.
What is the user name you want to give for MariaDB admin user that will be created and used by the RDAF platform?
MariaDB user[rdafadmin]:
What is the password you want to use for the newly created MariaDB root user?
MariaDB password[jffqjAaZ]:
- Enter RDAF infrastructure service
Opensearchhost(s) ip address or DNS name. For HA configuration, please enter comma separated values. Minimum of 3 hosts are required for theOpensearchHA configuration. If it is a non-HA deployment, only one RDAFOpensearchservice host's ip address or DNS name is required.
What is the "host/path-on-host" on which you want the opensearch server to be provisioned?
opensearch server host/path[192.168.125.141]: 192.168.125.145,192.168.125.146,192.168.125.147
- Change the default
Opensearchuser credentials if needed or press Enter to accept the defaults.
What is the user name you want to give for Opensearch admin user that will be created and used by the RDAF platform?
Opensearch user[rdafadmin]:
What is the password you want to use for the newly created Opensearch admin user?
Opensearch password[sLmr4ICX]:
- Enter RDAF infrastructure service
Kafkahost(s) ip address or DNS name. For HA configuration, please enter comma separated values. Minimum of 3 hosts are required for theKafkaHA configuration. If it is a non-HA deployment, only one RDAFKafkaservice host's ip address or DNS name is required.
What is the "host/path-on-host" on which you want the Kafka server to be provisioned?
Kafka server host/path[192.168.125.141]: 192.168.125.145,192.168.125.146,192.168.125.147
- Enter RDAF infrastructure service
GraphDBhost(s) ip address or DNS name. For HA configuration, please enter comma separated values. Minimum of 3 hosts are required for theGraphDBHA configuration. If it is a non-HA deployment, only one RDAFGraphDBservice host's ip address or DNS name is required.
What is the "host/path-on-host" on which you want the GraphDB to be deployed?
GraphDB host/path[192.168.125.141]: 192.168.125.145,192.168.125.146,192.168.125.147
- Enter RDAF infrastructure service
HAProxy(load-balancer) host(s) ip address or DNS name. For HA configuration, please enter comma separated values. Minimum of 2 hosts are required for theHAProxyHA configuration. If it is a non-HA deployment, only one RDAFHAProxyservice host's ip address or DNS name is required.
What is the host on which you want HAProxy to be provisioned?
HAProxy host[192.168.125.141]: 192.168.125.145,192.168.125.146
- Select the network interface name which is used for UI portal access. Ex:
eth0orens160etc.
What is the network interface on which you want the rdaf to be accessible externally?
Advertised external interface[eth0]: ens160
- Enter the
HAProxyservice's virtual IP address when it is configured in HA configuration. Virtual IP address should be an unused IP address. This step is not applicable whenHAProxyservice is deployed in non-HA configuration.
What is the host on which you want the platform to be externally accessible?
Advertised external host[192.168.125.143]: 192.168.125.149
- Enter the ip address of the Internal accessible advertised host
Note
Internal advertized host ip is only needed when RDA Fabric VMs are configured with dual NIC interfaces, one is for management network for UI access, second one is for internal app to app communication using non-routable ip address network scheme which is isolated from management network.
Dual network configuration is primarily used to support DR solution where the RDA Fabric VMs are replicated from one site to another site using VM level replication or underlying storage array replication (volume to volume or LUN to LUN on which RDA Fabric VMs are hosted). When RDA Fabric VMs are recovered on a DR site, management network IPs need be changed as per DR site network's subnet, while secondary NIC's ip address scheme can be maintained with same as primary site to avoid RDA Fabric's application reconfiguration.
After entering the required inputs as above, rdaf setup generates self-signed SSL certificates, creates the required directory structure, configures SSH key based authentication on all of the RDAF hosts and generates rdaf.cfg configuration file under /opt/rdaf directory.
It creates the below director structure on all of the RDAF hosts.
- /opt/rdaf/cert: It contains the generated self-signed SSL certificates for all of the RDAF hosts.
- /opt/rdaf/config: It contains the required configuration file for each deployed RDAF service where applicable.
- /opt/rdaf/data: It contains the persistent data for some of the RDAF services.
- /opt/rdaf/deployment-scripts: It contains the docker-compose
.ymlfile of the services that are configured to be provisioned on RDAF host. - /opt/rdaf/logs: It contains the RDAF services log files.
8.5 RDAF Infra Services Installation
Note
Starting from version 1.0.4 onwards, MetalLB Installation is mandatory. These MetalLB Steps are applicable only for Kubernetes.
-
For Online Installation Please Click Here
-
For Offiine Installation Please Click Here
rdafk8s infra install command is used to deploy / install RDAF infrastructure services on Kubernetes Cluster.
Run the below command to deploy all RDAF infrastructure services. (Note: Below shown tag name is a sample one for a reference only, for actual tag, please contact CloudFabrix support team at support@cloudfabrix.com.)
Run the below command to install a specific RDAF infrastructure service. Below are the supported infrastructure services.
- haproxy
- nats
- mariadb
- opensearch
- kafka
- graphdb
Note
This step is optional. Customers who wish to install qdrant service needs to mount a 10GB disk and can run the below command for HA. It will prompt for the deployment IPs, so please make sure to assign 3 IPs for the infrastructure VMs. For Non-HA Please assign one Infra VM IP.
1.5.1 Status check
Run the below command to see the status of all of the deployed RDAF infrastructure services.
+-----------------------+----------------+----------------+--------------+------------------------------+
| Name                  | Host           | Status         | Container Id | Tag                          |
+-----------------------+----------------+----------------+--------------+------------------------------+
| haproxy               | 192.168.108.31 | Up 3 hours     | 217fe8852f2d | 1.0.4                        |
| rda-nats              | 192.168.108.31 | Up 3 Hours ago | 58cf96d50a3c | 1.0.4                        |
| rda-minio             | 192.168.108.31 | Up 3 Hours ago | 6704c211e803 | RELEASE.2024-12-18T13-15-44Z |
| rda-mariadb           | 192.168.108.31 | Up 3 Hours ago | d83f0e0e3c0c | 1.0.4                        |
| rda-opensearch        | 192.168.108.31 | Up 3 Hours ago | f36fd18bc397 | 1.0.4                        |
| rda-kafka-controller  | 192.168.108.31 | Up 3 Hours ago | 0bb0d3e6580a | 1.0.4                        |
| rda-graphdb[operator] | 192.168.108.31 | Up 3 Hours ago | 2491c9e12c53 | 1.0.4                        |
| rda-graphdb[server]   | 192.168.108.31 | Up 3 Hours ago | 98a139960fbd | 1.0.4                        |
+-----------------------+----------------+----------------+--------------+------------------------------+
Below are the Kubernetes Cluster kubectl get pods commands to check the status of RDA Fabric infrastructure services.
NAME                            READY   STATUS    RESTARTS        AGE
opensearch-cluster-master-0     1/1     Running   0               7m12s
rda-kafka-0                     1/1     Running   2 (5m26s ago)   7m10s
rda-kafka                       1/1     Running   0               7m10s
rda-mariadb-mariadb-galera-0    1/1     Running   0               8m8s
rda-minio-65f755bb5f-9tjdm      1/1     Running   0               8m25s
rda-nats-0                      3/3     Running   0               8m57s
rda-nats-box-7b7b46969b-79lnf   1/1     Running   0               8m57s
Below kubectl get pods command provides additional details of deployed RDAF Infrastructure services (PODs) along with their worker node(s) on which they were deployed.
In order to get detailed status of the each RDAF Infrastructure service POD, run the below kubectl describe pod command.
Name:         rda-nats-0
Namespace:    rda-fabric
Priority:     0
Node:         k8rdapfm01/192.168.125.45
Start Time:   Sun, 12 Feb 2023 00:36:39 +0000
Labels:       app=rda-fabric-services
                app_category=rdaf-infra
                app_component=rda-nats
                controller-revision-hash=rda-nats-64747cd755
...
...
Events:
Type    Reason     Age   From               Message
----    ------     ----  ----               -------
Normal  Scheduled  10m   default-scheduler  Successfully assigned rda-fabric/rda-nats-0 to k8rdapfm01
Normal  Pulling    10m   kubelet            Pulling image "192.168.125.140:5000/rda-platform-nats:1.0.4"
Normal  Pulled     10m   kubelet            Successfully pulled image "192.168.125.140:5000/rda-platform-nats:1.0.4" in 3.102792187s
Normal  Created    10m   kubelet            Created container nats
Note
Below steps are applicable only if RDAF Application (OIA) services are going to be installed.
- Run the below command to update the necessary HAProxy load-balancer configuration for RDAF OIA application services.
After deploying the RDAF OIA application services, it is mandatory to run the rdaf app update-config which will apply and restart the HAProxy load-balancer service automatically.
rdaf infra install command is used to deploy / install RDAF infrastructure services.
Run the below command to deploy all RDAF infrastructure services.
It deploys the below RDAF Infrastructure services.
- haproxy
- nats
- mariadb
- opensearch
- kafka
- graphdb
- qdrant (optional)
Note
This step is optional. Customers who wish to install qdrant service needs to mount a 10GB disk and can run the below command for HA. It will prompt for the deployment IPs, so please make sure to assign 3 IPs for the infrastructure VMs. For Non-HA Please assign one Infra VM IP.
1.5.1 Status check
Run the below command to see the status of all of the deployed RDAF infrastructure services.
+-----------------------+--------------+----------------+--------------+--------------------------------+
| Name                  | Host         | Status         | Container Id | Tag                            |
+-----------------------+--------------+----------------+--------------+--------------------------------+
| haproxy               | 192.168.108.31 | Up 3 hours     | 217fe8852f2d | 1.0.4                        |
| rda-nats              | 192.168.108.31 | Up 3 Hours ago | 58cf96d50a3c | 1.0.4                        |
| rda-minio             | 192.168.108.31 | Up 3 Hours ago | 6704c211e803 | RELEASE.2024-12-18T13-15-44Z |
| rda-mariadb           | 192.168.108.31 | Up 3 Hours ago | d83f0e0e3c0c | 1.0.4                        |
| rda-opensearch        | 192.168.108.31 | Up 3 Hours ago | f36fd18bc397 | 1.0.4                        |
| rda-kafka-controller  | 192.168.108.31 | Up 3 Hours ago | 0bb0d3e6580a | 1.0.4                        |
| rda-graphdb[operator] | 192.168.108.31 | Up 3 Hours ago | 2491c9e12c53 | 1.0.4                        |
| rda-graphdb[server]   | 192.168.108.31 | Up 3 Hours ago | 98a139960fbd | 1.0.4                        |
+-----------------------+--------------+----------------+--------------+------------------------------+
Check Infra services liveness / health status
Run the below command to verify RDAF infrastructure service's liveness / health status. This command helps to quickly identify any infrastructure service's availability or accessibility issues.
+----------------+-----------------+--------+------------------------------+----------------+--------------+
| Name           | Check           | Status | Reason                       | Host           | Container Id |
+----------------+-----------------+--------+------------------------------+----------------+--------------+
| haproxy        | Port Connection | OK     | N/A                          | 192.168.107.63 | a78256a09ee6 |
| haproxy        | Service Status  | OK     | N/A                          | 192.168.107.63 | a78256a09ee6 |
| haproxy        | Firewall Port   | OK     | N/A                          | 192.168.107.63 | a78256a09ee6 |
| haproxy        | Port Connection | OK     | N/A                          | 192.168.107.64 | 968fe5c56865 |
| haproxy        | Service Status  | OK     | N/A                          | 192.168.107.64 | 968fe5c56865 |
| haproxy        | Firewall Port   | OK     | N/A                          | 192.168.107.64 | 968fe5c56865 |
| keepalived     | Service Status  | OK     | N/A                          | 192.168.107.63 | N/A          |
| keepalived     | Service Status  | OK     | N/A                          | 192.168.107.64 | N/A          |
| nats           | Port Connection | OK     | N/A                          | 192.168.107.63 | ca708ba9a4ae |
| nats           | Service Status  | OK     | N/A                          | 192.168.107.63 | ca708ba9a4ae |
| nats           | Firewall Port   | OK     | N/A                          | 192.168.107.63 | ca708ba9a4ae |
+----------------+-----------------+--------+------------------------------+----------------+--------------+
Note
Below steps are applicable only if RDAF Application (OIA) services are going to be installed.
- Run the below command to update the necessary HAProxy load-balancer configuration for RDAF OIA application services.
After deploying the RDAF OIA application services, it is mandatory to run the rdaf app update-config which will apply and restart the HAProxy load-balancer service automatically.
8.5.1 Install Nginx for External URL Access
Note
The below step is applicable only when a URL prefix is configured in "values.yaml" under portal backend section.
8.6 RDAF Platform Services Installation
rdafk8s platform install command is used to deploy / install RDAF core platform services.
Run the below command to deploy all RDAF core platform services. (Note: Below shown tag name is a sample one for a reference only, for actual tag, please contact CloudFabrix support team at support@cloudfabrix.com)
As part of the installation of RDAF core platform services, it creates a default tenant admin user called admin@cfx.com
The default password for admin@cfx.com is admin1234
On first login onto RDAF UI portal, it prompts for resetting the above default password to user's choice.
In order to access RDAF UI portal, open a web browser and type the HAProxy server's IP address if it is a non-HA deployment or HAProxy server's virtual IP address if it is an HA deployment as shown below.
Status check
Run the below command to see the status of all of the deployed RDAF core platform services.
+---------------------+----------------+---------------+----------------+--------+
| Name                | Host           | Status        | Container Id   | Tag    |
+---------------------+----------------+---------------+----------------+--------+
| rda-api-server      | 192.168.131.46 | Up 1 Days ago | faf4cdd79dd4   | 8.2.1  |
| rda-api-server      | 192.168.131.44 | Up 1 Days ago | 409c81c1000d   | 8.2.1  |
| rda-registry        | 192.168.131.46 | Up 1 Days ago | fa2682e9f7bb   | 8.2.1  |
| rda-registry        | 192.168.131.45 | Up 1 Days ago | 91eca9476848   | 8.2.1  |
| rda-identity        | 192.168.131.46 | Up 1 Days ago | 4e5e337eabe7   | 8.2.1  |
| rda-identity        | 192.168.131.44 | Up 1 Days ago | b10571cfa217   | 8.2.1  |
| rda-fsm             | 192.168.131.44 | Up 1 Days ago | 1cea17b4d5e0   | 8.2.1  |
| rda-fsm             | 192.168.131.46 | Up 1 Days ago | ac34fce6b2aa   | 8.2.1  |
| rda-chat-helper     | 192.168.131.45 | Up 1 Days ago | ea083e20a082   | 8.2.1  |
+---------------------+----------------+---------------+----------------+--------+
Below are the Kubernetes Cluster kubectl commands to check the status of RDA Fabric core platform services.
NAME                                    READY   STATUS    RESTARTS   AGE
rda-access-manager-668d68bb67-tks95     1/1     Running   0          11d
rda-api-server-b6c888bdd-nv4jm          1/1     Running   0          11d
rda-asset-dependency-7969f7b657-cmx24   1/1     Running   0          11d
rda-collector-6bd6c79475-52hvg          1/1     Running   0          11d
rda-identity-679864f487-74xtd           1/1     Running   0          11d
rda-portal-59dbd8cc6d-b2sfn             2/2     Running   0          11d
rda-registry-7767f58949-jw6s8           1/1     Running   0          11d
rda-resource-manager-84c9995887-bmzw4   1/1     Running   0          11d
rda-scheduler-5b87b9798f-fxztt          1/1     Running   0          11d
rda-user-preferences-7469dfb75d-b4l5r   1/1     Running   0          11d
Below kubectl get pods command provides additional details of deployed RDAF core platform services (PODs) along with their worker node(s) on which they were deployed.
In order to get detailed status of the each RDAF core platform service POD, run the below kubectl describe pod command.
Name:         rda-collector-6bd6c79475-52hvg
Namespace:    rda-fabric
Priority:     0
Node:         rda-k8-cluster-infra10819/192.168.108.19
Start Time:   Tue, 31 Jan 2023 05:00:57 +0000
Labels:       app=rda-fabric-services
                app_category=rdaf-platform
                app_component=rda-collector
                pod-template-hash=6bd6c79475
...
...
QoS Class:                   Burstable
Node-Selectors:              rdaf_platform_services=allow
Tolerations:                 node.kubernetes.io/not-ready:NoExecute op=Exists for 300s
                            node.kubernetes.io/unreachable:NoExecute op=Exists for 300s
                            pod-type=rda-tenant:NoSchedule
Events:                      <none>
rdaf platform install command is used to deploy / install RDAF core platform services.
Run the below command to deploy all RDAF core platform services.
As part of the installation of RDAF core platform services, it creates a default tenant admin user called admin@cfx.com
The default password for admin@cfx.com is admin1234
On first login onto RDAF UI portal, it prompts for resetting the above default password to user's choice.
In order to access RDAF UI portal, open a web browser and type the HAProxy server's IP address if it is a non-HA deployment or HAProxy server's virtual IP address if it is an HA deployment as shown below.
Status check
Run the below command to see the status of all of the deployed RDAF infrastructure services.
+--------------------------+----------------+------------+--------------+--------+
| Name                     | Host           | Status     | Container Id | Tag    |
+--------------------------+----------------+------------+--------------+--------+
| rda_api_server           | 192.168.107.61 | Up 5 hours | 6fc70d6b82aa | 8.2.1  |
| rda_api_server           | 192.168.107.62 | Up 5 hours | afa31a2c614b | 8.2.1  |
| rda_registry             | 192.168.107.61 | Up 5 hours | 9f8adbb08b95 | 8.2.1  |
| rda_registry             | 192.168.107.62 | Up 5 hours | cc8e5d27eb0a | 8.2.1  |
| rda_scheduler            | 192.168.107.61 | Up 5 hours | f501e240e7a3 | 8.2.1  |
| rda_scheduler            | 192.168.107.62 | Up 5 hours | c5b2b258efe1 | 8.2.1  |
| rda_collector            | 192.168.107.61 | Up 5 hours | 2260fc37ebe5 | 8.2.1  |
| rda_collector            | 192.168.107.62 | Up 5 hours | 3e7ab4518394 | 8.2.1  |
+--------------------------+----------------+------------+--------------+--------+
8.7 External Opensearch Setup (Optional)
RDAF Platform supports deploying a dedicated OpenSearch cluster to efficiently store and manage time-series data such as metrics, logs, and events data. While configuring an external OpenSearch cluster is optional, it is highly recommended for production environments to ensure optimal performance and scalability. In such deployments, OpenSearch plays a crucial role in performance management by ingesting and indexing large volumes of time-series data. Additionally, leveraging a dedicated OpenSearch cluster allows organizations to retain data for extended periods, enabling deeper historical analysis and more effective long-term observability.
OpenSearch clusters consist of different node roles, each serving a specific function to optimize performance, scalability, and fault tolerance.
Master Node:
- Manages the cluster state, including index creation, settings, and shard allocation.
- Handles node discovery, failover, and election processes.
- It is recommended to have at least three dedicated master nodes for high availability.
Coordinator Node:
- Acts as a load balancer, distributing query requests across data nodes.
- Handles query parsing and merging of results before returning to the client.
- Improves cluster performance by offloading query coordination from data nodes.
Data Node:
- Stores and manages indexed data and processes search and aggregation queries.
- Handles shard allocation, replication, and indexing operations.
- Requires adequate storage, memory, and CPU for optimal performance.
Note
In the RDAF platform, the default OpenSearch cluster deployment consists of a 3-node setup, where each node serves as a Master, Coordinator, and Data node. This configuration provides a balanced approach for small to mid-scale deployments.
For large-scale performance data management use cases, these node roles can be deployed separately to optimize cluster efficiency, scalability, and reliability. Dedicated Master, Coordinator, and Data nodes ensure better workload distribution, improved fault tolerance, and enhanced search and indexing performance.
OpenSearch clusters scale horizontally to support growing workloads. For high availability and fault tolerance, OpenSearch allows tagging nodes with a zone attribute, where each zone represents an availability zone. This ensures that primary and replica shards are not placed in the same availability zone, reducing the risk of data loss in case of a failure.
OpenSearch automatically distributes primary and replica shards across availability zones to maintain data redundancy and ensure continued operations even if one availability zone becomes unavailable.
For optimal resilience, it is recommended to distribute OpenSearch master, co-ordinator and data nodes across at least three availability zones or more.
When deploying an OpenSearch cluster on-premise, each Physical Server, Hypervisor, or Rack can be treated as an availability zone. OpenSearch nodes that are tagged with an availability zone attribute, should be provisioned accordingly on the underlying Hypervisor or Physical Servers. This ensures that failures at the hardware or hypervisor level do not impact the availability of the entire cluster.
Note
The availability zone attribute tagging is applicable only to Data Nodes to ensure that primary and replica shards are distributed across different availability zones.
Pre-Requisites
- For Opensearch cluster deployment, VMs need to be provisioned, Please refer RDAF platform VMs deployment using OVF or RDAF Platform VMs deployment on RHEL/Ubuntu OS/Rocky Linux sections.
- If you use OVF option, please chose RDA Fabric Platform Instance as the deployment profile.
- Please add an additional disk for Opensearch cluster node data and mount it as /opensearch
- The VMs should be added as K8s worker nodes and should be in Ready state.
- For Opensearch cluster deployment, VMs need to be provisioned, Please refer RDAF platform VMs deployment using OVF or RDAF Platform VMs deployment on RHEL/Ubuntu OS/Rocky Linux sections.
- If you use OVF option, please chose RDA Fabric Platform Instance as the deployment profile.
- Please add an additional disk for Opensearch cluster node data and mount it as /opensearch
External Opensearch Cluster Setup
- Please use the command below to setup external Opensearch cluster configuration.
Note
Please note that, in the output of the command below, the OpenSearch cluster client host is essentially the same as the OpenSearch cluster coordinator host.
What is the SSH password for the SSH user used to communicate between hosts
SSH password:
Re-enter SSH password:
What is the host(s) for cluster manager?
opensearch cluster manager host(s)[]: 192.168.125.45,192.168.125.46,192.168.125.47
What is the host(s) for cluster clients?
opensearch cluster client host(s)[]: 192.168.125.45,192.168.125.46,192.168.125.47
Do you want to configure cluster zoning? [yes/No]: yes
Please specify the number of zones to be configured
Number of Zones[2]: 3
What is the host(s) for data nodes in zone-0?
opensearch cluster data host(s) for zone-0[]: 192.168.125.45
What is the host(s) for data nodes in zone-1?
opensearch cluster data host(s) for zone-1[]: 192.168.125.46
What is the host(s) for data nodes in zone-2?
opensearch cluster data host(s) for zone-2[]: 192.168.125.47
What is the user name you want to give for opensearch cluster admin user that will be created and used by the RDAF platform?
opensearch user[rdafadmin]:
What is the password you want to use for opensearch admin user?
opensearch password[7XvJqlSxTd]:
Re-enter opensearch password[7XvJqlSxTd]:
2024-11-29 04:11:02,810 [rdaf.component.opensearch_external] INFO     - Doing setup for opensearch_external
2024-11-29 04:11:14,079 [rdaf.component.opensearch_external] INFO     - Created opensearch external configuration at /opt/rdaf/config/opensearch_external/opensearch.yaml on 192.168.125.45
2024-11-29 04:11:14,410 [rdaf.component.opensearch_external] INFO     - Created opensearch external configuration at /opt/rdaf/config/opensearch_external/opensearch.yaml on 192.168.125133.46
2024-11-29 04:11:14,766 [rdaf.component.opensearch_external] INFO     - Created opensearch external configuration at /opt/rdaf/config/opensearch_external/opensearch.yaml on 192.168.125133.47
[+] Pulling 11/1149,181 [rdaf.component] INFO     -
✔ opensearch Pulled                                                      31.4s
...
2024-11-29 04:12:01,121 [rdaf.component.opensearch_external] INFO     - Setup completed successfully
- Please use the command below to install external Opensearch cluster
2024-12-03 04:54:48,530 [rdaf.component] INFO     - Pulling opensearch_external images on host 192.168.125.45
2024-12-03 04:54:48,918 [rdaf.component] INFO     - 1.0.4: Pulling from internal/rda-platform-opensearch
Digest: sha256:fc0c794872425d40b28549f254a4a4c79813960d4c4d1491a29a4cd955953983
Status: Image is up to date for docker2.cloudfabrix.io:443/internal/rda-platform-opensearch:1.0.4
docker2.cloudfabrix.io:443/internal/rda-platform-opensearch:1.0.4
2024-12-03 04:54:48,920 [rdaf.component] INFO     - Pulling opensearch_external images on host 192.168.125.46
2024-12-03 04:54:49,344 [rdaf.component] INFO     - 1.0.4: Pulling from internal/rda-platform-opensearch
Digest: sha256:fc0c794872425d40b28549f254a4a4c79813960d4c4d1491a29a4cd955953983
Status: Image is up to date for docker2.cloudfabrix.io:443/internal/rda-platform-opensearch:1.0.4
docker2.cloudfabrix.io:443/internal/rda-platform-opensearch:1.0.4
2024-12-03 04:54:49,346 [rdaf.component] INFO     - Pulling opensearch_external images on host 192.168.125.47
2024-12-03 04:54:49,741 [rdaf.component] INFO     - 1.0.4: Pulling from internal/rda-platform-opensearch
Digest: sha256:fc0c794872425d40b28549f254a4a4c79813960d4c4d1491a29a4cd955953983
Status: Image is up to date for docker2.cloudfabrix.io:443/internal/rda-platform-opensearch:1.0.4
docker2.cloudfabrix.io:443/internal/rda-platform-opensearch:1.0.4
[+] Running 1/14:51,842 [rdaf.component] INFO     -
✔ Container os_external-opensearch_external-1  Started                    0.2s
[+] Running 1/14:52,804 [rdaf.component] INFO     -
✔ Container os_external-opensearch_external-1  Started                    0.3s
...
...
2024-12-03 04:54:56,002 [rdaf.component.opensearch_external] INFO     - Updating policy.json with os_external endpoint.
- Run the command below to verify the external Opensearch cluster deployment status
+---------------------+----------------+----------------+--------------+-------+
| Name                | Host           | Status         | Container Id | Tag   |
+---------------------+----------------+----------------+--------------+-------+
| opensearch_external | 192.168.125.45 | Up 8 Weeks ago | 57d5a30ab896 | 1.0.4 |
| opensearch_external | 192.168.125.46 | Up 8 Weeks ago | 1654e0745ab4 | 1.0.4 |
| opensearch_external | 192.168.125.47 | Up 8 Weeks ago | 61f153a20e50 | 1.0.4 |
+---------------------+----------------+----------------+--------------+-------+
Warning
If external Opensearch cluster is deployed for an existing RDAF platform installation, please restart the below RDAF platform services. Please perform this activity during a maintenance window.
- rda-api-server
- rda-collector
- Please use the command below to setup external Opensearch cluster configuration.
Note
Please note that, in the output of the command below, the OpenSearch cluster client host is essentially the same as the OpenSearch cluster coordinator host.
What is the SSH password for the SSH user used to communicate between hosts
SSH password:
Re-enter SSH password:
What is the host(s) for cluster manager?
opensearch cluster manager host(s)[]: 192.168.125.45,192.168.125.46,192.168.125.47
What is the host(s) for cluster clients?
opensearch cluster client host(s)[]: 192.168.125.45,192.168.125.46,192.168.125.47
Do you want to configure cluster zoning? [yes/No]: yes
Please specify the number of zones to be configured
Number of Zones[2]: 3
What is the host(s) for data nodes in zone-0?
opensearch cluster data host(s) for zone-0[]: 192.168.125.45
What is the host(s) for data nodes in zone-1?
opensearch cluster data host(s) for zone-1[]: 192.168.125.46
What is the host(s) for data nodes in zone-2?
opensearch cluster data host(s) for zone-2[]: 192.168.125.47
What is the user name you want to give for opensearch cluster admin user that will be created and used by the RDAF platform?
opensearch user[rdafadmin]:
What is the password you want to use for opensearch admin user?
opensearch password[7XvJqlSxTd]:
Re-enter opensearch password[7XvJqlSxTd]:
2024-11-29 04:11:02,810 [rdaf.component.opensearch_external] INFO - Doing setup for opensearch_external
2024-11-29 04:11:14,079 [rdaf.component.opensearch_external] INFO - Created opensearch external configuration at /opt/rdaf/config/opensearch_external/opensearch.yaml on 192.168.125.45
2024-11-29 04:11:14,410 [rdaf.component.opensearch_external] INFO - Created opensearch external configuration at /opt/rdaf/config/opensearch_external/opensearch.yaml on 192.168.125133.46
2024-11-29 04:11:14,766 [rdaf.component.opensearch_external] INFO - Created opensearch external configuration at /opt/rdaf/config/opensearch_external/opensearch.yaml on 192.168.125133.47
[+] Pulling 11/1149,181 [rdaf.component] INFO -
✔ opensearch Pulled 31.4s
...
2024-11-29 04:12:01,121 [rdaf.component.opensearch_external] INFO - Setup completed successfully
- Please use the command below to install external Opensearch cluster
2026-04-07 07:18:32,619 [rdaf.component] INFO - Pulling opensearch_external images on host 192.168.108.126
2026-04-07 07:18:38,605 [rdaf.component] INFO - 1.0.4.1: Pulling from rda-platform-opensearch
Digest: sha256:77a51e7a48a6b6c949e0a9f029089187d0a3353e7826dfa7cfdec4b448020ba8
Status: Image is up to date for 192.168.108.122:5000/rda-platform-opensearch:1.0.4.1
192.168.108.122:5000/rda-platform-opensearch:1.0.4.1
2026-04-07 07:18:38,618 [rdaf.component] INFO - Pulling opensearch_external images on host 192.168.108.127
2026-04-07 07:19:02,960 [rdaf.component] INFO - 1.0.4.1: Pulling from rda-platform-opensearch
a60da04a601b: Pull complete
4c036822f697: Pull complete
4077e1cc9344: Pull complete
83ca2899e055: Pull complete
4f4fb700ef54: Pull complete
7d34d22a4931: Pull complete
002fbd2438c8: Pull complete
4b414e6c10ba: Pull complete
cd1570ec1e4a: Pull complete
21634b78ecb6: Pull complete
5808e503468a: Pull complete
9965b125177b: Pull complete
Digest: sha256:77a51e7a48a6b6c949e0a9f029089187d0a3353e7826dfa7cfdec4b448020ba8
Status: Downloaded newer image for 192.168.108.122:5000/rda-platform-opensearch:1.0.4.1
192.168.108.122:5000/rda-platform-opensearch:1.0.4.1
2026-04-07 07:19:02,973 [rdaf.component] INFO - Pulling opensearch_external images on host 192.168.108.128
2026-04-07 07:19:30,503 [rdaf.component] INFO - 1.0.4.1: Pulling from rda-platform-opensearch
a60da04a601b: Pull complete
4c036822f697: Pull complete
4077e1cc9344: Pull complete
83ca2899e055: Pull complete
4f4fb700ef54: Pull complete
7d34d22a4931: Pull complete
002fbd2438c8: Pull complete
4b414e6c10ba: Pull complete
cd1570ec1e4a: Pull complete
21634b78ecb6: Pull complete
5808e503468a: Pull complete
9965b125177b: Pull complete
Digest: sha256:77a51e7a48a6b6c949e0a9f029089187d0a3353e7826dfa7cfdec4b448020ba8
Status: Downloaded newer image for 192.168.108.122:5000/rda-platform-opensearch:1.0.4.1
192.168.108.122:5000/rda-platform-opensearch:1.0.4.1
[+] Running 1/10:02,167 [rdaf.component] INFO -
✔ Container os_external-opensearch_external-1 Started 0.2s
[+] Running 1/10:14,200 [rdaf.component] INFO -
✔ Container os_external-opensearch_external-1 Started 0.2s
[+] Running 1/10:27,508 [rdaf.component] INFO -
✔ Container os_external-opensearch_external-1 Started 0.2s
2026-04-07 07:20:27,534 [rdaf.component.opensearch_external] INFO - Updating config.json with os_external endpoint.
2026-04-07 07:20:27,539 [rdaf.component.platform] INFO - Creating directory /opt/rdaf/config/network_config
2026-04-07 07:20:39,336 [rdaf.component.platform] INFO - Creating directory /opt/rdaf/config/network_config
2026-04-07 07:20:50,830 [rdaf.component.platform] INFO - Creating directory /opt/rdaf/config/network_config
2026-04-07 07:21:02,422 [rdaf.component.platform] INFO - Creating directory /opt/rdaf/config/network_config
2026-04-07 07:21:13,594 [rdaf.component.opensearch_external] INFO - Updating policy.json with os_external endpoint.
- Run the command below to verify the external Opensearch cluster deployment status
+---------------------+---------------+----------------+--------------+-----------+
| Name | Host | Status | Container Id | Tag |
+---------------------+---------------+----------------+--------------+-----------+
| opensearch_external | 192.168.125.45 | Up 8 Weeks ago | 57d5a30ab896 | 1.0.4.1 |
| opensearch_external | 192.168.125.46 | Up 8 Weeks ago | 1654e0745ab4 | 1.0.4.1 |
| opensearch_external | 192.168.125.47 | Up 8 Weeks ago | 61f153a20e50 | 1.0.4.1 |
+---------------------+----------------+----------------+--------------+----------+
The resource settings for the external OpenSearch service, such as the memory limit for the service container and Java HEAP memory allocation, can be modified in the /opt/rdaf/deployment-scripts/opensearch-external-values.yaml file.
Note
The mem_limit and memswap_limit environment variables can be used to increase the memory allocated to the OpenSearch container service.
The OPENSEARCH_JAVA_OPTS environment variable is used to configure Java HEAP memory for OpenSearch. In production environments, it should be allocated at least 50% of the OpenSearch container service's allocated memory and should not exceed slightly less than 32GB to optimize performance. It is applicable to all Opensearch master, co-ordinator and data nodes.
For appropriate OpenSearch cluster resource sizing in production environments, please contact the CloudFabrix support team.
- Run the command below to apply the updated configuration from the
/opt/rdaf/deployment-scripts/opensearch-external-values.yamlfile.
Note
Please use the same existing tag version to apply the updated configuration.
Warning
If external Opensearch cluster is deployed for an existing RDAF platform installation, please restart the below RDAF platform services. Please perform this activity during a maintenance window.
- rda_api_server
- rda_collector
For Pstream management using external Opensearch cluster, please refer Persistent Streams documentation.
8.8 RDAF Client (rdac) CLI Installation
rdafk8s rdac_cli command allows you to install RDA client CLI utility which interacts with RDA Fabric services and operations.
- To install RDA client CLI, run the below command
- Run the below command to see RDA client CLI help and available subcommand options.
Run with one of the following commands
agent-bots List all bots registered by agents for the current tenant
agent-get-config Get Agent configuration
agents List all agents for the current tenant
alert-rules Alert Rule management commands
bot-catalog-generation-from-file Generate bot catalog for given sources
bot-package Bot Package management commands
bots-by-source List bots available for given sources
bundle-deploy Deploy artifacts from Bundle tar.gz file
chat Commands to interact with RDA Chat Bot
check-credentials Perform credential check for one or more sources on a worker pod
checksum Compute checksums for pipeline contents locally for a given JSON file
compare Commands to compare different RDA systems using different RDA Config files
content-to-object Convert data from a column into objects
copy-to-objstore Deploy files specified in a ZIP file to the Object Store
dashboard User defined dashboard management commands
dashgroup User defined dashboard-group management commands
dataset Dataset management commands
demo Demo related commands
deployment Service Blueprints (Deployments) management commands
event-gw-status List status of all ingestion endpoints at all the event gateways
evict Evict a job from a worker pod
file-ops Perform various operations on local files
file-to-object Convert files from a column into objects
fmt-template Formatting Templates management commands
fsm Commands to manage FSM objects, list FSM models and objects
gdb-create-alerts-relationship Create relationships for alerts data in GraphDB
gdb-create-index Create index in GraphDB
gdb-create-topology-relationships Create relationships for topology data in GraphDB
gdb-relations-add Add a new relations map for GraphDB
gdb-relations-delete Delete GraphDB Relations Map
gdb-relations-get Get GraphDB Relations Map
gdb-relations-list List GraphDB Relations Maps
gdb-upload-data Upload data from a file to GraphDB
gdb-upload-data-as-df Upload data as df
graphdb Commands to interact with GraphDB
healthcheck Perform healthcheck on each of the Pods
invoke-agent-bot Invoke a bot published by an agent
jobs List all jobs for the current tenant
logarchive Logarchive management commands
maintenance Commands to set and pods in maintenance mode.
msp Commands to manage Managed Service Provider environments
nats-request Send a nats request on a subject.
object RDA Object management commands
os-cluster Open Search Cluster management commands
output Get the output of a Job using jobid.
pack Commands to manage RDA Packages
pipeline Pipeline management commands
playground Start Webserver to access RDA Playground
pod-logging Commands to set and get logging configuration of pods.
pods List all pods for the current tenant
project Project management commands. Projects can be used to link different tenants / projects from this RDA Fabric or a remote RDA Fabric.
pstream Persistent Stream management commands
purge-outputs Purge outputs of completed jobs
qtemplate Commands to manage Query Templates
rda-app Commands to set and get app deployment type
read-stream Read messages from an RDA stream
reco-engine Recommendation Engine management commands
replay-stream Write data to the specified stream by loading data from a JSON file, at the specified rate
restore Commands to restore backed-up artifacts to an RDA Platform
run Run a pipeline on a worker pod
run-get-output Run a pipeline on a worker, and Optionally, wait for the completion, get the final output
schema Dataset Model Schema management commands
search-stream Perform a live search on an RDA Stream
secret Credentials (Secrets) management commands
set-pod-log-level Update the logging level for a given RDA Pod.
shell Start RDA Client interactive shell
site-profile Site Profile management commands
site-summary Show summary by Site and Overall
snapshot Commands to manage RDA Artifact Snapshots
stack Application Dependency Mapping (Stack) management commands
staging-area Staging Area based data ingestion management commands
subscription Show current CloudFabrix RDA subscription details
synthetics Data synthesizing management commands
usecase Commands to manage Usecases
verify-pipeline Verify the pipeline on a worker pod
viz Visualize data from a file within the console (terminal)
watch Commands to watch various streams such sas trace, logs and change notifications by microservices
web-server Start Webserver to access RDA Client data using REST APIs
worker-obj-info List all worker pods with their current Object Store configuration
write-stream Write data to the specified stream
positional arguments:
command RDA subcommand to run
optional arguments:
-h, --help show this help message and exit
Tip
Please refer RDA Client CLI Usage for detailed information.
- Set RDA Fabric platform's application configuration as
rdausing the below command.
Note
Other supported options for above command are below:
-
rda: Choose this option when only RDA Fabric platform need to be installed along with RDA Worker and RDA Event Gateway services without OIA (AIOps) application services. -
aiops: Choose this option when Operations Intelligence (OIA, a.k.a AIOps) application need to be installed. -
asset: Choose this option when Asset Intelligence (AIA) application need to be installed. (Note: AIA application type is deprecated and all of it's capabilities are available through base RDA Fabric platform itself. For more information, please contact cfx-support@cloudfabric.com) -
all: Choose this option, when all of the supported applications need to be installed.
- Please restart the RDAF Platform services using the below command.
- Run the below
rdac healthcheckcommand to check the health status of all of the RDAF core platform services.
All of the dependency checks should show as ok under Status column.
+-----------+----------------------------------------+--------------+----------+-------------+-----------------------------------------------------+----------+-------------------------------------------------------+
| Cat | Pod-Type | Host | ID | Site | Health Parameter | Status | Message |
|-----------+----------------------------------------+--------------+----------+-------------+-----------------------------------------------------+----------+-------------------------------------------------------|
| rda_infra | api-server | rda-api-serv | b1b910d9 | | service-status | ok | |
| rda_infra | api-server | rda-api-serv | b1b910d9 | | minio-connectivity | ok | |
| rda_app | asset-dependency | rda-asset-de | 090669bf | | service-status | ok | |
| rda_app | asset-dependency | rda-asset-de | 090669bf | | minio-connectivity | ok | |
| rda_app | authenticator | rda-identity | 57905b20 | | service-status | ok | |
| rda_app | authenticator | rda-identity | 57905b20 | | minio-connectivity | ok | |
| rda_app | authenticator | rda-identity | 57905b20 | | DB-connectivity | ok | |
| rda_app | cfxdimensions-app-access-manager | rda-access-m | 6338ad29 | | service-status | ok | |
| rda_app | cfxdimensions-app-access-manager | rda-access-m | 6338ad29 | | minio-connectivity | ok | |
| rda_app | cfxdimensions-app-access-manager | rda-access-m | 6338ad29 | | service-dependency:registry | ok | 1 pod(s) found for registry |
| rda_app | cfxdimensions-app-access-manager | rda-access-m | 6338ad29 | | service-initialization-status | ok | |
| rda_app | cfxdimensions-app-access-manager | rda-access-m | 6338ad29 | | DB-connectivity | ok | |
| rda_app | cfxdimensions-app-notification-service | rda-notifica | bb9e3e7b | | service-status | ok | |
| rda_app | cfxdimensions-app-notification-service | rda-notifica | bb9e3e7b | | minio-connectivity | ok | |
| rda_app | cfxdimensions-app-notification-service | rda-notifica | bb9e3e7b | | service-initialization-status | ok | |
| rda_app | cfxdimensions-app-notification-service | rda-notifica | bb9e3e7b | | DB-connectivity | ok | |
| rda_app | cfxdimensions-app-resource-manager | rda-resource | e5a28e16 | | service-status | ok | |
| rda_app | cfxdimensions-app-resource-manager | rda-resource | e5a28e16 | | minio-connectivity | ok | |
| rda_app | cfxdimensions-app-resource-manager | rda-resource | e5a28e16 | | service-dependency:registry | ok | 1 pod(s) found for registry |
| rda_app | cfxdimensions-app-resource-manager | rda-resource | e5a28e16 | | service-dependency:cfxdimensions-app-access-manager | ok | 1 pod(s) found for cfxdimensions-app-access-manager |
| rda_app | cfxdimensions-app-resource-manager | rda-resource | e5a28e16 | | service-initialization-status | ok | |
| rda_app | cfxdimensions-app-resource-manager | rda-resource | e5a28e16 | | DB-connectivity | ok | |
| rda_infra | collector | rda-collecto | 99553e51 | | service-status | ok | |
| rda_infra | collector | rda-collecto | 99553e51 | | minio-connectivity | ok | |
| rda_infra | collector | rda-collecto | 99553e51 | | opensearch-connectivity:default | ok | |
| rda_infra | registry | rda-registry | a46cd712 | | service-status | ok | |
| rda_infra | registry | rda-registry | a46cd712 | | minio-connectivity | ok | |
| rda_infra | scheduler | rda-schedule | d5537051 | | service-status | ok | |
| rda_infra | scheduler | rda-schedule | d5537051 | | minio-connectivity | ok | |
| rda_infra | scheduler | rda-schedule | d5537051 | | DB-connectivity | ok | |
| rda_app | user-preferences | rda-user-pre | fd09d3ba | | service-status | ok | |
| rda_app | user-preferences | rda-user-pre | fd09d3ba | | minio-connectivity | ok | |
| rda_app | user-preferences | rda-user-pre | fd09d3ba | | service-dependency:registry | ok | 1 pod(s) found for registry |
| rda_app | user-preferences | rda-user-pre | fd09d3ba | | service-initialization-status | ok | |
| rda_app | user-preferences | rda-user-pre | fd09d3ba | | DB-connectivity | ok | |
+-----------+----------------------------------------+--------------+----------+-------------+-----------------------------------------------------+----------+-------------------------------------------------------+
rdaf rdac_cli command allows you to install RDA client CLI utility which interacts with RDA Fabric services and operations.
- To install RDA client CLI, run the below command
- Run the below command to see RDA client CLI help and available subcommand options.
Run with one of the following commands
agent-bots List all bots registered by agents for the current tenant
agent-get-config Get Agent configuration
agents List all agents for the current tenant
alert-rules Alert Rule management commands
bot-catalog-generation-from-file Generate bot catalog for given sources
bot-package Bot Package management commands
bots-by-source List bots available for given sources
bundle-deploy Deploy artifacts from Bundle tar.gz file
chat Commands to interact with RDA Chat Bot
check-credentials Perform credential check for one or more sources on a worker pod
checksum Compute checksums for pipeline contents locally for a given JSON file
compare Commands to compare different RDA systems using different RDA Config files
content-to-object Convert data from a column into objects
copy-to-objstore Deploy files specified in a ZIP file to the Object Store
dashboard User defined dashboard management commands
dashgroup User defined dashboard-group management commands
dataset Dataset management commands
demo Demo related commands
deployment Service Blueprints (Deployments) management commands
event-gw-status List status of all ingestion endpoints at all the event gateways
evict Evict a job from a worker pod
file-ops Perform various operations on local files
file-to-object Convert files from a column into objects
fmt-template Formatting Templates management commands
fsm Commands to manage FSM objects, list FSM models and objects
gdb-create-alerts-relationship Create relationships for alerts data in GraphDB
gdb-create-index Create index in GraphDB
gdb-create-topology-relationships Create relationships for topology data in GraphDB
gdb-relations-add Add a new relations map for GraphDB
gdb-relations-delete Delete GraphDB Relations Map
gdb-relations-get Get GraphDB Relations Map
gdb-relations-list List GraphDB Relations Maps
gdb-upload-data Upload data from a file to GraphDB
gdb-upload-data-as-df Upload data as df
graphdb Commands to interact with GraphDB
healthcheck Perform healthcheck on each of the Pods
invoke-agent-bot Invoke a bot published by an agent
jobs List all jobs for the current tenant
logarchive Logarchive management commands
maintenance Commands to set and pods in maintenance mode.
msp Commands to manage Managed Service Provider environments
nats-request Send a nats request on a subject.
object RDA Object management commands
os-cluster Open Search Cluster management commands
output Get the output of a Job using jobid.
pack Commands to manage RDA Packages
pipeline Pipeline management commands
playground Start Webserver to access RDA Playground
pod-logging Commands to set and get logging configuration of pods.
pods List all pods for the current tenant
project Project management commands. Projects can be used to link different tenants / projects from this RDA Fabric or a remote RDA Fabric.
pstream Persistent Stream management commands
purge-outputs Purge outputs of completed jobs
qtemplate Commands to manage Query Templates
rda-app Commands to set and get app deployment type
read-stream Read messages from an RDA stream
reco-engine Recommendation Engine management commands
replay-stream Write data to the specified stream by loading data from a JSON file, at the specified rate
restore Commands to restore backed-up artifacts to an RDA Platform
run Run a pipeline on a worker pod
run-get-output Run a pipeline on a worker, and Optionally, wait for the completion, get the final output
schema Dataset Model Schema management commands
search-stream Perform a live search on an RDA Stream
secret Credentials (Secrets) management commands
set-pod-log-level Update the logging level for a given RDA Pod.
shell Start RDA Client interactive shell
site-profile Site Profile management commands
site-summary Show summary by Site and Overall
snapshot Commands to manage RDA Artifact Snapshots
stack Application Dependency Mapping (Stack) management commands
staging-area Staging Area based data ingestion management commands
subscription Show current CloudFabrix RDA subscription details
synthetics Data synthesizing management commands
usecase Commands to manage Usecases
verify-pipeline Verify the pipeline on a worker pod
viz Visualize data from a file within the console (terminal)
watch Commands to watch various streams such sas trace, logs and change notifications by microservices
web-server Start Webserver to access RDA Client data using REST APIs
worker-obj-info List all worker pods with their current Object Store configuration
write-stream Write data to the specified stream
positional arguments:
command RDA subcommand to run
optional arguments:
-h, --help show this help message and exit
Tip
Please refer RDA Client CLI Usage for detailed information.
- Set RDA Fabric platform's application configuration as
rdausing the below command.
Note
Other supported options for above command are below:
-
rda: Choose this option when only RDA Fabric platform need to be installed along with RDA Worker and RDA Event Gateway services without OIA (AIOps) application services. -
aiops: Choose this option when Operations Intelligence (OIA, a.k.a AIOps) application need to be installed. -
asset: Choose this option when Asset Intelligence (AIA) application need to be installed. (Note: AIA application type is deprecated and all of it's capabilities are available through base RDA Fabric platform itself. For more information, please contact cfx-support@cloudfabric.com) -
all: Choose this option, when all of the supported applications need to be installed.
- Please restart the RDAF Platform services using the below command.
- Run the below
rdac healthcheckcommand to check the health status of all of the RDAF core platform services.
All of the dependency checks should show as ok under Status column.
+-----------+----------------------------------------+--------------+----------+-------------+-----------------------------------------------------+----------+-------------------------------------------------------+
| Cat | Pod-Type | Host | ID | Site | Health Parameter | Status | Message |
|-----------+----------------------------------------+--------------+----------+-------------+-----------------------------------------------------+----------+-------------------------------------------------------|
| rda_infra | api-server | rda-api-serv | b1b910d9 | | service-status | ok | |
| rda_infra | api-server | rda-api-serv | b1b910d9 | | minio-connectivity | ok | |
| rda_app | asset-dependency | rda-asset-de | 090669bf | | service-status | ok | |
| rda_app | asset-dependency | rda-asset-de | 090669bf | | minio-connectivity | ok | |
| rda_app | authenticator | rda-identity | 57905b20 | | service-status | ok | |
| rda_app | authenticator | rda-identity | 57905b20 | | minio-connectivity | ok | |
| rda_app | authenticator | rda-identity | 57905b20 | | DB-connectivity | ok | |
| rda_app | cfxdimensions-app-access-manager | rda-access-m | 6338ad29 | | service-status | ok | |
| rda_app | cfxdimensions-app-access-manager | rda-access-m | 6338ad29 | | minio-connectivity | ok | |
| rda_app | cfxdimensions-app-access-manager | rda-access-m | 6338ad29 | | service-dependency:registry | ok | 1 pod(s) found for registry |
| rda_app | cfxdimensions-app-access-manager | rda-access-m | 6338ad29 | | service-initialization-status | ok | |
| rda_app | cfxdimensions-app-access-manager | rda-access-m | 6338ad29 | | DB-connectivity | ok | |
| rda_app | cfxdimensions-app-notification-service | rda-notifica | bb9e3e7b | | service-status | ok | |
| rda_app | cfxdimensions-app-notification-service | rda-notifica | bb9e3e7b | | minio-connectivity | ok | |
| rda_app | cfxdimensions-app-notification-service | rda-notifica | bb9e3e7b | | service-initialization-status | ok | |
| rda_app | cfxdimensions-app-notification-service | rda-notifica | bb9e3e7b | | DB-connectivity | ok | |
| rda_app | cfxdimensions-app-resource-manager | rda-resource | e5a28e16 | | service-status | ok | |
| rda_app | cfxdimensions-app-resource-manager | rda-resource | e5a28e16 | | minio-connectivity | ok | |
| rda_app | cfxdimensions-app-resource-manager | rda-resource | e5a28e16 | | service-dependency:registry | ok | 1 pod(s) found for registry |
| rda_app | cfxdimensions-app-resource-manager | rda-resource | e5a28e16 | | service-dependency:cfxdimensions-app-access-manager | ok | 1 pod(s) found for cfxdimensions-app-access-manager |
| rda_app | cfxdimensions-app-resource-manager | rda-resource | e5a28e16 | | service-initialization-status | ok | |
| rda_app | cfxdimensions-app-resource-manager | rda-resource | e5a28e16 | | DB-connectivity | ok | |
| rda_infra | collector | rda-collecto | 99553e51 | | service-status | ok | |
| rda_infra | collector | rda-collecto | 99553e51 | | minio-connectivity | ok | |
| rda_infra | collector | rda-collecto | 99553e51 | | opensearch-connectivity:default | ok | |
| rda_infra | registry | rda-registry | a46cd712 | | service-status | ok | |
| rda_infra | registry | rda-registry | a46cd712 | | minio-connectivity | ok | |
| rda_infra | scheduler | rda-schedule | d5537051 | | service-status | ok | |
| rda_infra | scheduler | rda-schedule | d5537051 | | minio-connectivity | ok | |
| rda_infra | scheduler | rda-schedule | d5537051 | | DB-connectivity | ok | |
| rda_app | user-preferences | rda-user-pre | fd09d3ba | | service-status | ok | |
| rda_app | user-preferences | rda-user-pre | fd09d3ba | | minio-connectivity | ok | |
| rda_app | user-preferences | rda-user-pre | fd09d3ba | | service-dependency:registry | ok | 1 pod(s) found for registry |
| rda_app | user-preferences | rda-user-pre | fd09d3ba | | service-initialization-status | ok | |
| rda_app | user-preferences | rda-user-pre | fd09d3ba | | DB-connectivity | ok | |
+-----------+----------------------------------------+--------------+----------+-------------+-----------------------------------------------------+----------+-------------------------------------------------------+
8.9 RDAF Worker Services Installation
rdafk8s worker install command is used to deploy / install RDAF worker services.
Run the below command to deploy all RDAF worker services. (Note: Below shown tag name is a sample one for a reference only, for actual tag, please contact CloudFabrix support team at support@cloudfabrix.com)
Status check
Run the below command to see the status of all of the deployed RDAF worker services.
+------------+-----------------+---------------+--------------+-----------------------+
| Name | Host | Status | Container Id | Tag |
+------------+-----------------+---------------+--------------+-----------------------+
| rda_worker | 192.168.125.149 | Up 18 seconds | 29cdeefd9d95 | 8.2.1 |
+------------+-----------------+---------------+--------------+-----------------------+
Below are the Kubernetes Cluster kubectl get pods commands to check the status of RDA Fabric worker services.
NAME READY STATUS RESTARTS AGE
rda-worker-749b977b95-cf757 1/1 Running 0 11d
rda-worker-749b977b95-xkb5w 1/1 Running 0 11d
Below kubectl get pods command provides additional details of deployed RDAF worker services (PODs) along with their worker node(s) on which they were deployed.
In order to get detailed status of the each RDAF worker service POD, run the below kubectl describe pod command.
Name: rda-worker-749b977b95-cf757
Namespace: rda-fabric
Priority: 0
Node: rda-k8-cluster-infra10820/192.168.108.20
Start Time: Tue, 31 Jan 2023 05:18:11 +0000
Labels: app=rda-fabric-services
app_category=rdaf-worker
app_component=rda-worker
pod-template-hash=749b977b95
...
...
QoS Class: Burstable
Node-Selectors: rdaf_worker_services=allow
Tolerations: node.kubernetes.io/not-ready:NoExecute op=Exists for 300s
node.kubernetes.io/unreachable:NoExecute op=Exists for 300s
pod-type=rda-tenant:NoSchedule
Events: <none>
rdaf worker install command is used to deploy / install RDAF worker services.
Run the below command to deploy all RDAF worker services. (Note: Below shown tag name is a sample one for a reference only, for actual tag, please contact CloudFabrix support team at support@cloudfabrix.com)
Status check
Run the below command to see the status of all of the deployed RDAF worker services.
+------------+-----------------+---------------+--------------+-------------------+
| Name | Host | Status | Container Id | Tag |
+------------+-----------------+---------------+--------------+-------------------+
| rda_worker | 192.168.125.149 | Up 18 seconds | 29cdeefd9d95 | 8.2.1 |
+------------+-----------------+---------------+--------------+-------------------+
8.10 RDAF App Services Installation
Please refer the below document to deploy / install RDAF OIA (a.k.a AIOps) application services
Please refer the below document to deploy / install RDAF OIA (a.k.a AIOps) application services
8.11 Install RDAF Bulkstats Services
Note
The RDAF Bulkstats service is optional and only necessary if the Bulkstats data ingestion feature is required. Otherwise, you may ignore the steps below and go to next section.
Run the below command to install bulk_stats services
A comma can be used to identify two hosts for HA Setups.
Note
When deploying bulk stats on New VM, make sure the username and password matches with the existing VM's
Run the below command to get the bulk_stats status
+----------------+----------------+---------------+--------------+-------+
| Name | Host | Status | Container Id | Tag |
+----------------+----------------+---------------+--------------+-------+
| rda-bulk-stats | 192.168.108.13 | Up 1 Days ago | ac3379bfcc9d | 8.2.1 |
| rda-bulk-stats | 192.168.108.14 | Up 1 Days ago | c78283c06d88 | 8.2.1 |
+----------------+----------------+---------------+--------------+-------+
Note
The RDAF Bulkstats service is optional and only necessary if the Bulkstats data ingestion feature is required. Otherwise, you may ignore the steps below and go to next section.
Run the below command to install bulk_stats services
A comma can be used to identify two hosts for HA Setups.
Note
When deploying bulk stats on New VM, make sure the username and password matches with the existing VM's
Run the below command to get the bulk_stats status
+----------------+----------------+-------------+--------------+-------+
| Name | Host | Status | Container Id | Tag |
+----------------+----------------+-------------+--------------+-------+
| rda_bulk_stats | 192.168.133.96 | Up 4 days | 67da2301d30c | 8.2.1 |
| rda_bulk_stats | 192.168.133.92 | Up 46 hours | 32179032bb97 | 8.2.1 |
+----------------+----------------+-------------+--------------+-------+
8.12 Install RDAF File Object Services
Note
This service is applicable for Non-K8s only, The RDAF File Object service is optional and only necessary if the Bulkstats data ingestion feature is required. Otherwise, you may ignore the steps below and go to next section
Stop file object service using docker-compose file
Remove rda_file_object entries in rdaf.cfg file if bulkstats already deployed with older versions
Run the below command to install File Object services and provision service instances across multiple hosts, ensuring that all VMs use the same username and password.
Log in to each file object node and update the permissions for the /opt/public folder.
Run the below command to get the file_object status
+-----------------+----------------+-----------+--------------+-------+
| Name | Host | Status | Container Id | Tag |
+-----------------+----------------+-----------+--------------+-------+
| rda_file_object | 192.168.108.50 | Up 7 days | 47d1a68c2bf2 | 8.2.1 |
| rda_file_object | 192.168.108.51 | Up 7 days | 6ce10218c204 | 8.2.1 |
+-----------------+----------------+-----------+--------------+-------+
8.13 Install Event Gateway Services
Important
This Service is for Non-K8s only
- To Install the event gateway, log in to the rdaf cli VM and execute the following command.
- Run the below command to verify the status of the RDAF Event Gateway Service.
+-------------------+-----------------+---------------+--------------+-------+
| Name | Host | Status | Container Id | Tag |
+-------------------+-----------------+---------------+--------------+-------+
| rda_event_gateway | 192.168.108.127 | Up 43 seconds | 44c4937ebf0a | 8.2.1 |
| | | | | |
| rda_event_gateway | 192.168.108.128 | Up 16 seconds | d6779fd7f75f | 8.2.1 |
| | | | | |
+-------------------+-----------------+---------------+--------------+-------+
9. SSL Certificates Installation
CloudFabrix's RDA Fabric platform is enabled with HTTPs (SSL/443) access by default for secure communication and it is installed with self-signed certificates during the deployment. However, for production deployments, it is highly recommended to install CA Signed certificates and the below steps help you to install them appropriately.
RDA Fabric platform uses HA Proxy service for managing UI access, incoming traffic (ex: Event / Alert notifications) securely over HTTPs (SSL/443) protocol, and internal application traffic where applicable.
Below steps to provide how to install CA Signed SSL certificates for HA Proxy service.
9.1 SSL Certificate Requirements:
CloudFabrix's dimensions platform's HA Proxy service requires below CA signed SSL certificate files in PEM format.
- server-ssl-certificate.crt (format: PEM)
- server-ssl-private.key
- trusted-ca-intermediate-root.crt (format: PEM)
- trusted-ca-root.crt (format: PEM)
OR
- server-ssl-certificate.crt (format: PEM)
- server-ssl-private.key
- trusted-ca-intermediate-root.crt & trusted-ca-root.crt chain in a single file (format: PEM)
The SSL server certificate that is obtained should match the DNS / FQDN of the cfxDimensions platform VM's IP address (This is also referred to as Common Name or CN within the certificate). Wildcard domain SSL certificate is also supported. The below screen provides an example of how to check the server's ssl certificate's CN name using openssl command. (In this example, the RDA Fabric platform's FQDN is cfx-rdaf.cloudfabrix.io and using a wildcard domain name (CN) SSL certificate)

Once you have the SSL certificate files as mentioned above, you need to create an SSL certificate chain by grouping them together as a single file in PEM format.
Th below diagram shows a valid CA signed SSL certificate chain flow for reference.
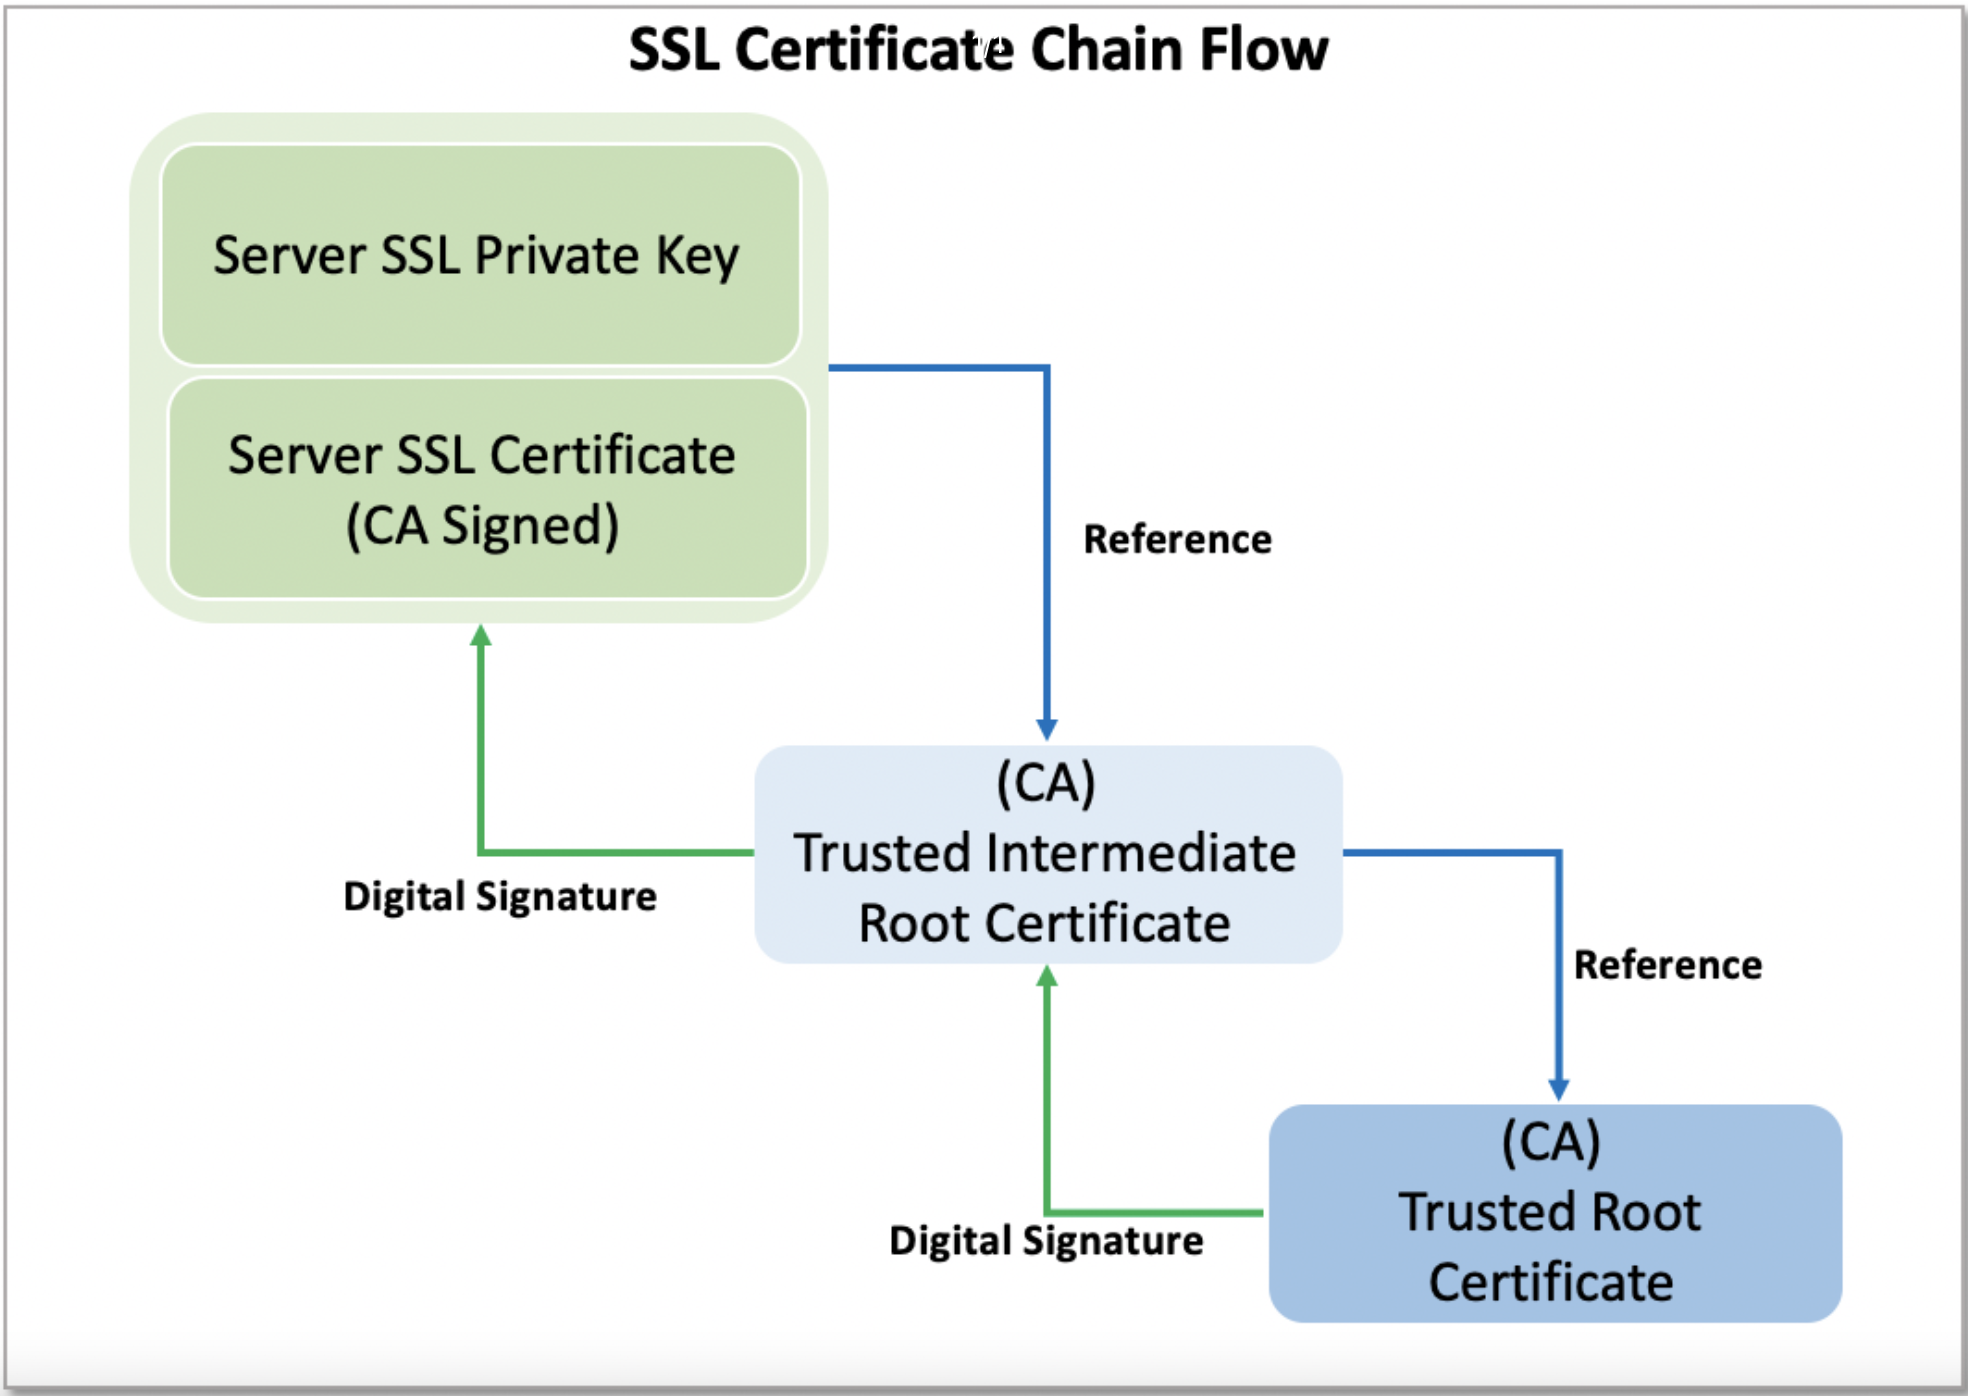
Run the below command to create a valid SSL certificate chain. (supported format is PEM)
OR

Info
Note: The final consolidated SSL certificate chain output is saved to cfx-ssl-haproxy.pem file which will be applied to HA Proxy configuration later in this document. The filename used here for reference only.
9.2 CA-signed SSL certificate verification:
Info
openssl tool is a pre-requisite for performing SSL certificate validation checks
Step 1: Run the below commands to verify both server's SSL certificate and private key. The output of these two commands should match exactly the same.
Step 2: Run the below commands to verify server's SSL certificate, intermediate & root certificate's (chain) date is valid and not expired.
Step 3: Run the below commands to verify the public keys contained in the private key file and the server certificate file are the same. The output of these two commands should match.
Step 4: Run the below command to verify the validity of the certificate chain. The response should come out as OK.
Step 5: Run the below command to see and verify SSL certificate chain order is correct.
Please refer to the below screenshot on how to validate the SSL certificate chain order.
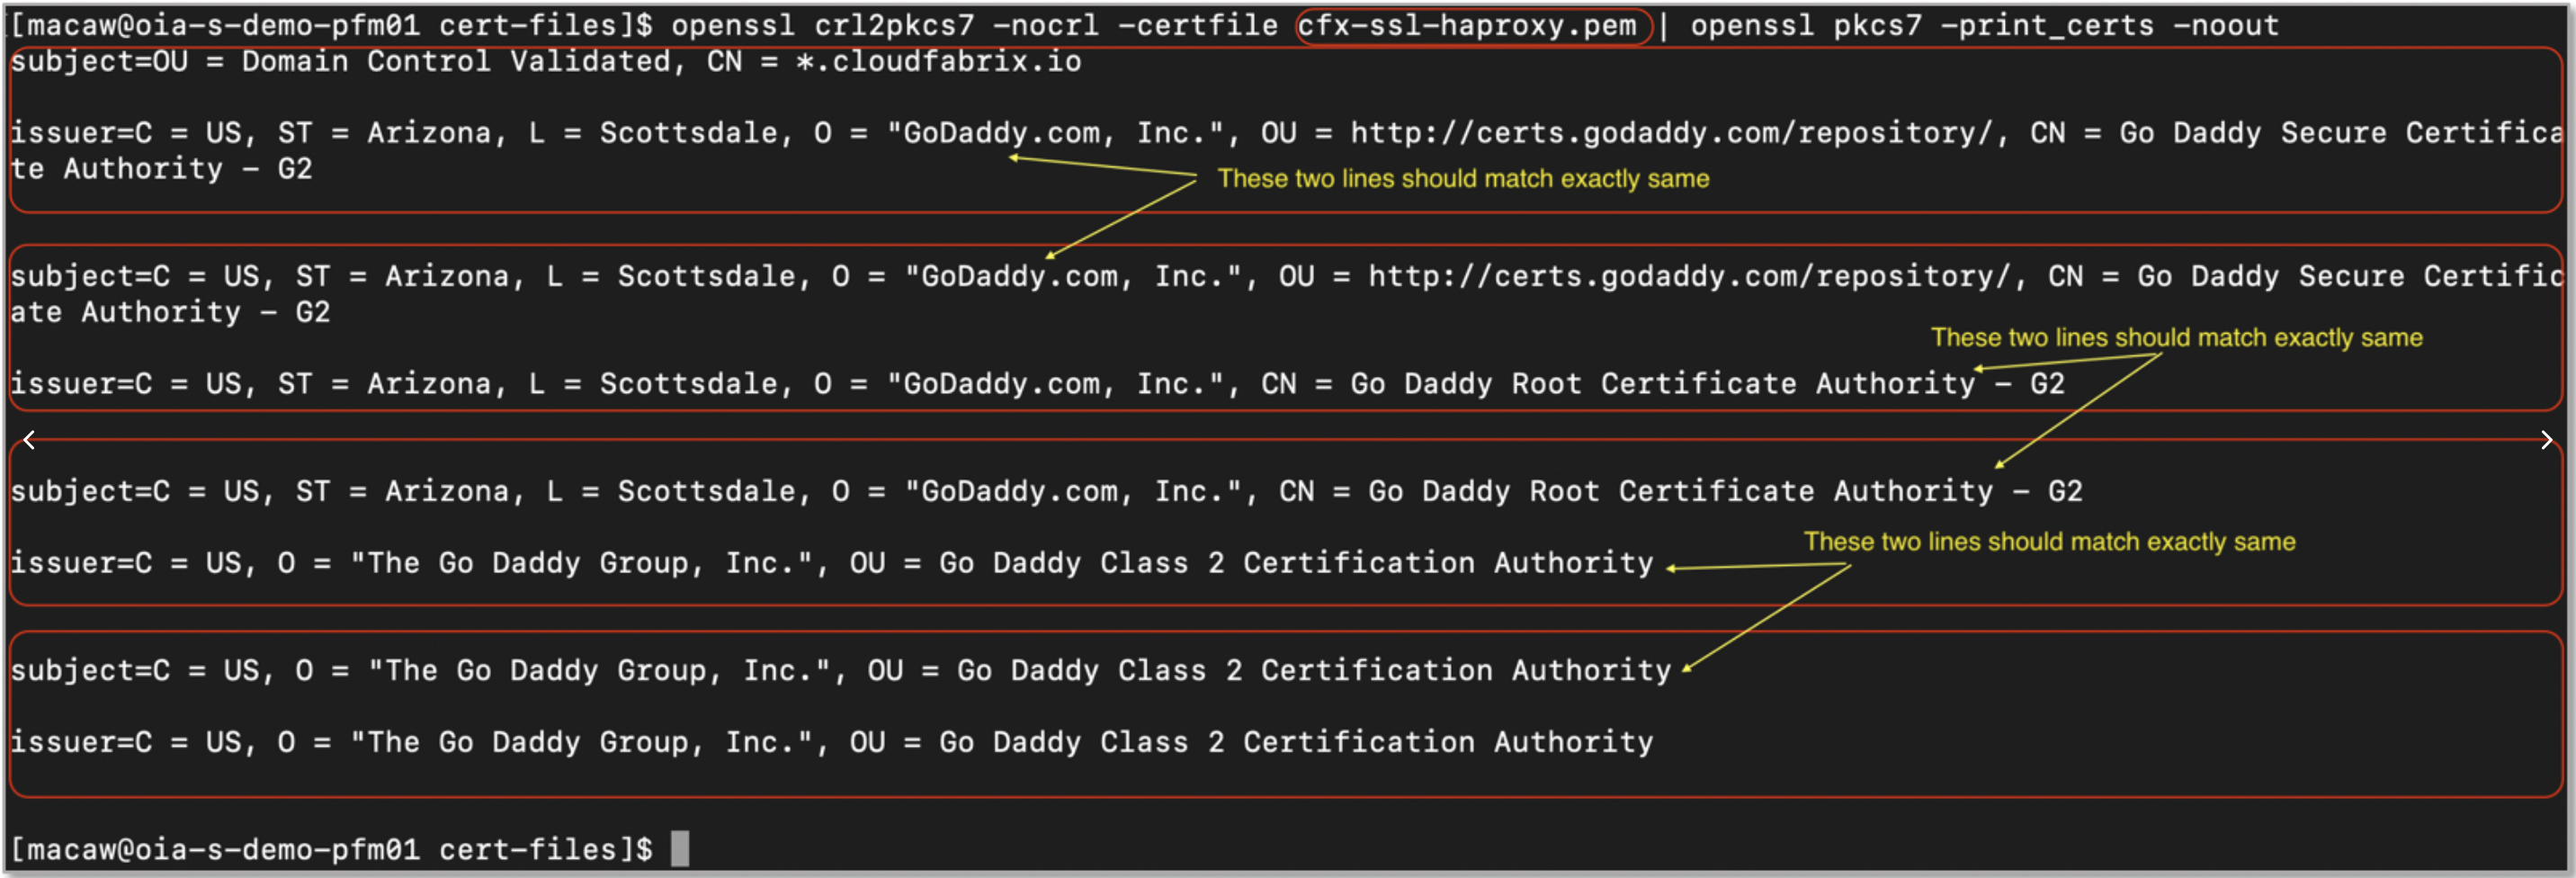
Verify if the SSL certificate and key is in PEM format.
9.3 CA-signed SSL Certificate Installation for HA Proxy service:
Step 1: Go to HAProxy service's certificates path on VM host(s) where HAProxy service was installed.
Step 2: Take a backup of the existing HA Proxy service's SSL certificate using this path /opt/rdaf/cert/rdaf
Step 3: Copy the CA-signed SSL certificate chain file that is in PEM format to this location as haproxy.pem
Step 4: Restart HA Proxy container
Step 5: Verify HA Proxy service logs to make sure there are no errors after installing CA signed SSL server certificate chain file.
Step 6: Run the below openssl command to verify the newly installed SSL certificate and check SSL verification is shown as OK without any validation failures.
Step 7: Open an internet browser (Firefox / Chrome / Safari) and enter the RDA Fabric Platform's FQDN to access the UI securely over HTTPs (port: 443) protocol.
https://cfx-rdaf-platform-fqdn
9.4 Self Signed SSL Certificate with Custom CA Root:
The truststore or root store is a file that contains the root certificates for Certificate Authorities (CA) that issue SSL certificates such as GoDaddy, Verisign, Network Solutions, Comodo and others. Internet browsers, operating systems and applications include list of authorized SSL certificate authorities within their root store or truststore repository file.
However, many enterprises may use Custom CA root certificates to validate and certify self-signed SSL certificates for internal use. In such scenario, when an application is being accessed through a browser or an SSL client, SSL certificate verification error may be observed. Because, neither the browser nor the SSL client will have the Custom CA root certificate within their root store / truststore repository file and hence, they will fail to recognize the authenticity of the SSL certificate and the issuer (CA) from the application.
In order to resolve this issue, update the client's root store / truststore with the Custom CA root & intermediate root certificates so that they can recognize them as a valid & trusted Certificate Authority (CA). Please refer the client's (internet browser or application) documentation on how to update their root store / truststore with custom CA root certificates.
Warning
Note: Please take guidance from your internal security team while using self-signed SSL certificates with Custom CA root certificates.
9.5 Appendix:
SSL Certificate Formats and Conversion:
SSL certificate files come in different formats and most common ones that CA's (Certificate Authorities) deliver include .pfx, .p7b, .pem, .crt, .cer, and .cert. You can get more details about these different certificate formats in the following link:
If you need to convert the format of your SSL certificate files to PEM, please use the following commands:
- Convert PFX to PEM
- Convert P7B to PEM
- Convert DER to PEM
You can use the following commands to check if your certificate files are already in the required format:
- Check and verify if your key is in PEM format
- Check and verify if your certificate is in PEM format