Microsoft Windows Server OS
CloudFabrix RDA provides out of the box agent-less integration for inventory data collection from Microsoft Windows server editions using WinRM protocol. Using this integration, inventory data like Windows OS version, server make & model, running services and processes and TCP/UDP network connections will be collected.
Using RDA's integration with Windows Server OS, below are the two primary use cases that are supported and consumed within the CloudFabrix Asset Intelligence and AIOps platforms.
- Windows Server OS inventory &
- Application Dependency
1. Prerequisites:
Windows Server OS inventory
Below are prerequisites which need to be configured on target Windows Server hosts.
- PowerShell 3.0 or above
- Operating system: Windows 2008 & R2, Windows 2012 & R2, Windows 2016 or above
- Configure WinRM for remote management (refer WinRM configuration section)
WinRM OutofMemmory Hotfix is recommended - When running on PowerShell v3.0, there is a bug with the WinRM service that limits the amount of memory available to WinRM. KB2842230 ("Out of memory" error on a computer that has a customized MaxMemoryPerShellMB quota set and has WMF 3.0 installed (microsoft.com) Lack of this fix on host, RDA may fail to execute certain commands on target host.
- User Credentials
Note
Cloudfbarix recommends providing the local administrator privileges of the target server for the user account which is created for data collection (domain or local). However, In the absence of elevated privileges, discovery requires a user account that has enough privileges (read & execute) for WinRM remote management (WS-Man) and respective commands used in discovery. Refer the sections 2 & 3 for more information.
WinRM configuration:
CloudFabrix supports both WinRM configuration over HTTP/HTTPS and authentication protocols using Basic/NTLM .
Info
We recommend referring to the Microsoft document to configure WinRM over HTTP/HTTPS. The following configuration steps are for reference only.
Configure WinRM over HTTP:
Open command shell in windows and run the following command to quickly enable the WinRM with default configuration
- Make sure to allow WinRM TCP port 5985 in Windows Firewall if it's enabled.
- Similar configuration can be done from PowerShell console by executing following command.
Configure WinRM over HTTPS:
Info
Microsoft has published detailed information on how to configure WinRM over HTTPS @ <a href="https://learn.microsoft.com/en-US/troubleshoot/windows-client/system-management-components/configure-winrm-for-https">How to configure WINRM for HTTPS - Windows Client | Microsoft Docs</a>
- WinRM over HTTPS requires a certificate with CN matching the hostname.
- Install/import the certificate on Windows Host Certificate --> Personal --> Certificates
- Open command shell and execute the following command. It will create WinRM configuration and HTTPS listener
-
Modify WinRM configuration
The following parameters are required to modify apart from the default configuration.
-
Add CloudFabrix RDA’s IP address to TrustedHosts parameter or use “*” to accept remote connections from any source. Following command helps to modify the TrustedHosts value.
- Configure WinRM based on authentication method. CloudFabrix support both Basic/NTLM
Note
If you wanted to use **Basic** auth method then **AllowUnencrypted** parameter value should be set to **true**
- CbtHardeningLevel value should be Relaxed
Configuring WinRM with Group Policy:
Please refer the document from Microsoft to configure WinRM using Group Policies.
Info
We recommend to provide the elevated or local administrator privileges for the user account which is created for data collection (domain or local) for deep discovery. However, In the absence of elevated privileges, discovery requires an user account which has enough privileges (read & execute) for WinRM remote management (WS-Man). Refer the following Microsoft documentation for more information on user privileges @<a href="https://learn.microsoft.com/en-us/windows/win32/winrm/authentication-for-remote-connections">https://docs.microsoft.com/en-us/windows/win32/winrm/authentication-for-remote-connections</a>
2. Assigning User Permissions for data collection
The following actions are required to get least read/execute privileges to non-admin users. These items are for reference only and providing the privileges depends on the customer infrastructure environment.
- Create a local / domain user service account
- Add the user account (which is created for data collection) to the following local group.
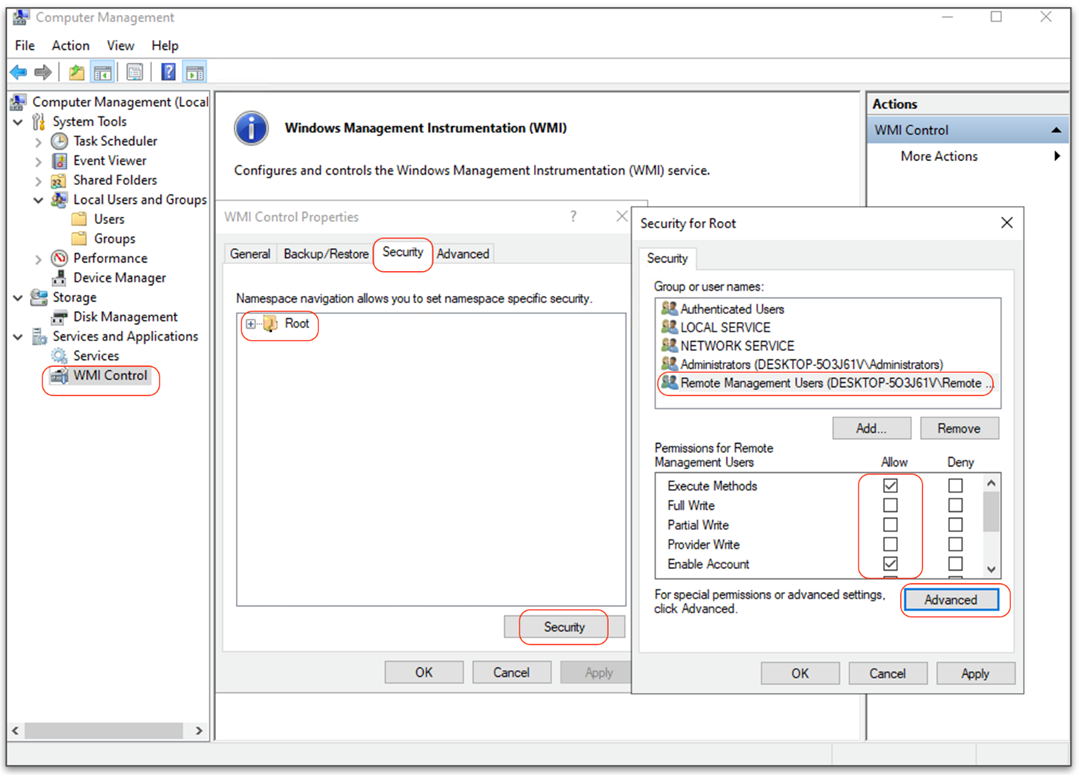
WinRMRemoteWMIUsers__ OR Remote Management Users
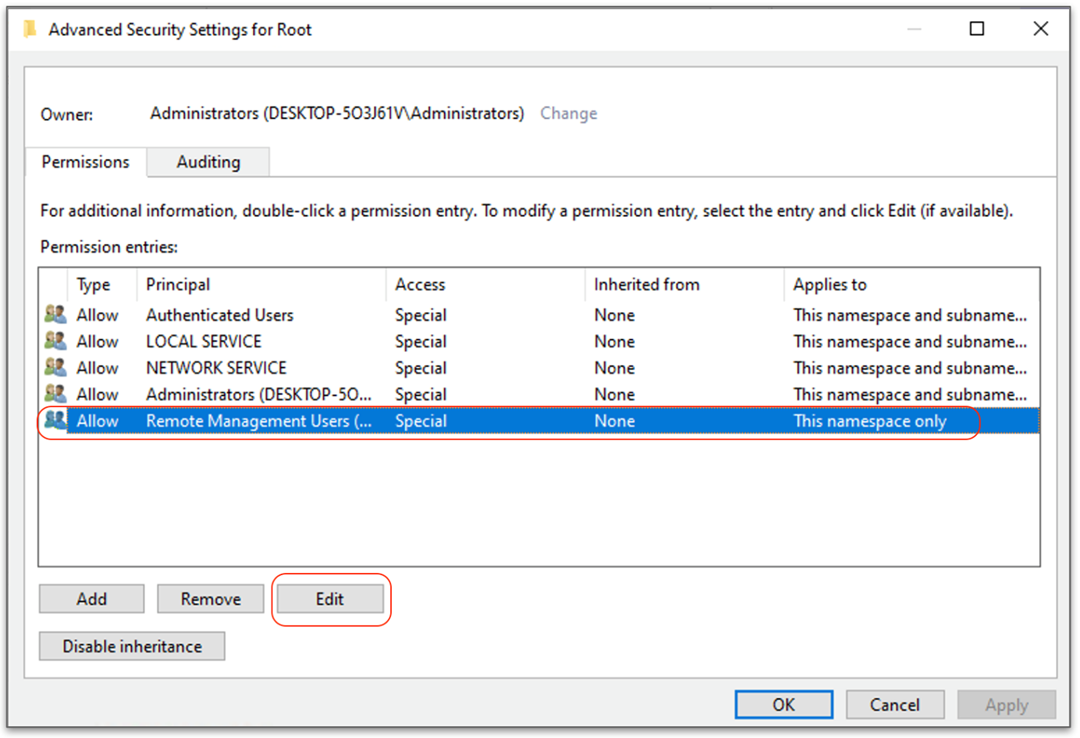
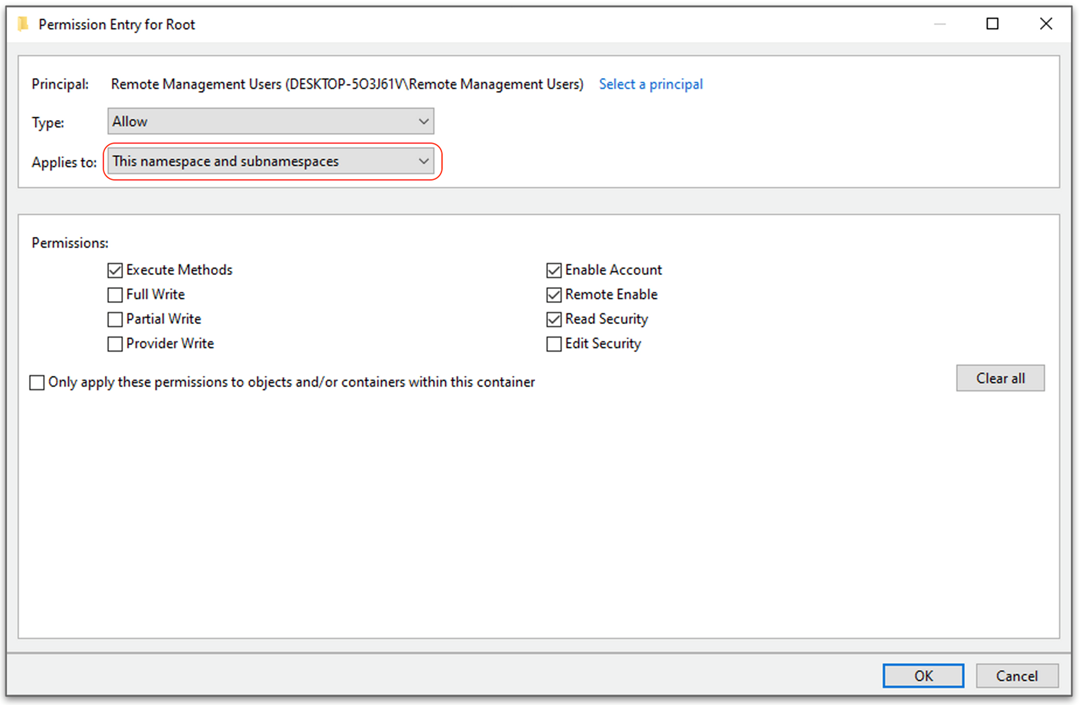
- Configure execute, remote enable, read security, and enable account permissions for the Remote Management Users group on the root WMI namespace and subnamespaces.
- Provide explicit read & execute permissions to the user in WinRM SDDL configuration. Following command helps to configure the privileges.
- Provide explicit read/execute permissions to the user account (which is created for data collection) in powershell session configuration.
Following command helps to configure the privileges.
- Grant SC_MANAGER_CONNECT and GENERIC_READ permissions for
scmanager(Service Control Manager) to the service account which is going to be used for data collection using thesc.execommand utility.
Execute the below script in a powershell CLI interface as an Administrator to list currently configured remote access permissions for built-in users / groups for scmanager.
Add-Type -TypeDefinition @'
using System;
namespace SCManager
{
    [Flags]
    public enum AccessMask
    {
        SC_MANAGER_CONNECT = 0x0001,
        SC_MANAGER_CREATE_SERVICE = 0x0002,
        SC_MANAGER_ENUMERATE_SERVICE = 0x0004,
        SC_MANAGER_LOCK = 0x0008,
        SC_MANAGER_QUERY_LOCK_STATUS = 0x0010,
        SC_MANAGER_MODIFY_BOOT_CONFIG = 0x0020,
        STANDARD_RIGHTS_REQUIRED = 0xF0000,
        STANDARD_RIGHTS_READ = 0x20000,
        STANDARD_RIGHTS_WRITE = 0x20000,
        STANDARD_RIGHTS_EXECUTE = 0x20000,
        SC_MANAGER_ALL_ACCESS = STANDARD_RIGHTS_REQUIRED |
            SC_MANAGER_CONNECT |
            SC_MANAGER_CREATE_SERVICE |
            SC_MANAGER_ENUMERATE_SERVICE |
            SC_MANAGER_LOCK |
            SC_MANAGER_QUERY_LOCK_STATUS |
            SC_MANAGER_MODIFY_BOOT_CONFIG,
        GENERIC_READ = STANDARD_RIGHTS_READ |
            SC_MANAGER_ENUMERATE_SERVICE |
            SC_MANAGER_QUERY_LOCK_STATUS,
        GENERIC_WRITE = STANDARD_RIGHTS_WRITE |
            SC_MANAGER_CREATE_SERVICE |
            SC_MANAGER_MODIFY_BOOT_CONFIG,
        GENERIC_EXECUTE = STANDARD_RIGHTS_EXECUTE |
            SC_MANAGER_CONNECT |
            SC_MANAGER_LOCK,
        GENERIC_ALL = SC_MANAGER_ALL_ACCESS,
    }
}
'@
$sddl = ((sc.exe sdshow scmanager) -join "").Trim()
$sd = ConvertFrom-SddlString -Sddl $sddl
$sd.RawDescriptor.DiscretionaryAcl | ForEach-Object {
    $sid = $_.SecurityIdentifier
    try {
        $account = $sid.Translate([Security.Principal.NTAccount])
    } catch [Security.Principal.IdentityNotMappedException] {
        $account = $sid
    }
    [PSCustomObject]@{
        Account = $account
        Access = [SCManager.AccessMask]$_.AccessMask
        AccessMask = '0x{0:X8}' -f $_.AccessMask
        AceType = $_.AceType
    }
} | Format-List
Account    : NT AUTHORITY\INTERACTIVE
Access     : SC_MANAGER_CONNECT, GENERIC_READ
AccessMask : 0x00020015
AceType    : AccessAllowed

Account    : NT AUTHORITY\SERVICE
Access     : SC_MANAGER_CONNECT, GENERIC_READ
AccessMask : 0x00020015
AceType    : AccessAllowed

Account    : NT AUTHORITY\Authenticated Users
Access     : SC_MANAGER_CONNECT
AccessMask : 0x00000001
AceType    : AccessAllowed

Account    : NT AUTHORITY\SYSTEM
Access     : SC_MANAGER_CONNECT, SC_MANAGER_MODIFY_BOOT_CONFIG, GENERIC_READ
AccessMask : 0x00020035
AceType    : AccessAllowed

Account    : BUILTIN\Administrators
Access     : GENERIC_ALL
AccessMask : 0x000F003F
AceType    : AccessAllowed

Account    : BUILTIN\Hyper-V Administrators
Access     : GENERIC_READ
AccessMask : 0x00020014
AceType    : AccessAllowed
In the above example output, NT AUTHORITY\INTERACTIVE and NT AUTHORITY\SERVICE accounts has both SC_MANAGER_CONNECT and GENERIC_READ permissions.
Run the below command in cmd.exe CLI interface as an Administrator to get the currently configured user access permission settings (a.k.a SDDL string) for scmanager (Service Control Manager) service.
D:(A;;LCRPRC;;;HA)(A;;CC;;;AU)(A;;CCLCRPRC;;;IU)(A;;CCLCRPRC;;;SU)(A;;CCLCRPWPRC;;;SY)(A;;KA;;;BA)(A;;CC;;;AC)S:(AU;FA;KA;;;WD)(AU;OIIOFA;GA;;;WD)
Syntax of above SDDL string:
Permission Code for NT AUTHORITY\SERVICE account: A;;CCLCRPRC;;;
NT AUTHORITY\SERVICE account's short code: SU
Get SID of the service account user to whom the SC_MANAGER_CONNECT and GENERIC_READ permissions to be granted.
Note: Please run the below commands in cmd.exe CLI interface. cfxuser is used just for a reference.
SID
S-1-5-21-93897503-1393288148-4093635276-1002
Assign the SC_MANAGER_CONNECT and GENERIC_READ permissions to the service account user using the below command. In the above user permissions output for scmanager, NT AUTHORITY\SERVICE account has SC_MANAGER_CONNECT and GENERIC_READ permissions. Please apply the same permission codes to the service account.
Note
Please run the below command in `cmd.exe` CLI interface. The highlighted settings are the permission codes to configure `SC_MANAGER_CONNECT` and `GENERIC_READ` permissions for the SID of the service account user.
sc.exe sdset scmanager D:(A;;LCRPRC;;;HA)(A;;CC;;;AU)(A;;CCLCRPRC;;;IU)(A;;CCLCRPRC;;;SU)(A;;CCLCRPWPRC;;;SY)(A;;KA;;;BA)(A;;CC;;;AC)(A;;CCLCRPRC;;;S-1-5-21-93897503-1393288148-4093635276-1002)S:(AU;FA;KA;;;WD)(AU;OIIOFA;GA;;;WD)
- Restart Windows Remote Management service (WS-Man)
3. Windows Commands used for data collection:
- Windows OS System Inventory
systeminfo /fo csv
(Get-WmiObject -Class win32_computersystemproduct).UUID
Get-WmiObject -Class Win32_Processor | Select-Object -Property Manufacturer,Name, NumberOfCores,NumberOfLogicalProcessors,SocketDesignation,CurrentClockSpeed,SystemName,Status"

BIOS Details:

$bios = @{};
(Get-WmiObject -Class win32_computersystemproduct |
select IdentifyingNumber, SKUNumber, UUID, Vendor).psobject.properties |
% {$bios.Add($_.Name, $_.Value)};
(Get-WmiObject -Class  win32_bios |
select BIOSVersion, SerialNumber, ReleaseDate, Description, Manufacturer, Version).psobject.properties |
% {$bios.Add($_.Name, $_.Value)}; new-object psobject -Property $bios
- Windows Service & Process Inventory
- Windows Application TCP/UDP Connections
- Windows Network Configuration
Get-WmiObject -Class Win32_NetworkAdapterConfiguration | Select-Object -Property *
Get-WmiObject -Class Win32_NetworkAdapter | Select-Object -Property Index, NetConnectionStatus
- Windows installed Software Applications
Get-WmiObject Win32_Product |select-object Name,Version,Description,InstallDate,InstallDate2,InstallLocation,InstallSource,ProductID,RegCompany,RegOwner,Vendor
- Windows Disk Inventory
Get-WmiObject Win32_DiskDrive | Select-Object -Property *
Get-PhysicalDisk | Select-Object -Property DeviceId, SerialNumber, UniqueId
- Windows Disk Usage
- Windows installed Software Packages
$Apps = @()

function Get-InstalledApplications {
    [cmdletbinding(DefaultParameterSetName = 'GlobalAndAllUsers')]

    Param (
        [Parameter(ParameterSetName="Global")]
        [switch]$Global,

        [Parameter(ParameterSetName="GlobalAndCurrentUser")]
        [switch]$GlobalAndCurrentUser,

        [Parameter(ParameterSetName="GlobalAndAllUsers")]
        [switch]$GlobalAndAllUsers,

        [Parameter(ParameterSetName="CurrentUser")]
        [switch]$CurrentUser,

        [Parameter(ParameterSetName="AllUsers")]
        [switch]$AllUsers
    )

    # Explicitly set default param to True if used to allow conditionals to work
    if ($PSCmdlet.ParameterSetName -eq "GlobalAndAllUsers") {
        $GlobalAndAllUsers = $true
    }

    # Check if running with Administrative privileges if required
    if ($GlobalAndAllUsers -or $AllUsers) {
        $RunningAsAdmin = (New-Object Security.Principal.WindowsPrincipal([Security.Principal.WindowsIdentity]::GetCurrent())).IsInRole([Security.Principal.WindowsBuiltInRole]::Administrator)
        if ($RunningAsAdmin -eq $false) {
            break
        }
    }

    # Empty array to store applications
    $Apps = @()
    $32BitPath = "SOFTWARE\\Wow6432Node\\Microsoft\\Windows\\CurrentVersion\\Uninstall\\*"
    $64BitPath = "SOFTWARE\\Microsoft\\Windows\\CurrentVersion\\Uninstall\\*"

    # Retrieve globally installed applications
    if ($Global -or $GlobalAndAllUsers -or $GlobalAndCurrentUser) {
        $Apps += Get-ItemProperty "HKLM:\\$32BitPath"
        $Apps += Get-ItemProperty "HKLM:\\$64BitPath"
    }

    # Retrieve current user installed applications
    if ($CurrentUser -or $GlobalAndCurrentUser) {
        $Apps += Get-ItemProperty "Registry::\\HKEY_CURRENT_USER\\$32BitPath"
        $Apps += Get-ItemProperty "Registry::\\HKEY_CURRENT_USER\\$64BitPath"
    }

    # Retrieve applications from all users
    if ($AllUsers -or $GlobalAndAllUsers) {
        $AllProfiles = Get-CimInstance Win32_UserProfile | Select LocalPath, SID, Loaded, Special | Where {$_.SID -like "S-1-5-21-*"}
        $MountedProfiles = $AllProfiles | Where {$_.Loaded -eq $true}
        $UnmountedProfiles = $AllProfiles | Where {$_.Loaded -eq $false}

        $MountedProfiles | % {
            $Apps += Get-ItemProperty -Path "Registry::\\HKEY_USERS\\$($_.SID)\\$32BitPath"
            $Apps += Get-ItemProperty -Path "Registry::\\HKEY_USERS\\$($_.SID)\\$64BitPath"
        }

        $UnmountedProfiles | % {
            $Hive = "$($_.LocalPath)\\NTUSER.DAT"

            if (Test-Path $Hive) {
                REG LOAD HKU\\temp $Hive

                $Apps += Get-ItemProperty -Path "Registry::\\HKEY_USERS\\temp\\$32BitPath"
                $Apps += Get-ItemProperty -Path "Registry::\\HKEY_USERS\\temp\\$64BitPath"

                # Run manual garbage collection to allow hive to be unmounted
                [GC]::Collect()
                [GC]::WaitForPendingFinalizers()

                REG UNLOAD HKU\\temp
            } else {
                Write-Warning "Unable to access registry hive at $Hive"
            }
        }
    }

    Write-Output $Apps
}

# Call the function to get installed applications
Get-InstalledApplications
Test WinRM Connection:
To verify the WinRM configuration, use winrs.exe command which helps to test the remote connection to target Windows server using WinRM protocol.
Below are the sample commands to verify:
winrs -r:http://<Target_Win_IPaddress>:5985 -u:username -p:password hostname
winrs -r:https://<Target_Win_IPaddress>:5986 -u:username -p:password hostname
Test-NetConnection -computername "<Target_Win_IPaddress>" -P "5985"
Test-NetConnection -computername "<Target_Win_IPaddress>" -P "5986"
4. Adding Microsoft Windows OS as Datasource/Extension in RDA Studio:
Microsoft Windows OS or any other datasource/extension's configuration is configured in RDA's user interface. Login into RDA's user interface using a browser.
https://[rda-ip-address]:9998
Under Notebook, click on CFXDX Python 3 box
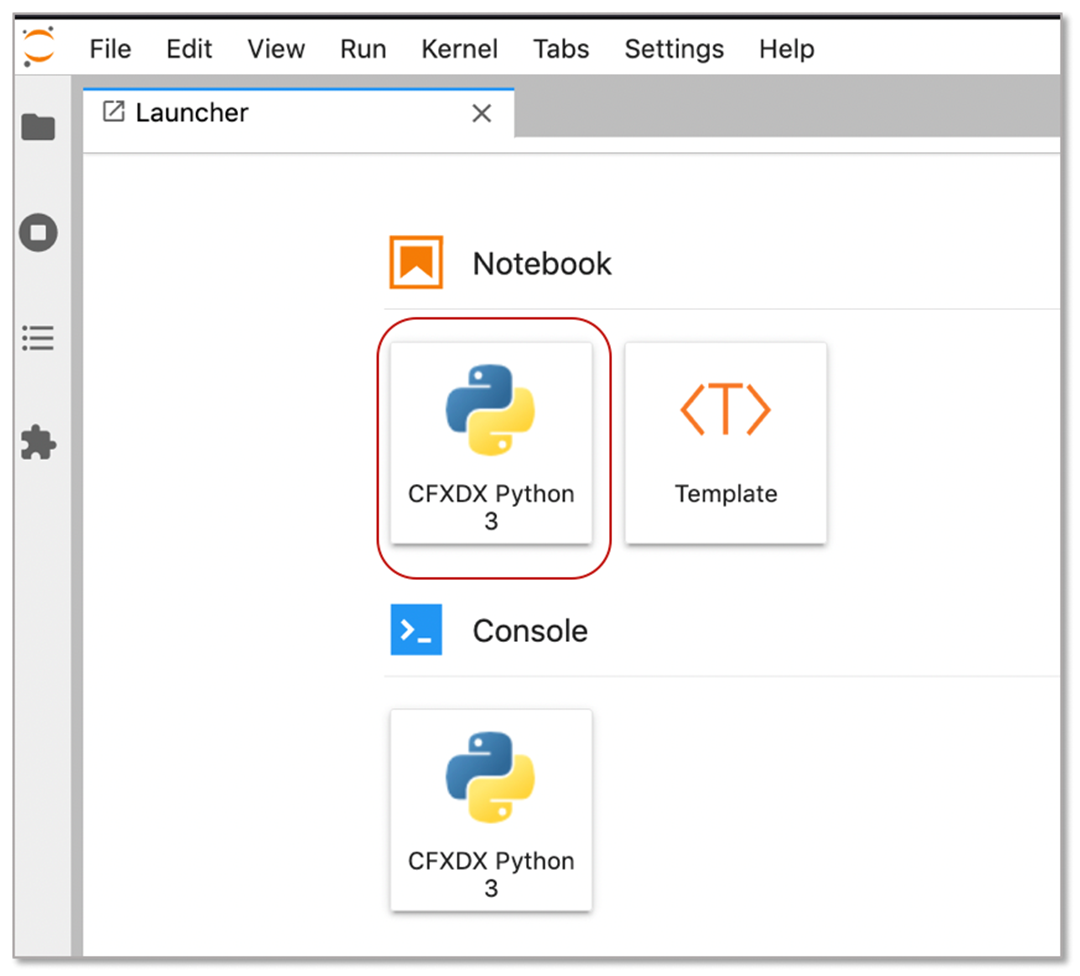
In the 'Notebook' command box, type botadmin() and alt (or option) + Enter to open datasource administration menu.
Click on 'Add' menu and under Type drop down, select windows-inventory
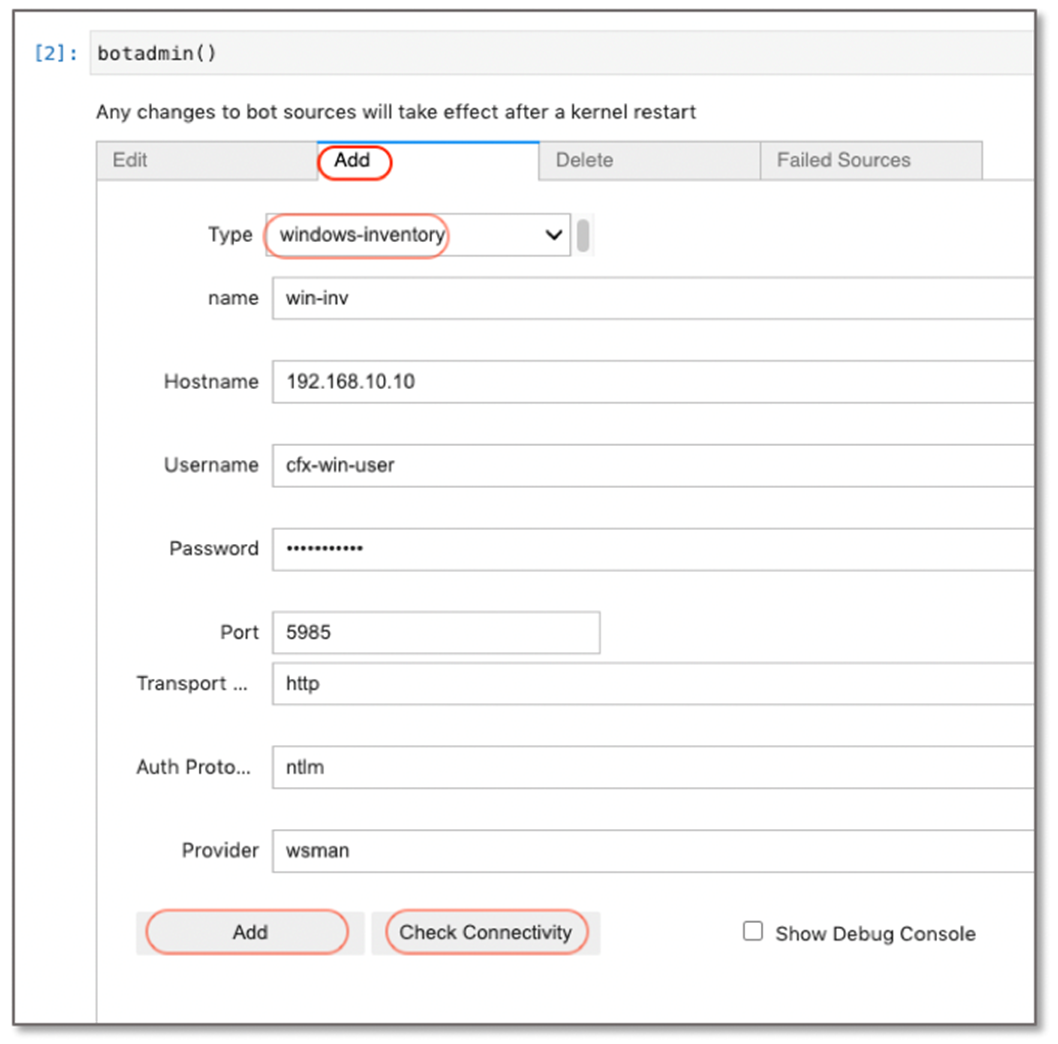
- Type: Datasource/Extension type. In this context, it is windows-inventory
- name: Datasource/Extension label which should be unique within the RDA
- Hostname: IP Address / DNS name of Windows host
- Username: Windows username
- Password: Windows password
- Port: 5985 / 5986
- Transport Protocol: http / https
- Auth Protocol: basic / ntlm / kerberos
- Provider: wsman (default value)
Info
**Hostname** field is only used for a quick network access and authentication access check against any one of the valid Window server host while adding the windows-inventory as a datasource. For actual data collection from Windows servers, it expects IP or IP subnet range as an input during runtime. Please refer the following sections for an example.
Click on Check Connectivity to verify the network access and credentials validity. Once it is validated, click on Add button to add the windows-inventory as a datasource.
5. Windows Server OS data exploration in RDA Studio:
Once Windows OS integration details are configured in RDA as a datasource, it will be ready to connect to targe Windows servers and explore the data for the analysis.
For the details on Windows OS inventory data collection bots, refer CloudFabrix RDA Bot Documentation