Note
The username/password has not been provided in this documentation. If you need access credentials, please reach out to the Support Team at (support@fabrix.ai)
Guide to navigate administrative operations in RDA Fabric platform's UI Portal
1. RDA Fabric Platform's UI Portal Introduction
The RDAF platform's UI portal is the primary interface for performing various administration operations, including but not limited to.
- RDA Fabric Artifact Configuration & Management
- Pipelines
- Credentials
- Service Blueprints
- Formatting Templates
- Synthetics
- Packs
- RDA Fabric Data Management
- Persistent Streams
- Datasets
- Log Archives
- Dependency Mappings
- Data Staging Area
- RDA Fabric Applications (OIA/AIA) on-boarding
- RDA Fabric Operational Dashboard
- RDA Fabric User Administration (RBAC)
- RDA Fabric User Dashboard Configuration & Management
2. RDA Fabric User Administration (RBAC)
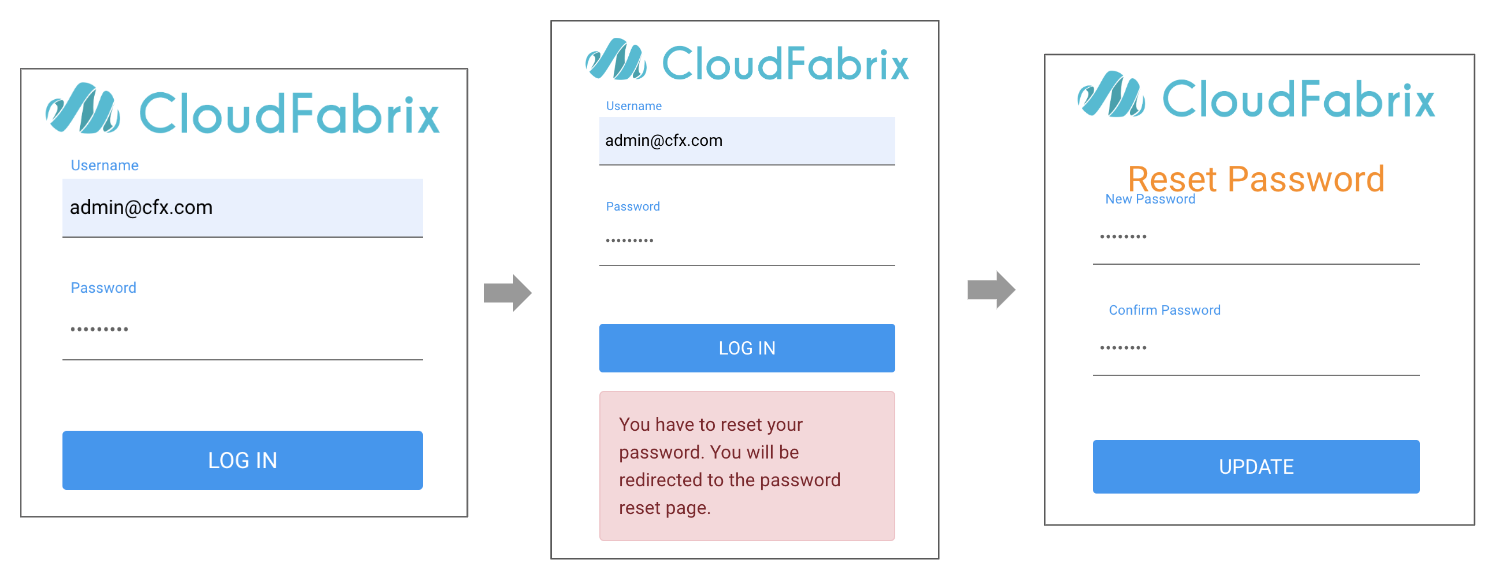
As part of the installation of RDAF core platform services, it creates a default tenant admin user called admin@cfx.com
In order to access RDAF UI portal, open a web browser and type the RDAF HAProxy server's IP address or DNS Name if it is a non-HA deployment or RDAF HAProxy server's virtual IP address or DNS Name if it is an HA deployment as shown below.
The default password for admin@cfx.com is admin1234
Note
admin@cfx.com user is the super admin user for RDA Fabric platform. For production deployment, please make sure to provide strong password and limit the access only to designated administrative users.
On first login onto RDAF UI portal, it prompts for resetting the above default password to user's choice.
2.1 Local Users
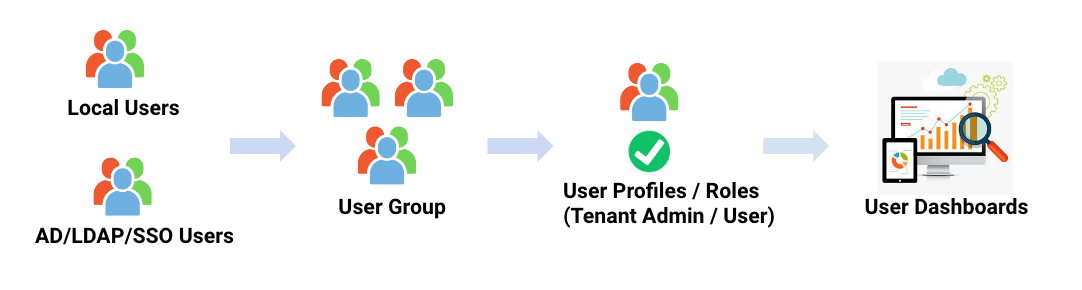
RDA Fabric platform support local users and remote users integrating with external identity and access management (IAM) tools. Below are supported for user access management.
- Local Users
- Active Directory Users
- SSO Users
Local Users are created and managed within the RDAF platform.
Note
Local Users should be used only for POC or Demo or Development environments. For Production deployments, it is recommended to integrate with external identity and access management tools such as Active Directory / LDAP or SSO
The below picture illustrates how the RDAF platform users (local/ or remote) are mapped and roles / permissions are assigned.
Adding MSP User Group:
After login into RDAF platform using admin@cfx.com user, go to Main Menu --> Administration --> Users
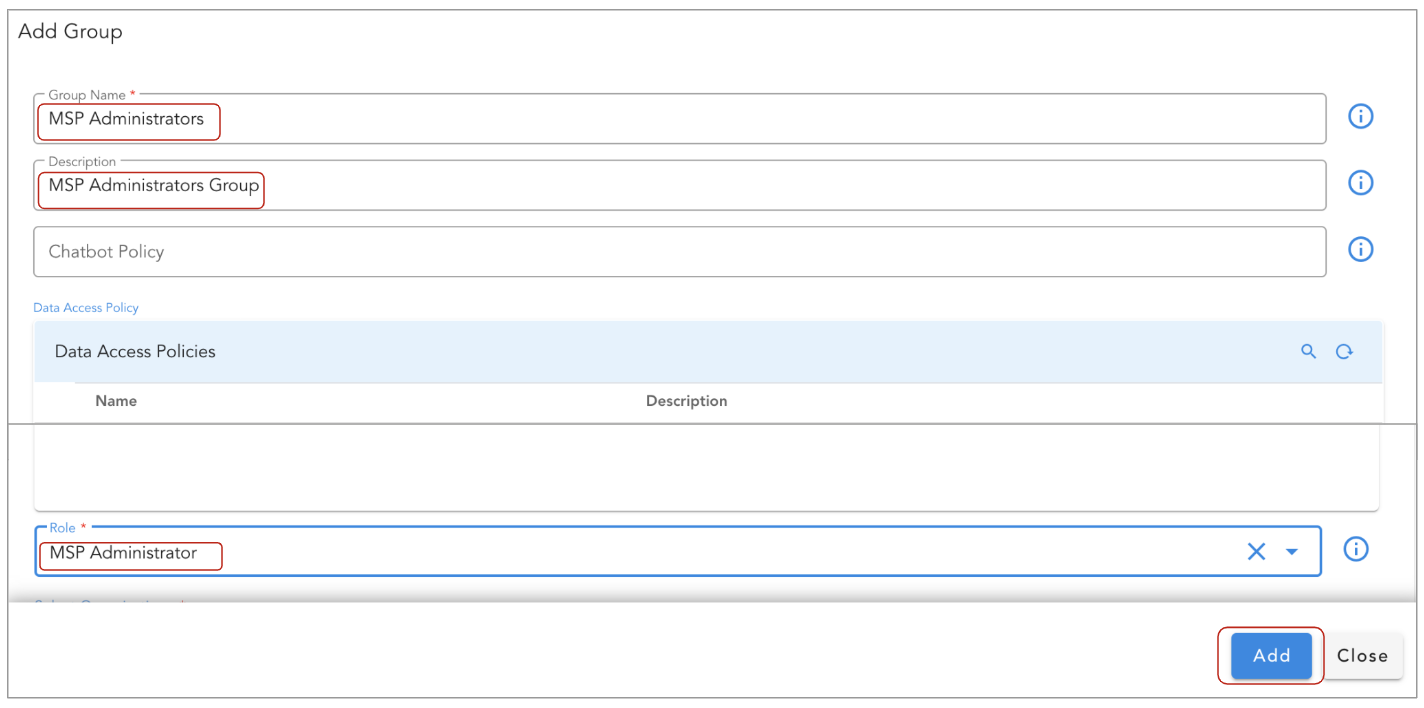
Under User Groups section, click on Add Group action button to create a new user group for MSP Administration
- Enter Group Name as MSP Administrators
- Enter Description as MSP Administration Group
- Select Role as MSP Administrator
Adding MSP User:
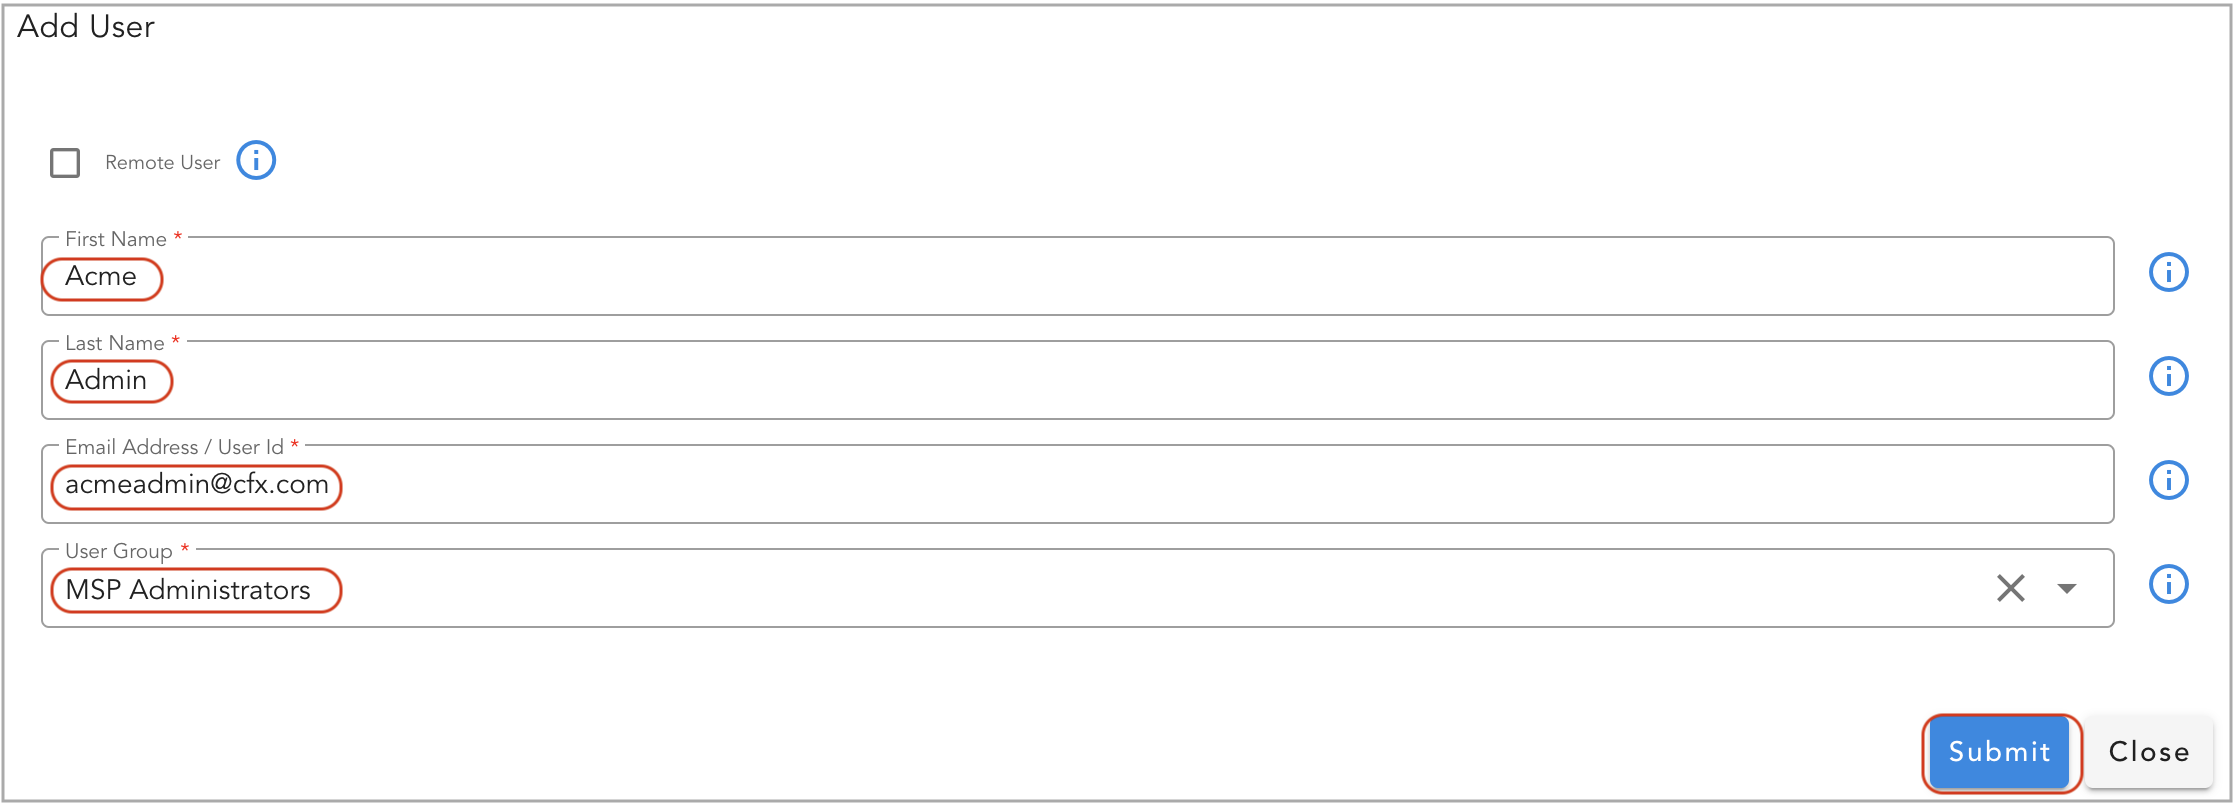
Under Users section, click on Add User action button to create a new MSP user.
- Enter User First and Last Name
- Enter User's email address (it is used as login if for the user)
- Select User Group as MSP Administrators (as created above)
RDAF platform by default comes with the below User Profiles / Roles which can be associated to an appropriate user groups as per the requirement.
- MSP Administrator: When MSP Administrator role is associated to an User Group, all the associated users to it will have full MSP Administration privileges and will have access to all of the RDAF platform's Menu items.
- MSP User: When MSP User role is associated to an User Group, all the associated users to it will have limited MSP privileges and will have access to all of the RDAF platform's Menu items.
- MSP Read Only User: When MSP Read Only User role is associated to an User Group, all the associated users to it will have read-only MSP privileges and will have access to all of the RDAF platform's Menu items.
- Organization Administrator: When Organization Administrator role is associated to an User Group, all the associated users to it will have Administrative privileges to the resources within the selected Organization.
- Organization User: When Organization User role is associated to an User Group, all the associated users to it will have limited privileges to the resources within the selected Organization.
- Organization Read Only User: When Organization Read Only User role is associated to an User Group, all the associated users to it will have read-only privileges to the resources within the selected Organization.
- L1 User: When L1 User role is associated to an User Group, all the associated users to it will have limited privileges and will have ONLY access to RDAF platform's Dashboards Menu.
- L3 User: When L3 User role is associated to an User Group, all the associated users to it will have limited privileges and will have ONLY access to RDAF platform's Dashboards Menu.
2.2 Active Directory Users
RDA Fabric platform supports integrating with Windows Active Directory IAM (Identity and Access Management) system.
For integrating with Windows Active Directory, go to Main Menu --> Administration --> Authentication Servers
Under Authentication Servers section, click on Add button to add Windows Active Directory server details.
Click on Test Connectivity button to validate the Active Directory integration before clicking on Add button to save the configuration.
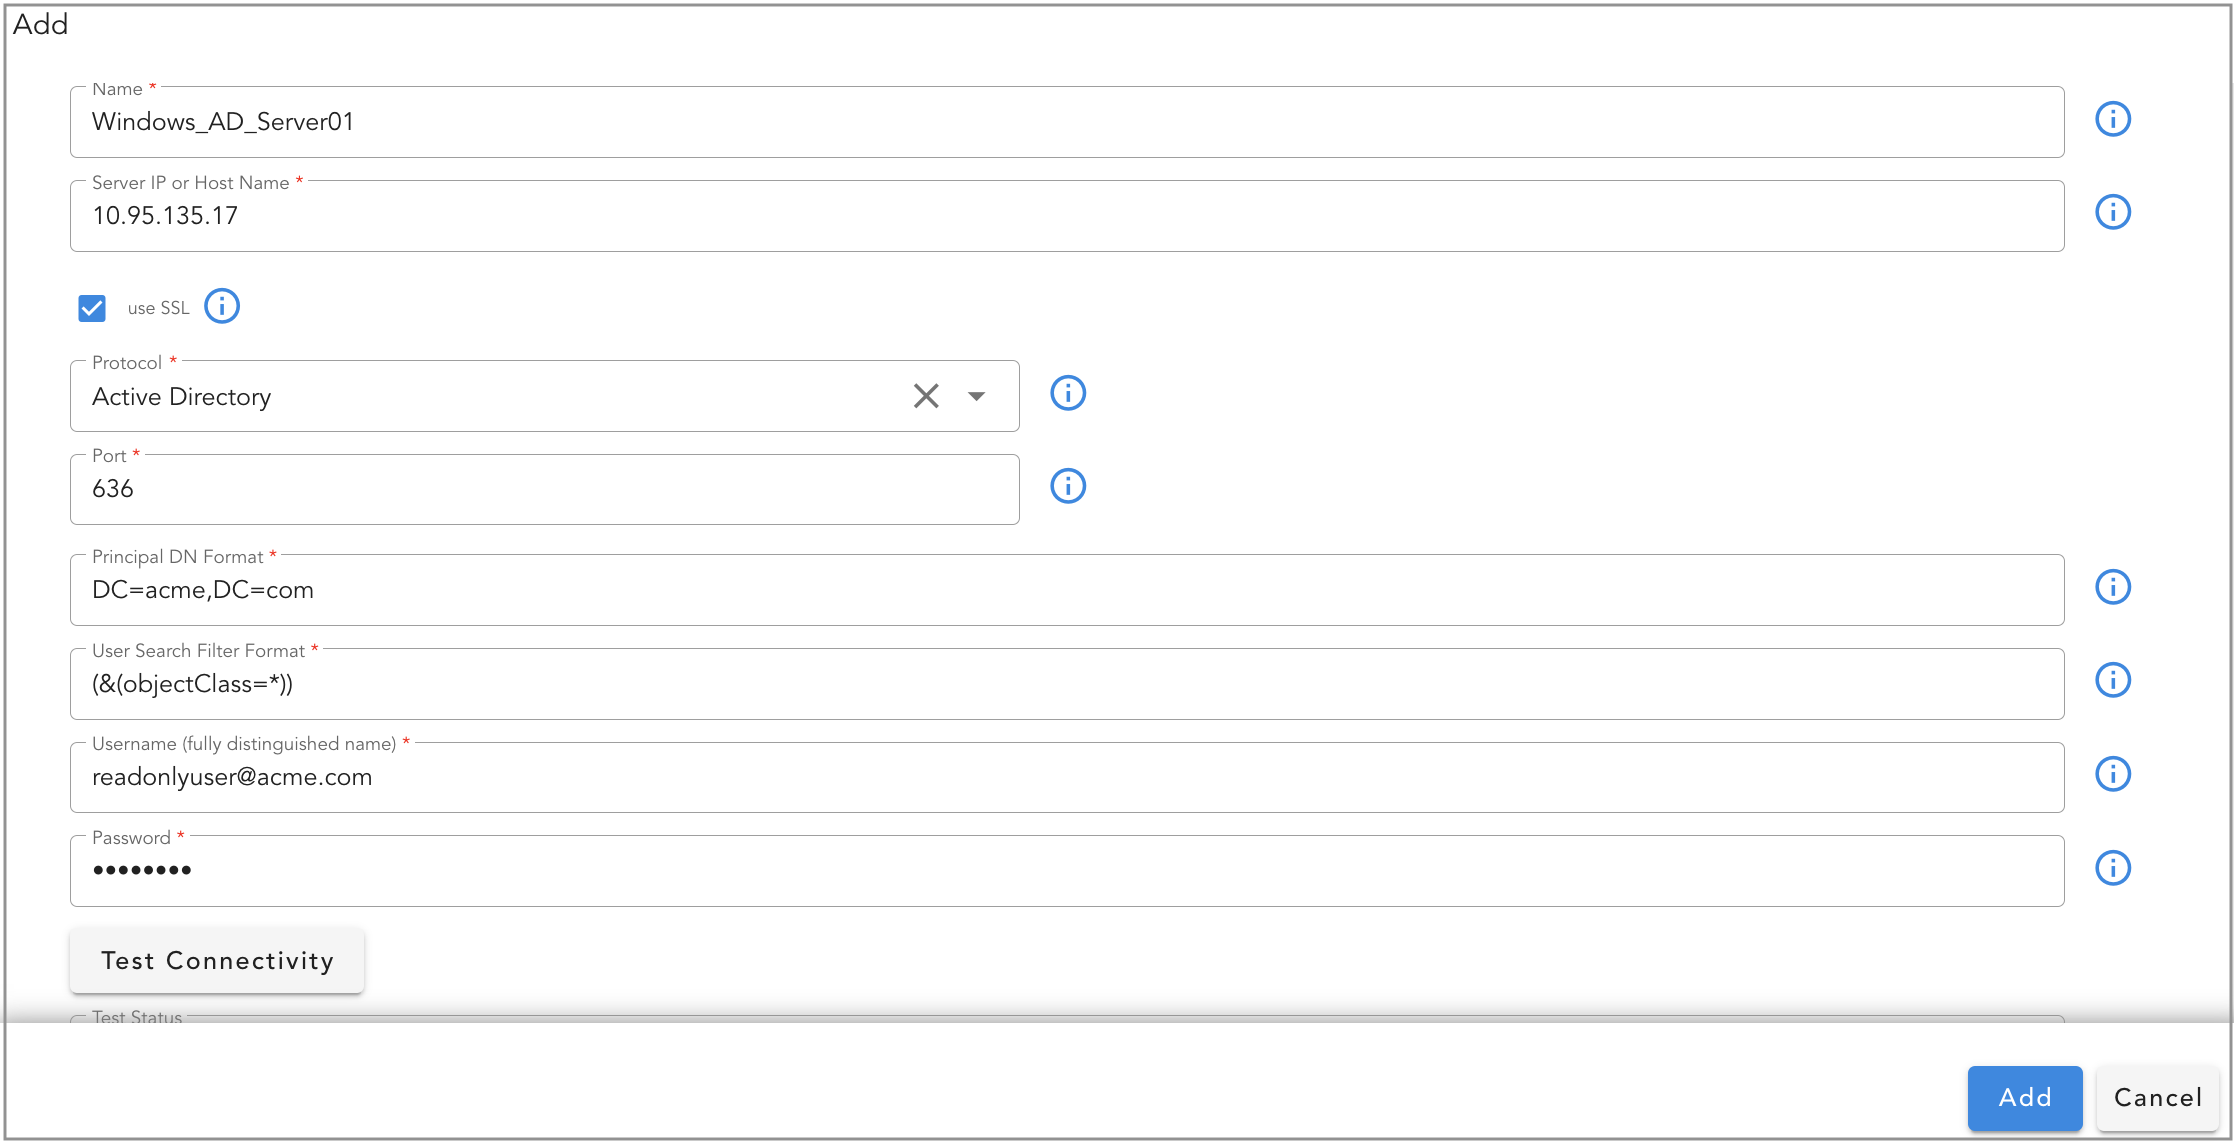
| Parameter Name | Description |
|---|---|
| Name | Specify a name or label for Windows Active Directory integration |
| Server IP or Host Name | Enter Active Directory server's IP Address or DNS Name |
| use SSL | Select this check box to use SSL protocol |
| Protocol | Select Active Directory |
| Port | Enter port 389 for non-SSL or port 636 for SSL protocol |
| Principal DN Format | Enter domain name in Distinguished Name (DN) format. For an example, if domain name is acme.com, DN format is DC=acme,DC=com. If domain name is dev.acme.com, DN format is DC=dev,DC=acme,DC=com |
| User Search Filter Format | Enter the value as (&(objectClass=*)). This filter is to include all Active Directory objects for searching the Users & Groups while importing them into RDA Fabric platform. |
| Username (fully distinguished name) | Enter a valid Active Directory domain user name in Distinguished Name (DN) format or in User Principal format (UPN). For an example, xxxxxxxuser@acme.com is in UPN format which is acceptable. DN format for the same user is CN=xxxxxxxuser,CN=Users,DC=acme,DC=com |
| Password | Enter User's password for the above specified domain user. |
Tip
Please note that only one Active Directory server integration can be added. After adding it successfully, the Add button will not appear in the UI. If a new Active Directory server needs to be added, either update the existing configuration or delete the current configuration and add a new one.
2.2.1 Import Active Directory Users
Tip
Before importing Active Directory users, it is a pre-requisite to create one or more Local User Groups and associate them to one of the available User Role.
Go to Main Menu --> Administration --> Users. Under User Groups section, click on Add Group action button to create a new user group.
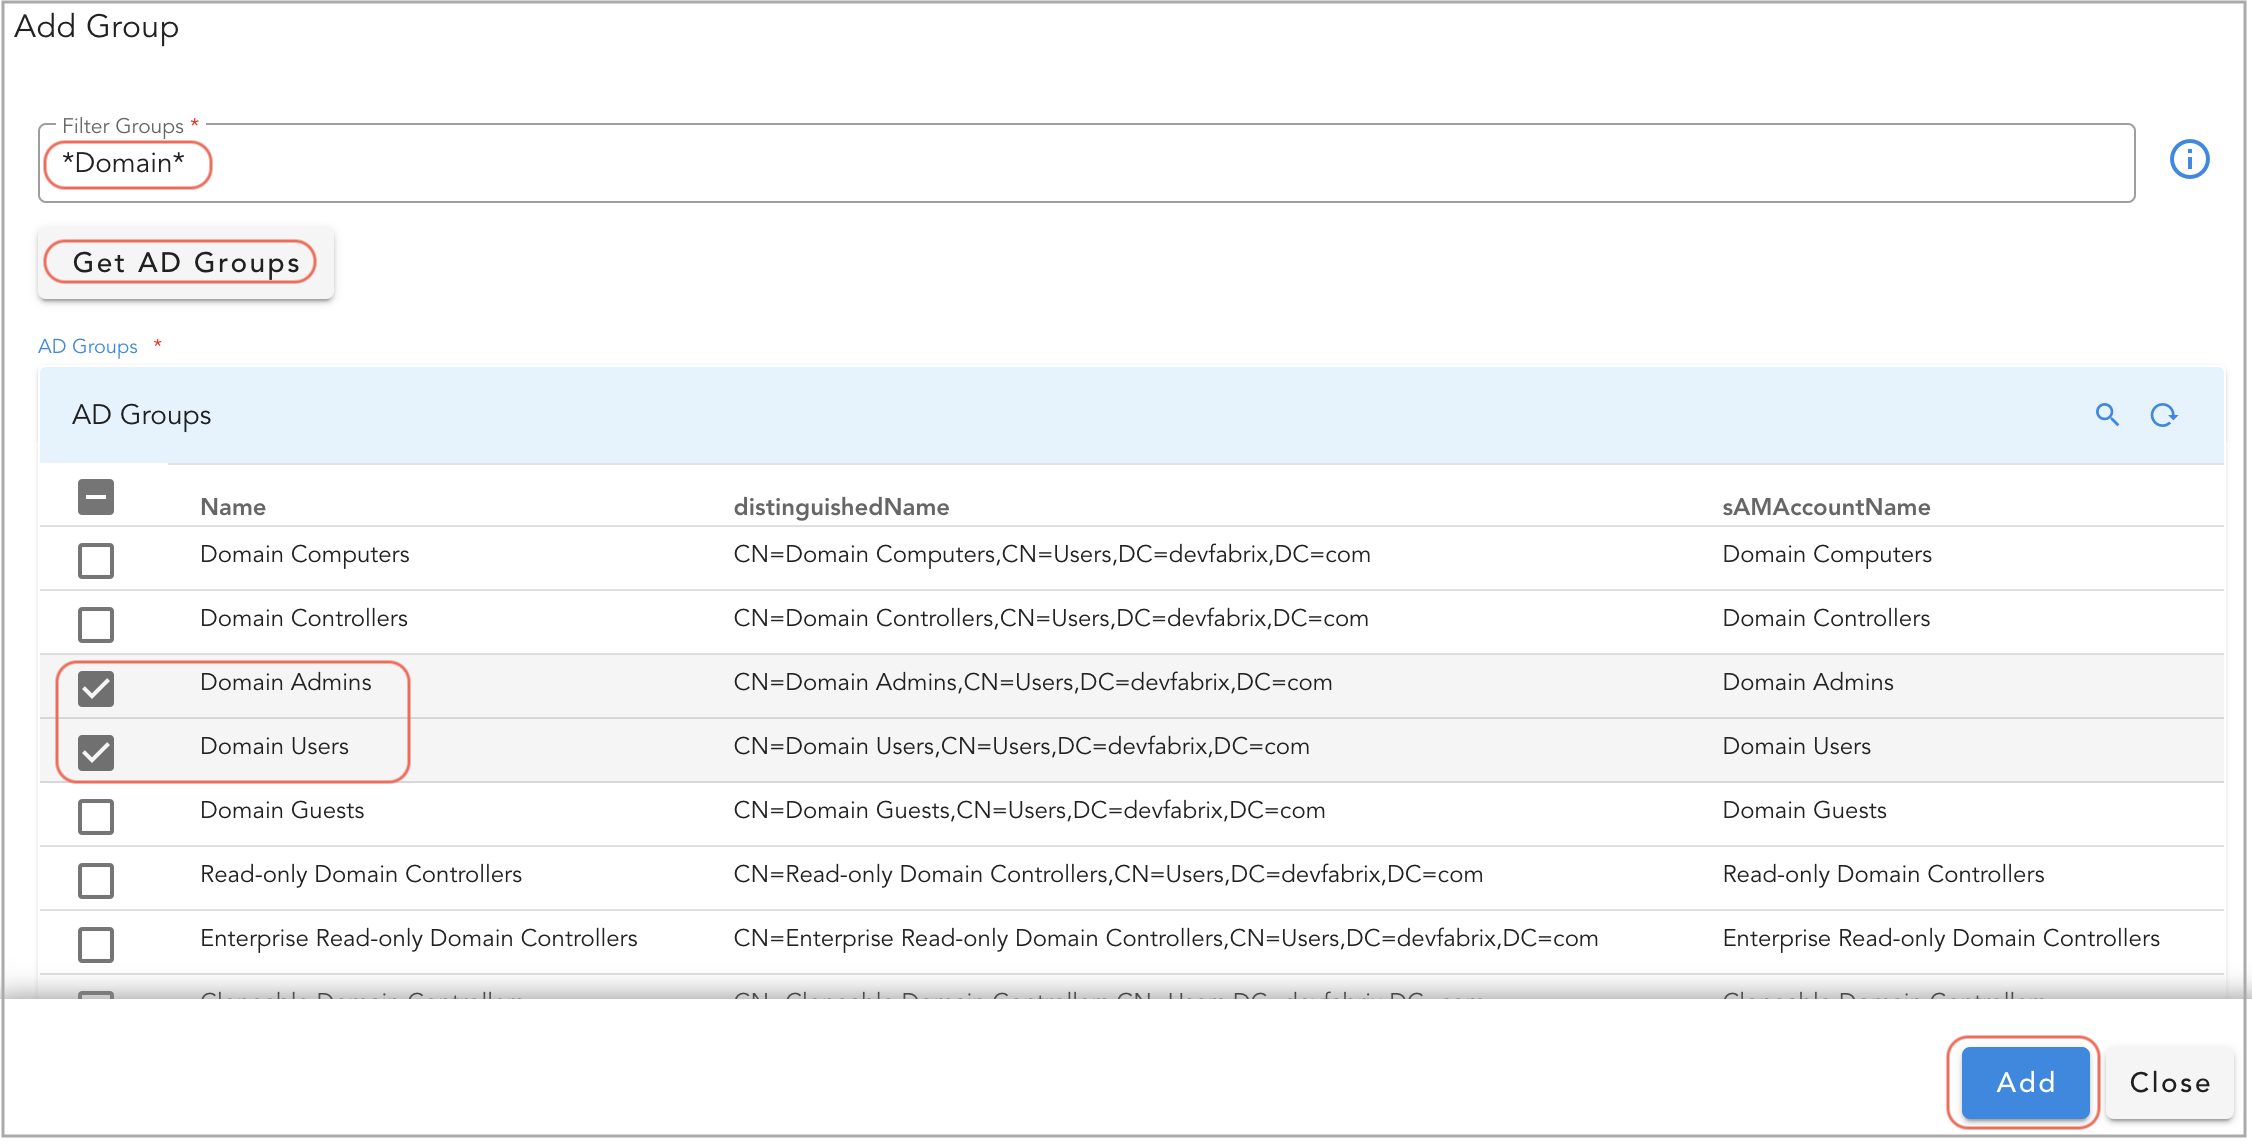
Before importing Active Directory users, ensure that Active Directory user groups, to which the users belong, have been added.
Go to Main Menu --> Administration --> Authentication Servers --> User Groups
Click on Add Group button to search and import the Active Directory user groups.
In the pop-up window, under Filter Groups, enter *Domain* (as an example) and click on Get AD Groups
Select one or more User Groups from the list and click on Add button.
Tip
Searching for user groups in Active Directory supports the use of wildcards, such as '*' before and after a user group name. User group filter with a wildcard in the below screenshot is for a reference only.
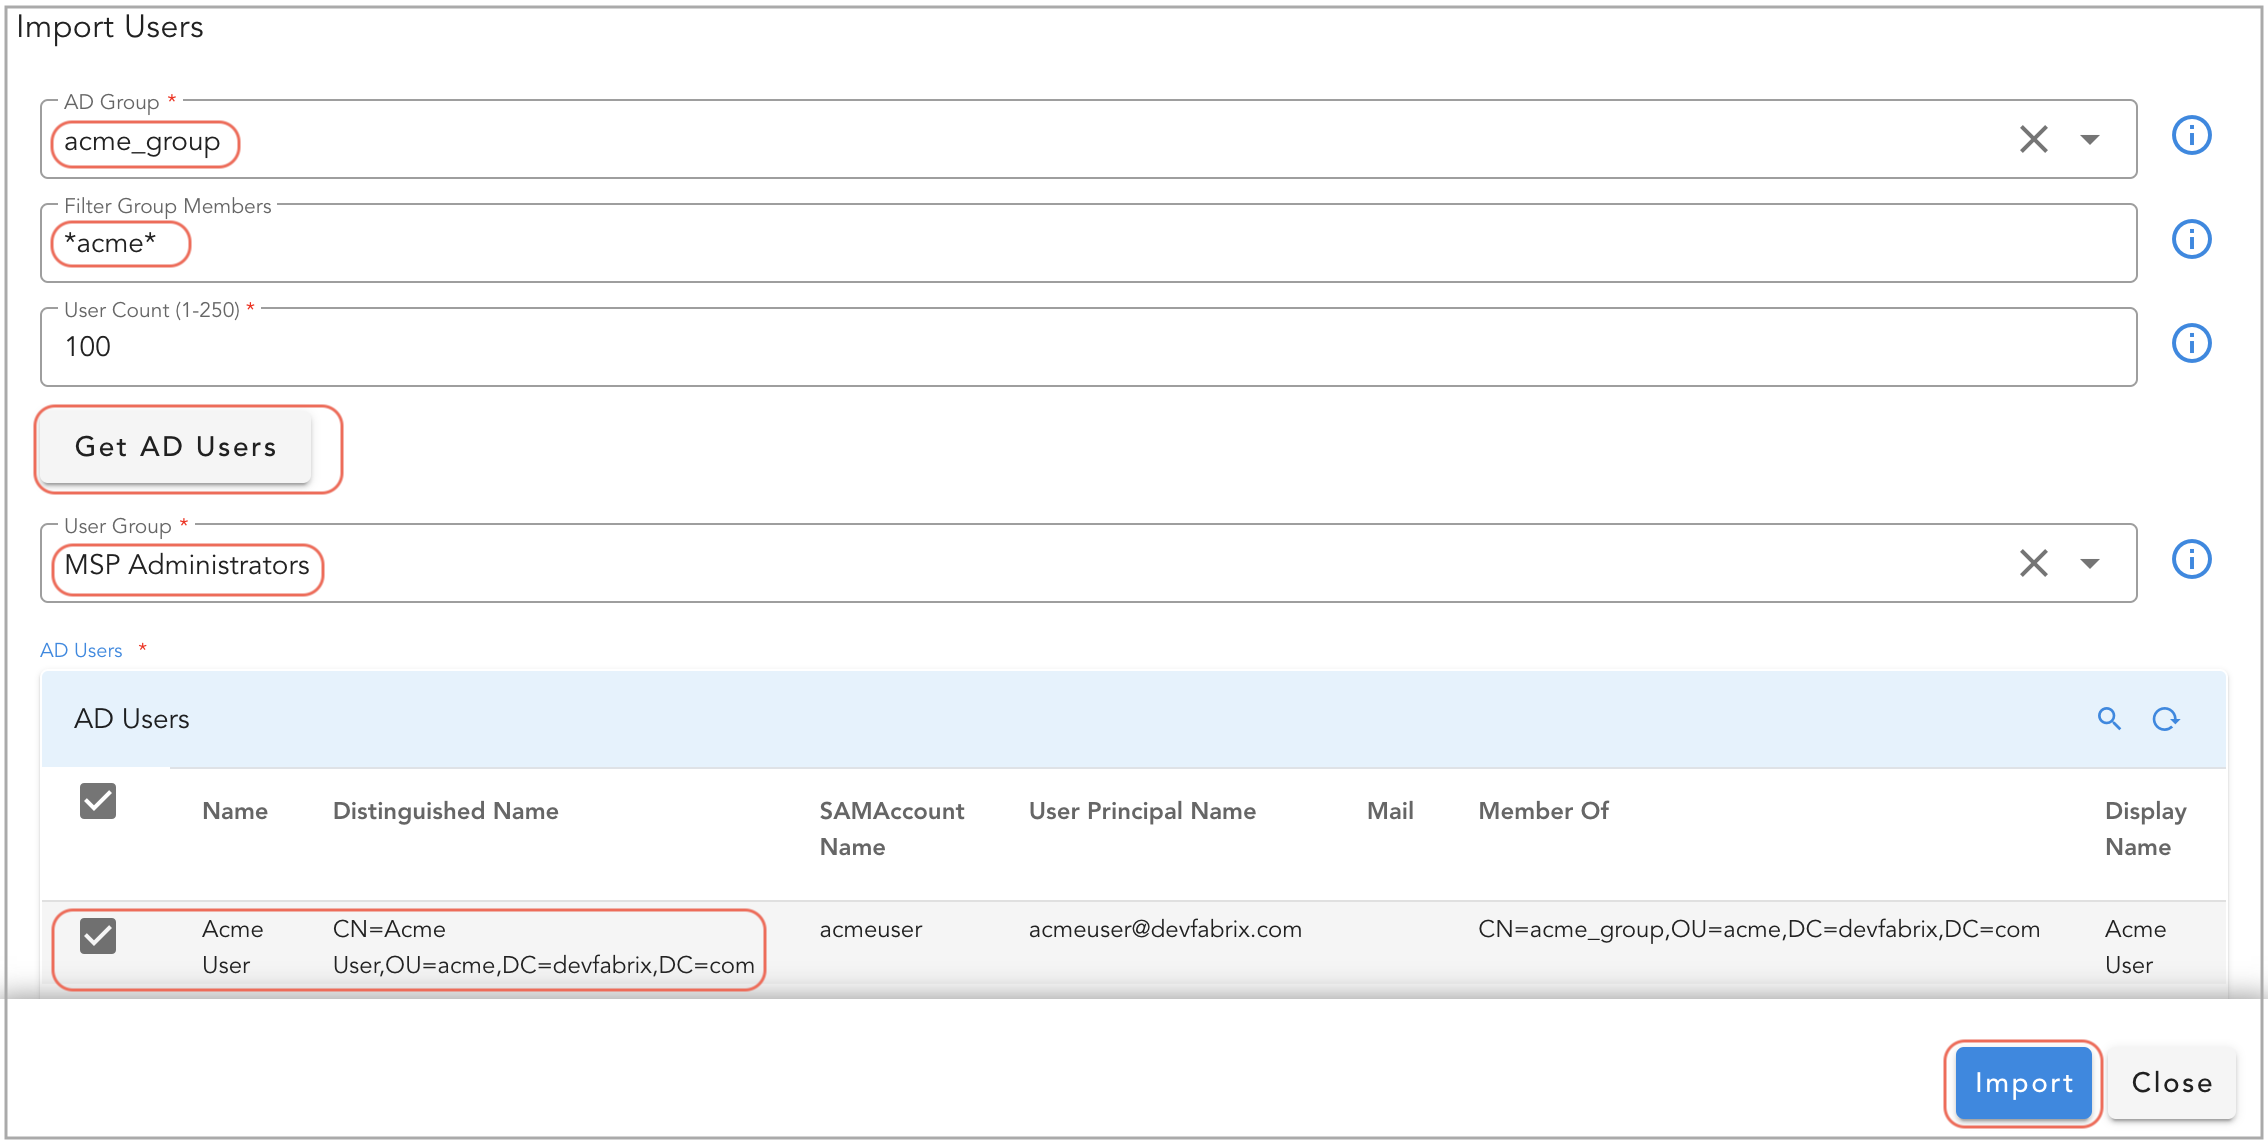
To add the Active Directory users, click on Users section.
Click on Import Users button to add one or more Active Directory users.
In the pop-up window, below options are available.
-
From AD Groups: Select this option to list all of the imported Active Directory user groups in the above step. It allows to select one of the user group from which Active Directory Users can be imported. (Note: If the Users are part of Domain Users group, please select the below option instead.)
-
From AD Default Group: Select this option to import the users from default Active Directory group i.e. Domain Users
-
AD Group: Select one of the Active Directory group from the list. (Note: This option only available when From AD Groups option is selected above.)
-
Filter Group Members: Enter username string with a wildcard, such as
*acme*(as an example), and click on Get AD Users to retrieve a list of users that match the wildcard filter. -
User Count: The default value is 100, and the maximum supported value is 250. This value is set to limit the number of users to be imported from Active Directory.
-
User Group: Select Local User Group that was created with a User Role to associate one or more Active Directory users.
-
AD Users: Select one or more Active Directory users to be imported.
Click on Import button to import the Active Directory users.
Delete Imported Active Directory Users & User Groups:
Go to Main Menu --> Administration --> Authentication Servers --> User Groups or Users
Select User Group and from the action menu, click on Delete
Select User and from the action menu, click on Delete
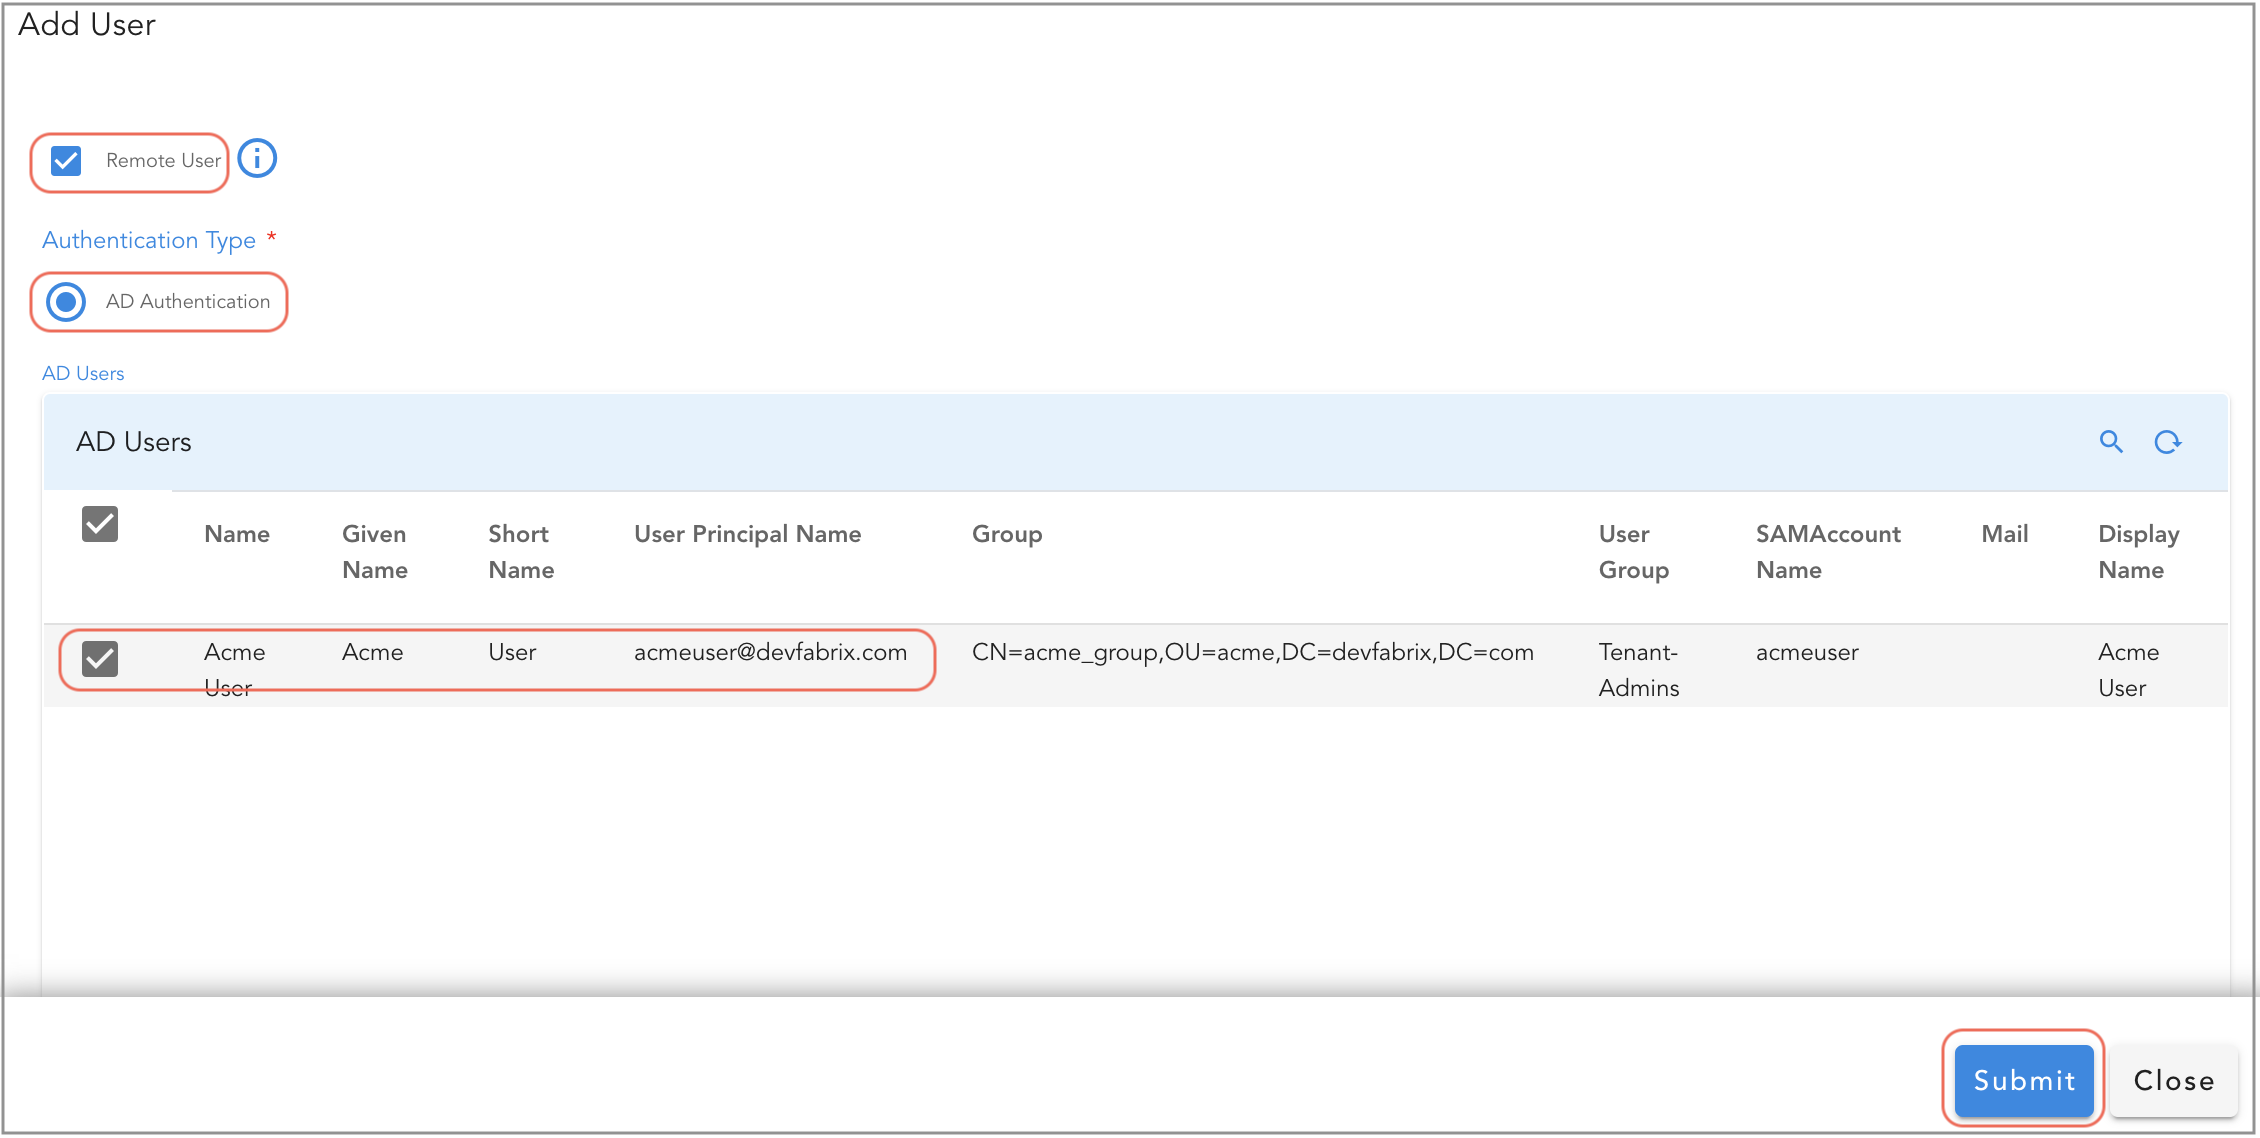
2.2.2 Add Active Directory Users
Go to Main Menu --> Administration --> Users
Click on Add User action button to add one or more Active Directory users.
Click on Remote User check box, under AD Users table, select one or more Active Directory users and click on Submit button.
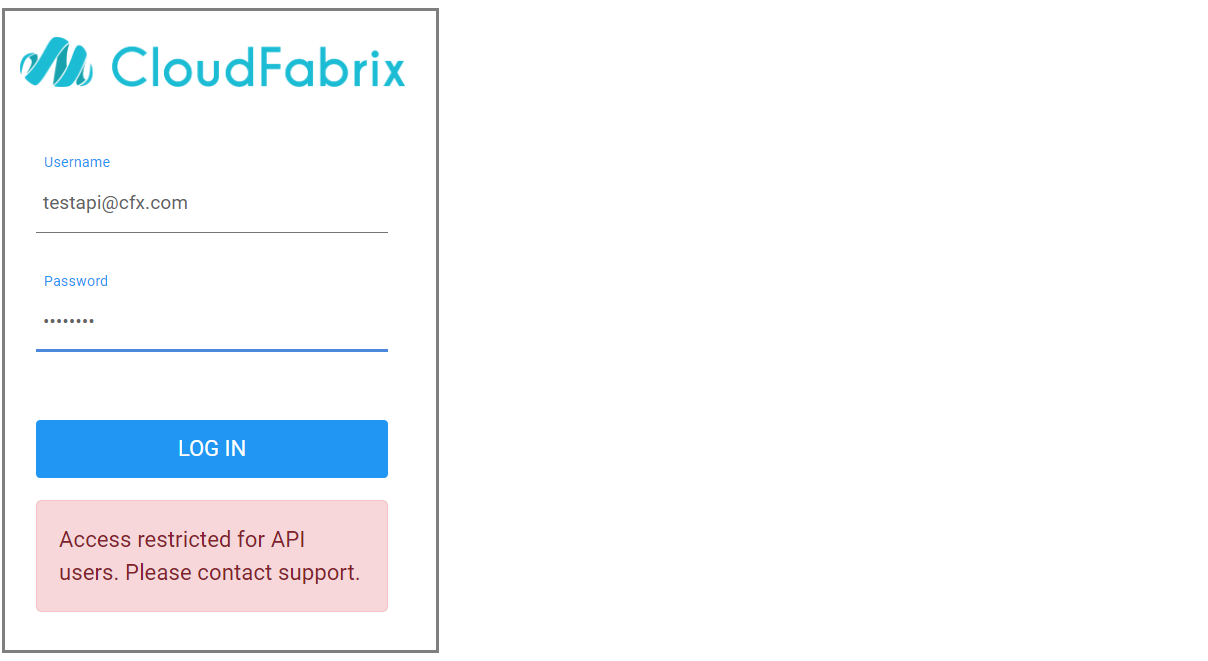
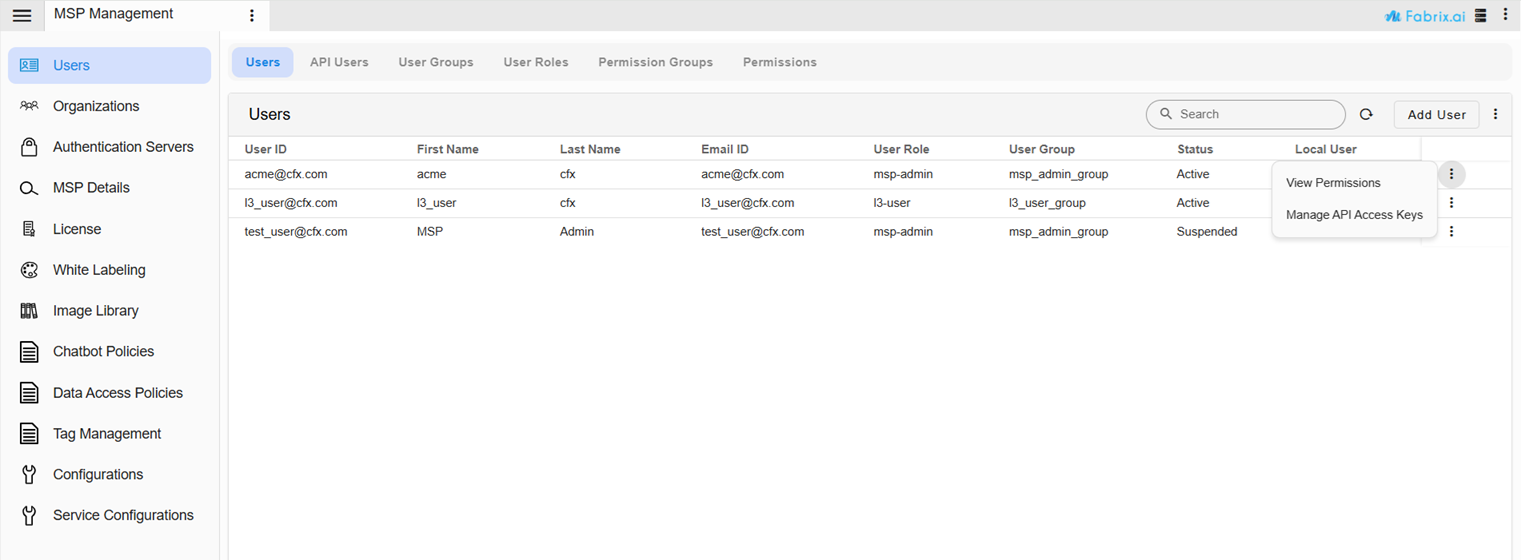
2.3 API Users
2.3.1 Onboarding API Users
-
On the Administration user's page, there is a New API Users Tab for users.
-
Navigation Path: Go to Homepage -> Administration -> Users
-
In order for API users to access the APIs in accordance with their roles, they will be assigned to a user group.

Click the Add user option to add new users.

- Users on-boarded through the API users report will only have access to the APIs. These users are restricted from logging into the portal.
MSP Admin users can also perform Deactivate, Delete, and Change Group actions on API User accounts.
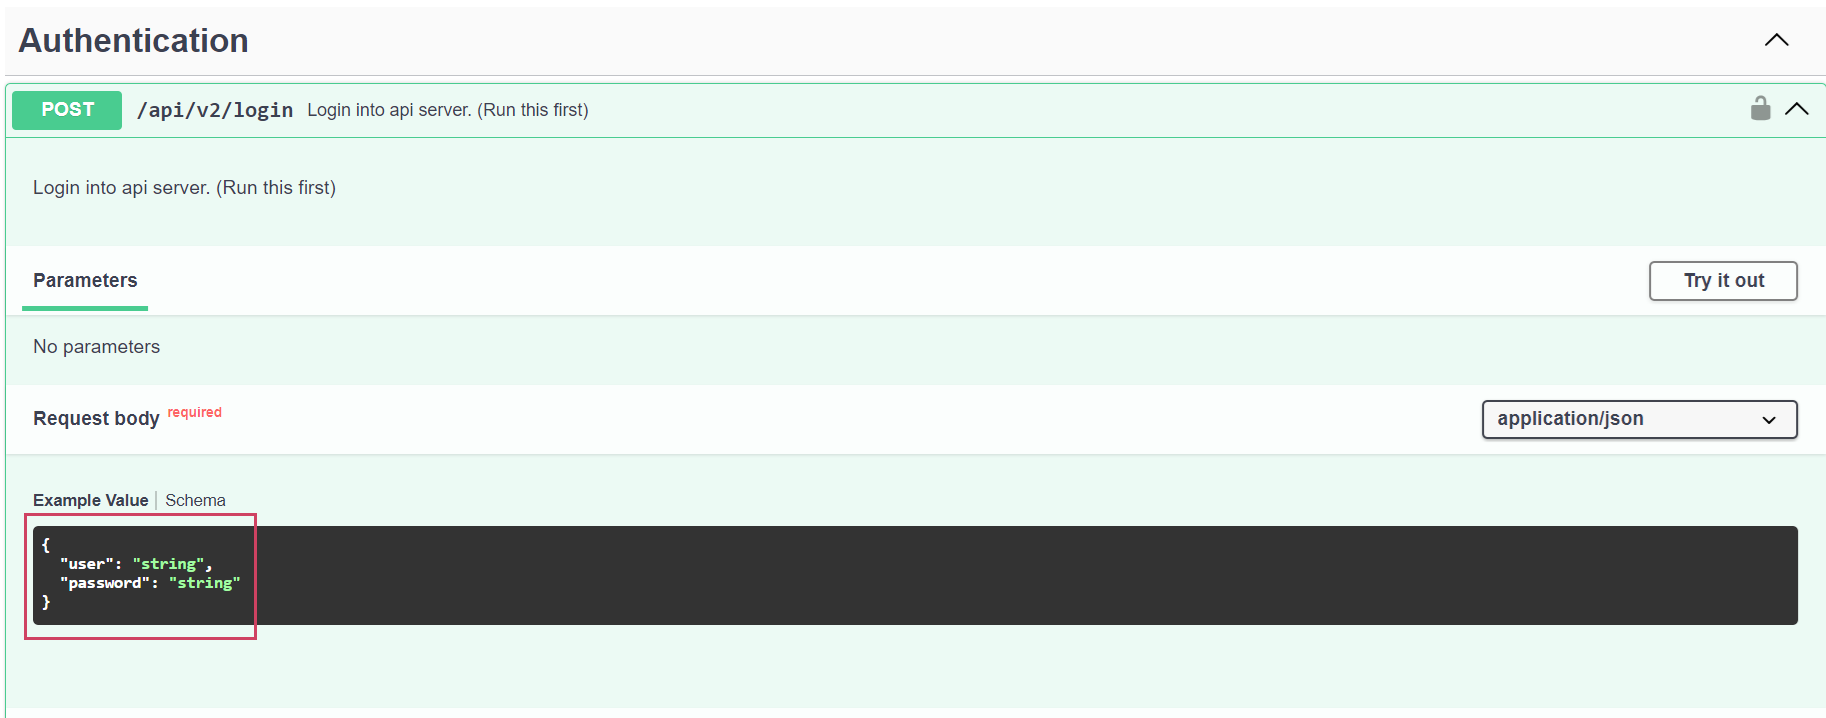
To Access Swagger APIs use the below mentioned URL
In Swagger APIs, there are two ways of authentication1. Using an Authorization Token

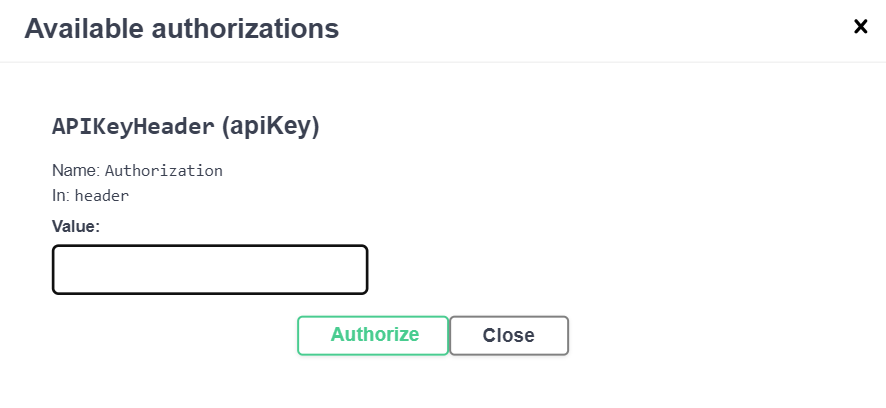
2. Using a User ID and Password
API users can authorize only using tokens and cannot use the user ID and password for login. Regular users can authorize using an authorization token or a user ID and password.
2.3.2 View Access Token
Navigation Path: Go to Homepage -> Administration -> Users -> API USERS -> View API Access Token
Admin users (MSP Admin) can generate the API Access token for each user using the row level action (View API Access Token) and share it with API users. Token can be copied using the Copy to Clipboard action as shown in the screenshots below.
Users can access API using the generated tokens


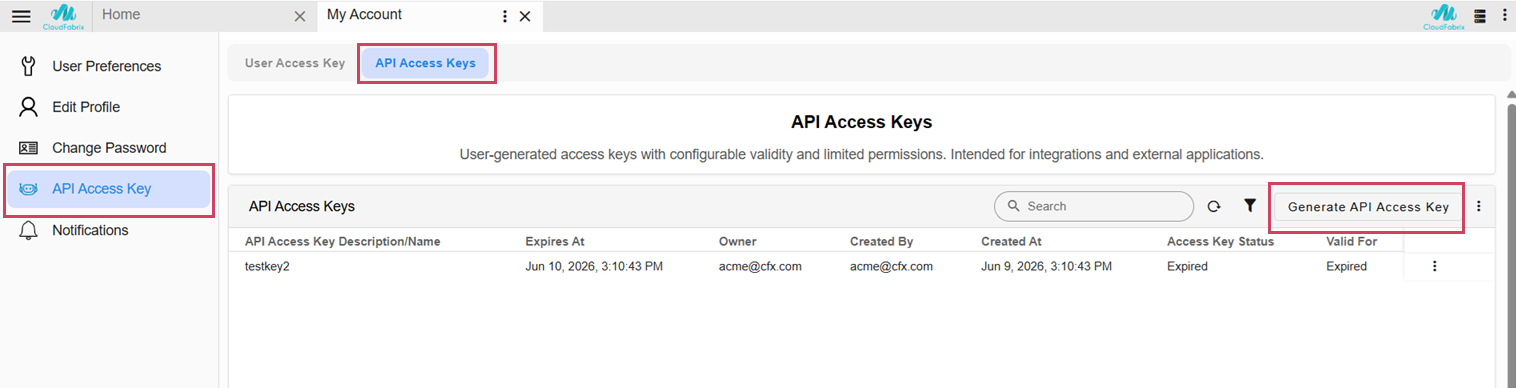
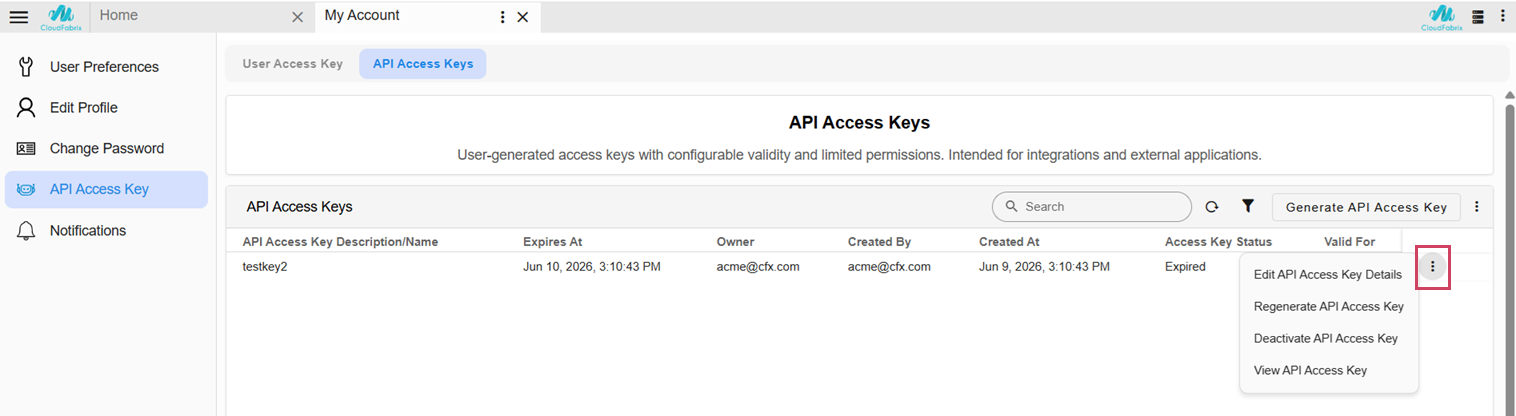
2.4 API Access Keys
Warning
The API Users feature is available in 8.2.1. However, in releases after 8.2.1, the feature is deprecated, with only the View action supported. Creation of new api users is no longer allowed. Going forward, use API Access Keys, which provide user-generated credentials with configurable validity periods and scoped permissions for integrations and external applications.
Navigation Path: Home → Administration → Users → API Users
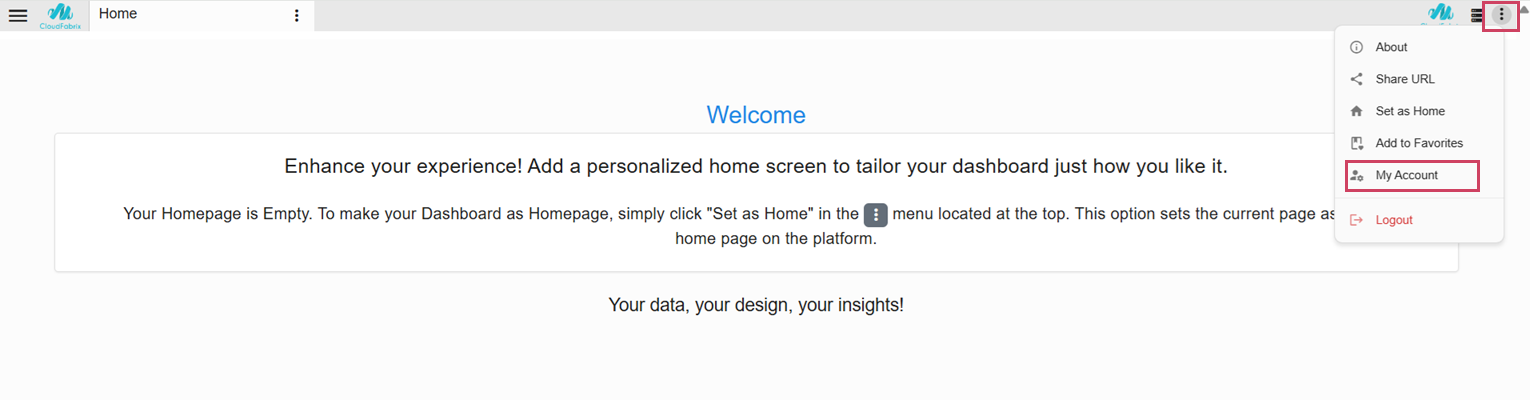
Your own keys: Home → My Account
Users will see two types of access keys: User Access Keys (short-term access) and API Access Keys (configurable validity).
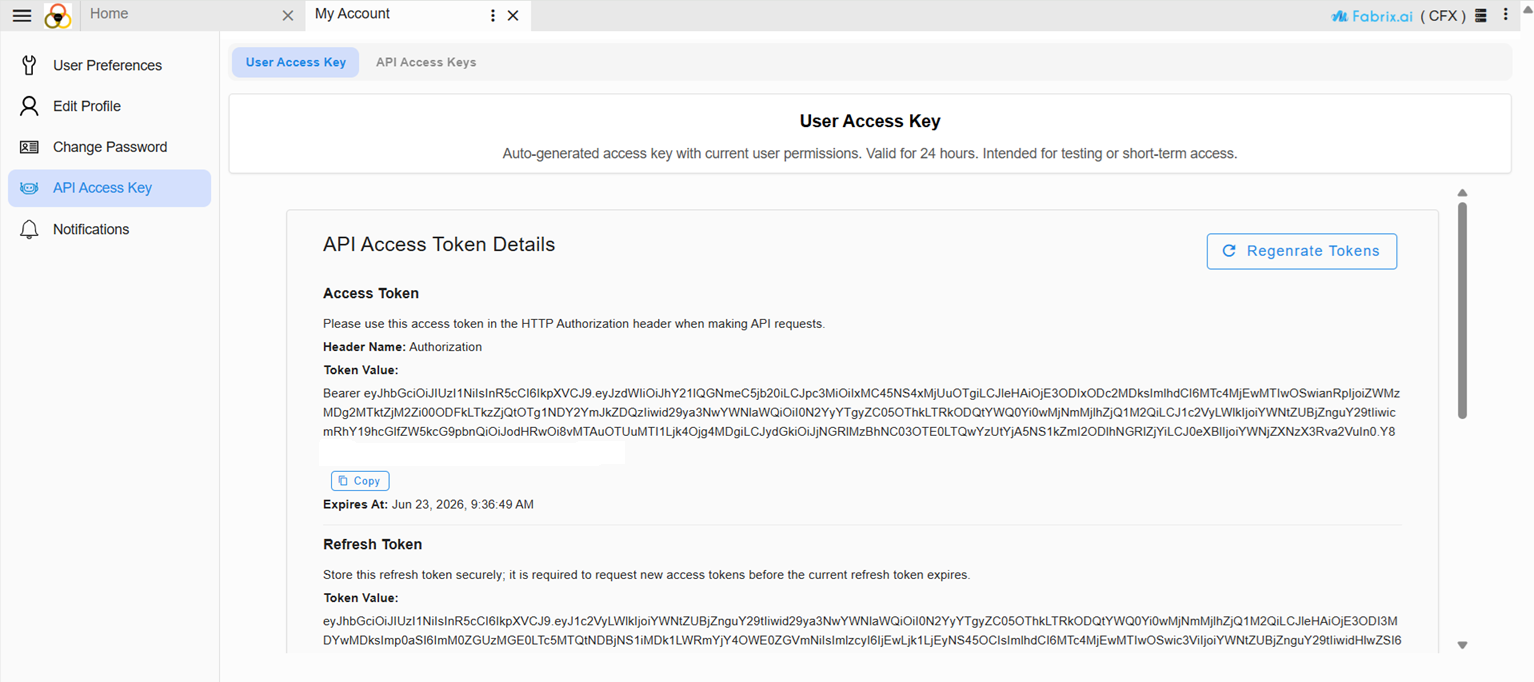
User Access Key : Auto-generated access key with current user permissions. Valid for 24 hours. Intended for testing or short-term access. For more info please click here
API Access Keys : User-generated access keys with configurable validity and limited permissions. Intended for integrations and external applications.
2.4.1 Generate API Access Key
Location: My Account → API Access Keys → Generate API Access Key
Admin path: Administration → Users → select user → Manage API Access Keys → Generate
2.4.2 Key Generation Wizard
In first Page the user has to provide the details given in the Key Configuration below, When the user clicks next it would generate the token in the second page
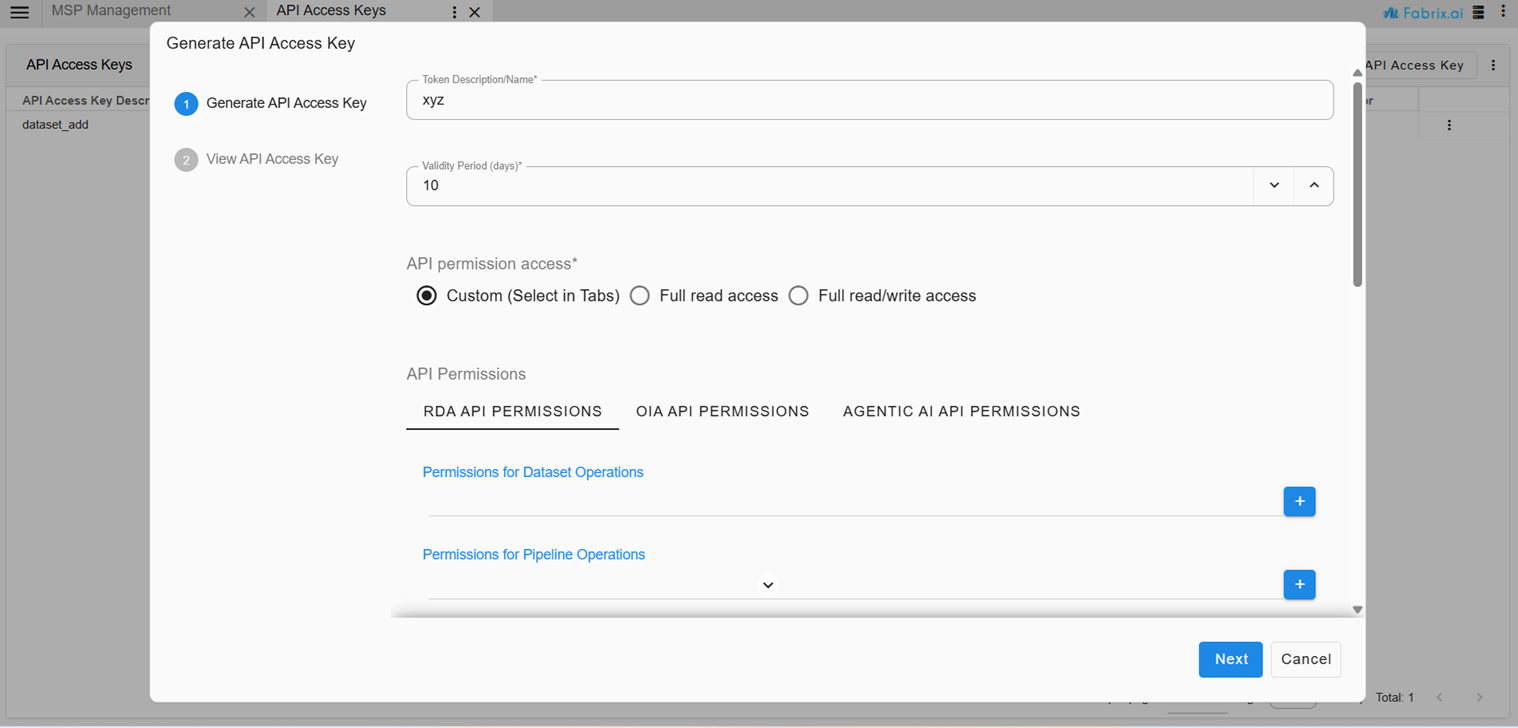
Key Configuration
| Field | Notes |
|---|---|
| Token name | A label to identify the key |
| Validity (days) | Must be between 1 and 365 |
| Permission scope | Custom, Full Read, or Full Read/Write |
| Organizations | Shown only if the parent user is multi-tenant with more than one org |
| Artifact permissions | Shown only when scope is Custom — limited to the parent user's permissions |
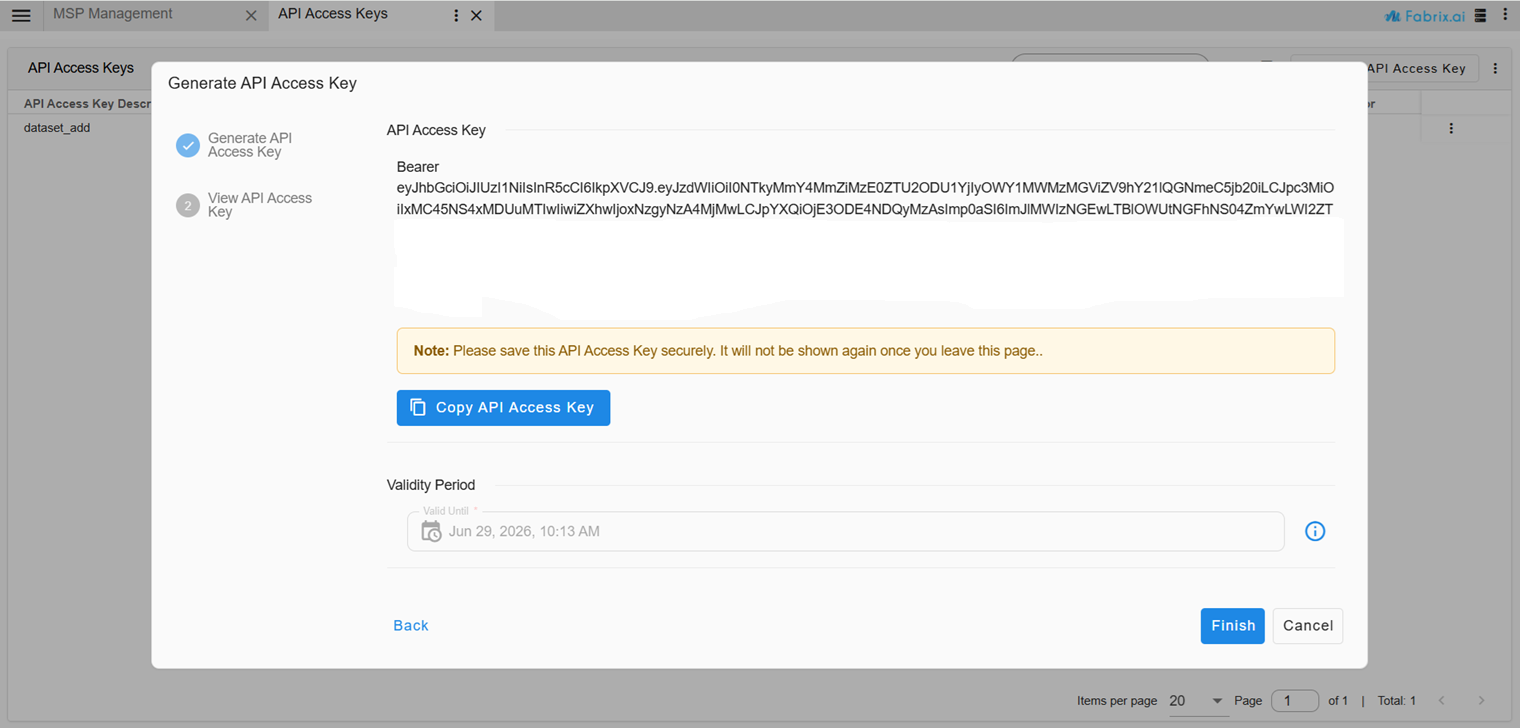
Copy API Access Key
Note
The API Access Key is displayed only once at generation. Copy and store it securely.
-
The Valid Until date is shown if expiry metadata is available.
-
After leaving this page, the API Access Key is never shown again.
2.4.3 Validation Rules
Rules to generate valid key
| Scenario | Expected Result |
|---|---|
| Validity = 0 or blank | Error — key not created |
| Validity = 366 or more | Error — key not created |
| Validity = 1 or 365 | Accepted |
| Parent has one org only | No org selector shown |
| Parent is multi-tenant with multiple orgs | Org selector shown and required |
| Admin generates for another user | Key is created under that user, not the admin |
2.4.4 View API Access Key
- The token field shows a masked placeholder — the live API Access Key is never shown here.
- Permission scope and expiry are visible.
2.4.5 Regenerate API Access Key
Issues a new API Access Key and allows setting a new validity period. Permissions and organizations remain unchanged.
- Current expiry and name are read-only.
- Enter a new validity (1–365 days) and submit.
- The new API Access Key is shown once on "Second Page" — the same copy-once rule applies.
- The Regenerate option is hidden when the key status is Suspended.
2.4.6 Edit API Access Key
Allows updating key settings without issuing a new API Access Key.
| What Can Be Changed |
|---|
| Organizations / projects (within the parent user's allowed set) |
| Permission scope (Custom / Full Read / Full Read/Write) |
| Artifact permissions (when scope is Custom) |
2.4.7 Deactivate, Activate, and Delete
| Action | When Available | Result |
|---|---|---|
| Deactivate | Key is Active | Key is suspended — authentication stops working |
| Activate | Key is Suspended | Key is re-enabled. Status shows Active if not expired, Expired if past validity |
| Delete | Key is Pending or Suspended | Key and all its dependent artifacts are permanently removed |
2.4.8 Admin — Managing Another User's Keys
- Admins (
msp-admin,workspace-admin) can manage keys on behalf of any user. - Keys generated this way are owned by the selected user, not the admin.
- Non-admins can only edit keys they own.
2.4.9 Background Sync
When a parent user's settings change, all the keys associated with the user are automatically updated. Sync runs in the background wait a few seconds before verifying results.
- Sync Triggers
| What Changed | Who Is Affected | Updates Applied to the Key |
|---|---|---|
| Custom tenant profile saved | All human users on that profile | Permissions + multi-tenancy |
| User group updated (projects changed) | All human users in that group | Projects (and permissions + multi-tenancy if profile also changed) |
| Permission group updated | Users whose profiles reference that group | Permissions only |
| User moved to a different group | That user only | Permissions + multi-tenancy + projects |
- Parent Status Change —
preservedStatusBehaviour
Each key tracks two status fields:
| Field | Meaning |
|---|---|
status |
The current effective status of the key |
preservedStatus |
The owner-set status (assigned when the key is created or updated). Not overwritten when the parent is suspended. |
How status and preservedStatus change across actions:
| Action | status |
preservedStatus |
|---|---|---|
Key created (addTokenUser) |
Set from input (default: Active) | Same as status |
Key updated (updateTokenUser — status change) |
Updated | Set to the new status |
| Parent suspended | All tokens → Suspended | Unchanged |
| Parent activated | Restored to Active only where preservedStatus = Active; otherwise unchanged |
Unchanged |
| Parent set to any other status | Bulk updated | Unchanged |
Example:
- Token A: Active, Token B: Suspended (owner-set) — both have matching
preservedStatus. - Parent suspended → both
status= Suspended;preservedStatusunchanged. - Parent activated → Token A → Active; Token B stays Suspended (
preservedStatusis still Suspended).
Note
Existing rows without preservedStatus will not auto-restore on parent activation until the owner updates the token (which sets preservedStatus).
- Parent User Deleted
When a parent user is deleted, all keys owned by that user are removed, along with their associated user groups, profiles, and permission groups. No orphaned records should remain.
2.4.10 User Access Key
User access Keys are automatically generated and inherit the permissions of the currently authenticated user. These tokens are intended for short-term API access.
Token Validity
| Token Type | Validity |
|---|---|
| Access Token | 24 Hours |
| Refresh Token | 7 Days |
- Using the Access Token
Include the access token in the HTTP Authorization header when making API requests.
- Refresh Token
Store the refresh token securely and use it to obtain a new access token before the current access token expires.
When a token refresh request is successful, the response includes.
- A new access token valid for 24 hours.
-
A new refresh token valid for 7 days from the time of rotation.
-
Regenerating Tokens
Use the following API endpoint to generate a new access token and refresh token.
| Parameter | Value |
|---|---|
| Endpoint | https://<portal_host>/api/portal/users/tokens/rotate |
| HTTP Method | POST |
| Request Header | Content-Type: application/json |
| Request Payload | |
3. UI Management
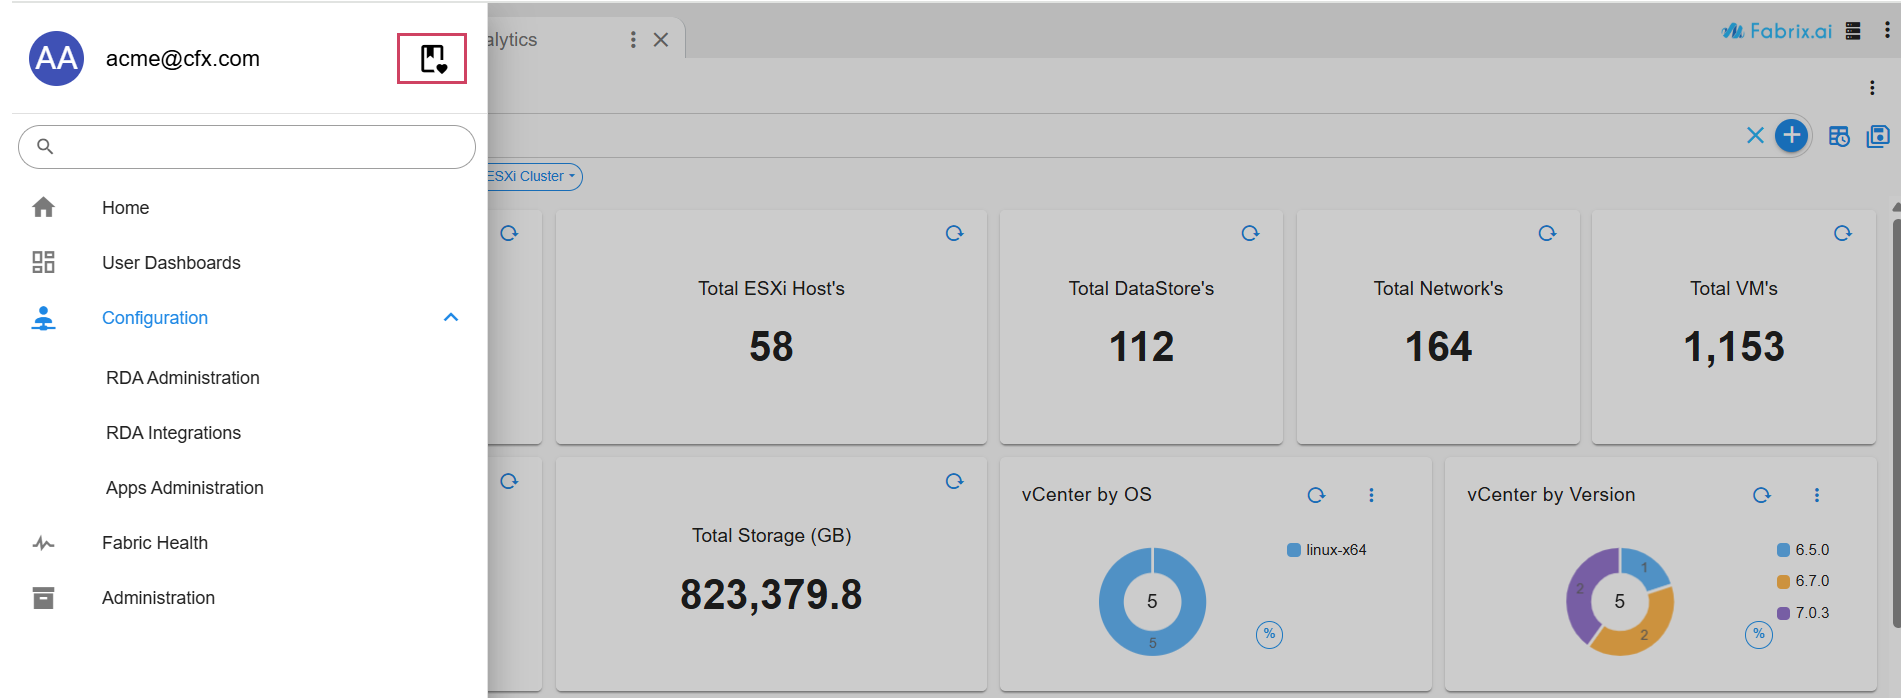
3.1 Favorites
RDA Fabric platform allows users to set any user dashboards or administrative / configuration pages as Favorites
Select the desired tab which needs to be marked as Favorite
Click on the 3 Dot Menu select Add to Favorites

Then a Pop-up appears then we can change the label to the User Defined Label

select the Tab that needs to be marked as favorite

Click on the UI Menu and select Favorite Icon as shown below in the screenshot
Tip
Please click on the pictures below to enlarge and to go back to the page please click on the back arrow button on the top.
User needs to click on the icon as shown in the below screenshot
Now the user can see the Tabs which they have marked as Favorite, when the user clicks on it, user will get navigated to the respective dashboard

4. Object Store
RDA Fabric platform supports raw files to be added to object store by uploading from the CFX portal UI.
Object Store configuration is located at Menu → Configuration → RDA Administration → Object Store
4.1 Add Objects
Users can add Templates/Files. To add a new file to Object Store, click on Upload action


Provide a Name for the file and a Folder Name to upload the file, then click on the Add button to upload the file.
Supported File Types
File Types |
|
|---|---|
| csv | html |
| pqt | txt |
| parquet | zip |
| pa | gz |
| orc | tar |
| json | yml |
| xlsx |
Note
If you need to reupload any template that was already added or stored, click on Upload and provide the same inputs for Name, Folder Name, and upload the new file along with the selection of the checkbox Enable Overwrite. Then click on Save.
4.2 Object Management
4.2.1 Download
- Allows to download the file that was uploaded earlier, The below Screenshots show how thats going to look like
Tip
Please click on the pictures below to enlarge and to go back to the page please click on the back arrow button on the top.

When the user clicks on to Download this is how its going to look like in the below screenshot.

4.2.2 Delete
- This option allows the user to delete the files that were added earlier as shown in the below screenshot.

When the user clicks on to Delete this is how its going to look like in the below screenshot.

5. Pstream Data Archival
Data retention supports the ability to backup the data and store it in storage object. It is supported to take backup automatically on a daily basis if archival is enabled on the data.
5.1 Enabling Data Archival
After login into CFX Portal UI go to Menu → Configuration → RDA Administration → Persistent Streams → Click Persistent Streams

Feature can also be enabled by passing a flag to a pstream while adding/editing the pstream.

Adding/Editing the required pstream
Parameter Name |
Mandatory | Description |
|---|---|---|
max_age_in_days |
no | Specify the number (days) after which the prior archived data is automatically deleted from the object storage. |
frequency |
no | Based on the specified interval, data is backed up. We currently only support daily. |
Note
When data collection happens for the first time it takes backup for the last 7 days.
5.2 Backup Collection
Daily Backup is configured to collect at 12AM UTC Time.
5.3 Backup Status
Once we have archival enabled for a pstream as it takes a backup, check if the backup is successful and once backup is successful users can see all the backups in CFX UI in the Archives page
Once we have archival enabled for a pstream as it takes a backup and once backup is successful users can see all the backups in CFX UI in the Archives page.

5.4 Download Archived Backups
All the successful backups collected/stored will be shown in the Archives page with the name of pstream(s). Click on the action of “View Archives” for a specific pstream user need to download the backup data.


Note
Download action gets enabled only when backup data has any update in the last 24 hours (daily schedule). If there is no update in data in the last 24 hours the action will not get enabled
5.5 Backup Data Transfer
Can a user transfer the downloaded, backed up data to a different setup? Yes, Once the file is downloaded, user will see a file named
pstreamName_dateofbackup_time tar.gz downloaded
n1_dashboards_data/2023/11/21/all_data_4b4ebde1.tar.gz
CFX supports multiple ways to Dump/Transfer backed up data to different setup
5.6 Ingest the Backup data to Pstream
-
As the file is downloaded on your computer you need to extract the
<backupfile>.tar.gzusing standard ‘gunzip’ or other utility. Once the file is extracted, user will see tmp folder in the same location. -
In tmp folder, user will see a file name
<tmp***>.gz, user is expected to to extract the gz file as well using gunzip or standard utility, Once extracted, user will see<tmp***>file -
As the extracted file will not have proper file extension, it will be saved as a document. Users can rename the file with extension as .csv. Ex:
<tmp***>.csv -
Login to CFX UI go to Menu → Configuration → RDA Administration → Persistent Streams → Click Persistent Streams and add the dataset using csv file. Click on Persistent Streams (below datasets) and make sure the new stream is present where the data needs to be copied or imported. If a stream is not present, create a new stream.
-
Click on Datasets (Page above to persistent streams) → Click Datasets and add the dataset using the csv file extracted in the earlier step.
-
On the new dataset that is created click on the action menu and select Ingest to Stream and select the stream name in the pop-up and click on Ingest. Users can check the status of data ingestion in rda_system_collector_ingestion_job_status in persistent streams report.
-
Data will be shown in the stream once data is ingested successfully to pstream.
Note
Timestamp date in pstream will be shown with the date that the backup has taken and with default time filter of Last 24 Hours data will not be shown in the pstream.
5.7 Using RDAC Commands
-
Copy the downloaded file to one of the VM where rdac is running.
-
Extract the file using below commands.
#tar -xvf <pstreamName_dateofbackup_time>tar.gz
#cd tmp/
#gunzip <tmp***>.gz
#mv <tmp***> <tmp***>.csv
-
Login to CFX UI go to Menu → Configuration → RDA Administration → Persistent Streams → Click “Persistent Streams” and add the dataset using csv file. Click on the Persistent Streams (below datasets) and make sure the new stream is present where the data needs to be copied. If a stream is not present, create a new stream.
-
Using rdac we can copy the data to pstream using the below command.
Below is the terminal output if data gets copied to stream.
Reading input data file...
Input data file has 1714 Rows and 62 Columns
Publishing 1000 rows..
Publishing 714 rows..
Completed loading of 1714 rows into stream demo_data in 1.3 seconds
6. Tag Management
-
Basic functionality of tags is to filter data displayed within dashboards dynamically
-
Only user with MSP Administrator role can tag artifacts
-
Artifacts that support tags:
a) Dashboards
b) Datasets
c) PStreams
d) Credentials
-
All users belonging to a user group with specific tag(s) when they login they see only the artifacts with those particular tag(s)
-
Example: If a User Group is assigned Tag Acme, all the users in that user group when they login will see only the filtered artifacts that have Tag Acme.
-
Users with msp-admin or workspace-admin role can see all the artifacts
Tip
Please click on the pictures below to enlarge and to go back to the page please click on the back arrow button on the top.
6.1 Add Tag
Login as user with MSP Admin role and go to Menu -> Administration -> Tag Management

After you click Tag Management user would have the option to Add Tag on the top right side as shown in the screenshot below where Name and Description can be added and saved

6.2 Edit Tag
If the added tag description needs to be edited, user will have the option on the top right side as shown in the screenshot below to edit the Description

After Adding Tag user would have the ability to edit description only for the added tag

6.3 Two Methods to Assign a Tag
6.3.1 Method One
- User needs to click on the Row Action and click on View Artifacts

View Artifacts action shows the artifacts with that particular tag. The following tables are shown:
-
User Groups : List of user groups with that particular tag
-
Dashboards : List of user groups with that particular tag
-
Persistant Streams : List of pstreams with that particular tag
-
Datasets : List of datasets with that particular tag
-
Credentials : List of credentials with that particular tag

User can pick a name from that particular Artifacts list and Assign a Tag
To assign tag to a user group user can click on Add Group and Click on the Group to assign the Tag as Shown below in the screenshot

To delete Tag from user group user can click on delete

Note
We can Follow the same procedure to Add and Delete Tags for other Artifacts such as Dashboards, Persistant Streams, Datasets & Credentials
6.3.2 Method Two
Go to Menu -> Configuration → RDA Administration click on the Row Action and select Manage Tags

Click on the Tags which the User wants to Assign

The assigned Tag can be seen as shown below in the screenshot

Note
The Method Two can be used only for Datasets , Dashboards & Credentials
7. Portal UI - System Default Landing Page
7.1 Default Homepage
When a User logs-in, the first page which shows up is the Landing Page, By default user can start the landing page in different places, User Group Level and User Level
Tip
Please click on the pictures below to enlarge and to go back to the page please click on the back arrow button on the top.
Default Landing Page would look same as shown in the screenshot shown below, when a user logs in for the first time the below home screen will be shown
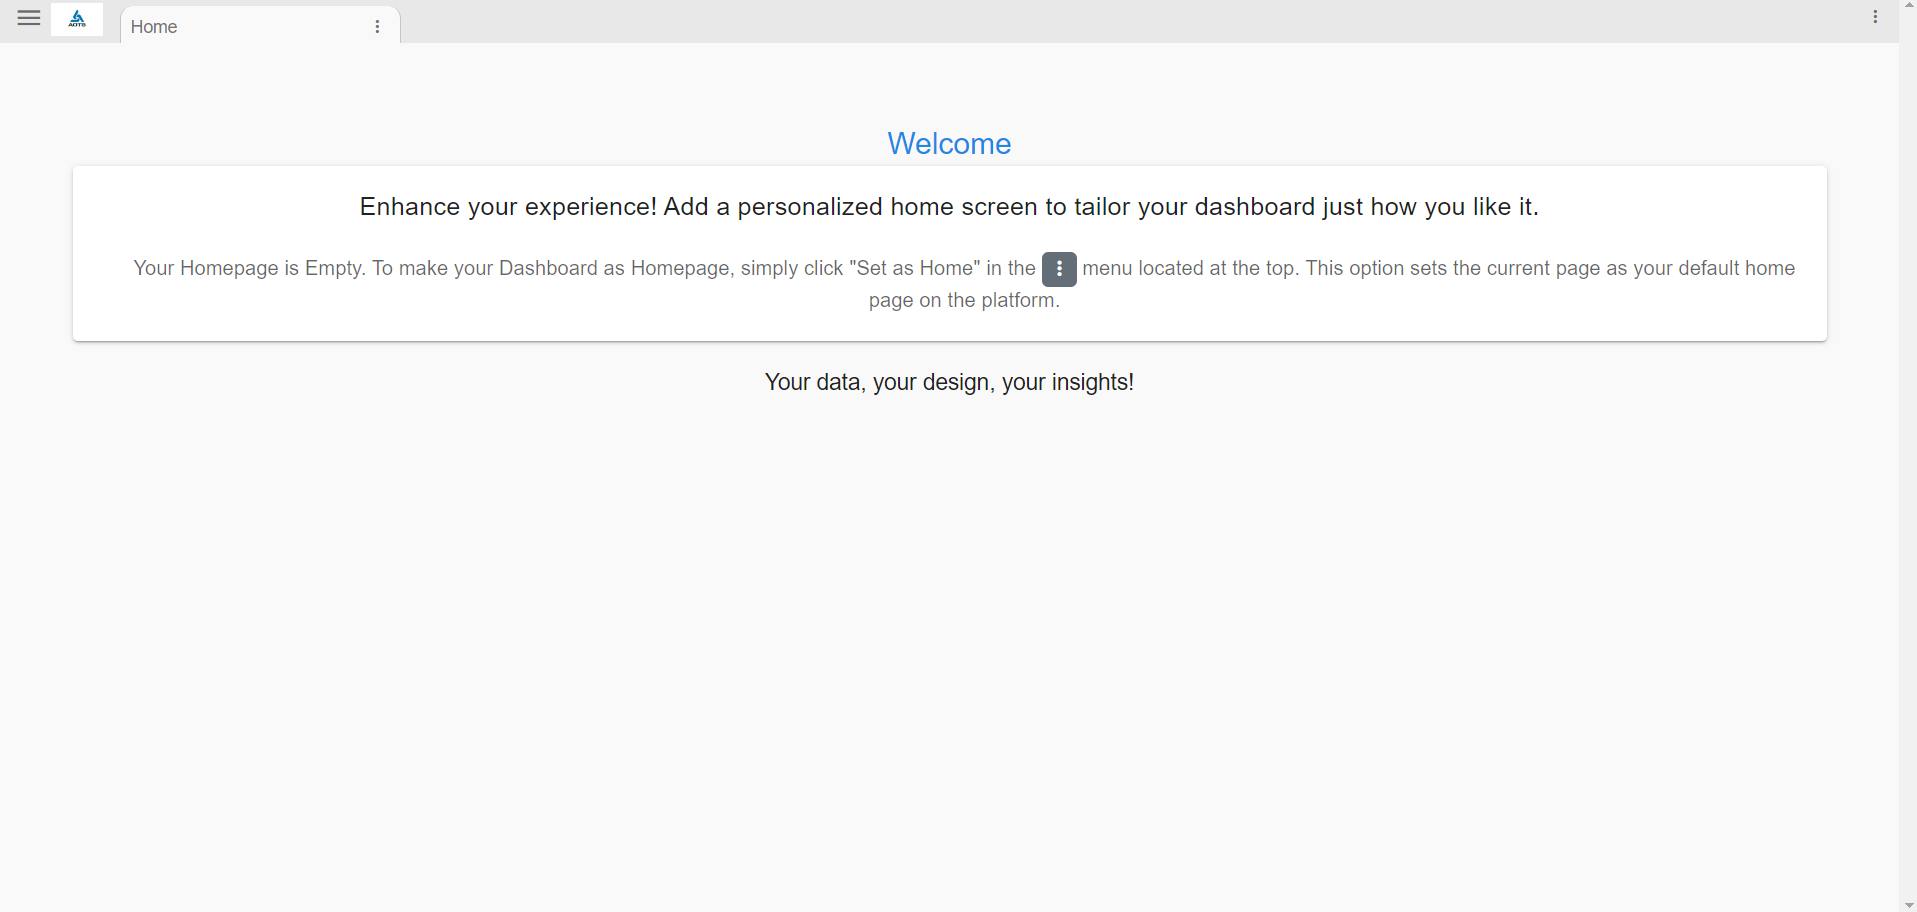
7.2 User Group Level
Only MSP Administrator can setup home page at User Group Level. This step sets a default home page for all users in that user group. Once logged in as MSP Administrator, Go to the top on the left click and go to Administration --> Users --> User Groups and has action then select a dashboard to be the home page and select Set Homepage all users within the user group will have the same homepage


The screenshot below shows the selected homepage appearing when the user clicks on Home in the left-side menu bar.

7.3 User Level
In the below screenshot a user by the name acme@cfx.com is logged in

Note
The Below step is for example purpose only, User can select any Page to set as Homepage
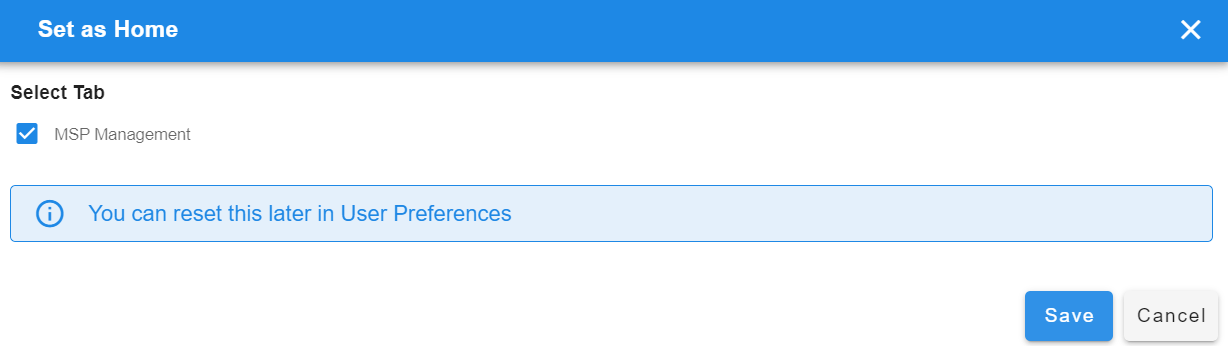
when user logs in, Menu --> Administration --> Authentication Servers --> top right side user has the option to Set as Home as shown below in the screenshot.

Here in the above screenshot the user selected Authentication Servers page as homepage and the user needs to click on Set As Home and then click on Save
Go back to the Main Menu and click on Home again, the above updated homepage can be seen here in the Below Screenshot, This way they can select any page as Homepage

7.4 Reset Default Home Page
Note
What ever the Home page user sets in the above section 9.3 will get replaced to default Homepage
if a user wants to go back to the default home page, he needs go to top right menu as shown in the below screenshot and select My Account

The User would have the option to Reset Homepage and go back to the default Homepage, click on Reset Homepage and Save

It goes back to the Default Home page which was L2 L3 Dashboard as shown in the one of the above screenshot
8. White Labeling
8.1 White Label Settings Using Portal
To update the white-label settings using Portal go to Menu -> Administration -> White Labeling -> Login Page
![]()
![]()
8.2 White Label Settings Using RDAC Command
Overview
To update the white-label settings using the RDAC command, users must provide a whitelabelsettings.json file containing the required properties. Each field in the file supports either an image or HTML content. The system prioritizes the image field, and if the image is null, the UI will use the HTML content.
- Use the below given RDAC command
Keynotes
- Publicly Accessible Images : For the login page, users must provide publicly accessible image URLs.
- Publicly or Internally Accessible Images: For app pages or MSP logs, users can provide either publicly accessible image URLs or internal paths (e.g., /iconlib/).
{
    "login_title": "Cloudfabrix Login",
    "login_tab_logo_img": "",
    "login_main_logo_img": "",
    "login_main_logo_html": null,
    "app_page_right_branding_img": "",
    "app_page_right_branding_html": null,
    "app_page_left_branding_img": null,
    "app_page_left_branding_html": null,
    "app_page_msp_logo_img": null,
    "app_page_msp_logo_html": null,
    "workspace_tab_logo_img": "/iconpub/cfx_dcfb5022",
    "workspace_tab_title": "CloudFabrix Portal"
}
8.3 Field Descriptions
8.3.1 Login Page Properties
Properties |
Description |
Requirement |
Example |
|---|---|---|---|
| login_title | The title displayed on the browser tab | Cloudfabrix Login |
|
| login_tab_logo_img | The URL for the favicon displayed on the browser tab | Public URL or iconlib image with public access | https://example.com/favicon.ico or /iconpub/imagename |
| Login_main_logo_img | The URL for the main logo displayed on the login page | https://example.com/logo.png or /iconpub/imagename “ |
![]()
8.3.2 App Page Properties
Properties |
Description |
Requirement |
Example |
|---|---|---|---|
| app_page_right_branding_img | The URL for the right branding image on the app page | Public URL or iconlib url | "https://example.com/right_branding.png or /iconlib/image_name” |
| app_page_right_branding_html | HTML content for the right branding section if the image is not provided | " Custom Branding " |
|
| app_page_left_branding_img | The URL for the left branding image on the app page | Public URL or internal path (e.g., /iconlib/logo.png) | "/iconlib/left_branding.png" |
| app_page_left_branding_html | HTML content for the left branding section if the image is not provided. | ||
| app_page_msp_logo_img | The URL for the MSP logo displayed on the app page | Public URL or internal path | "/iconlib/msp_logo.png" |
| app_page_msp_logo_html | HTML content for the MSP logo if the image is not provided | " MSP Logo " |
|
| workspace_tab_logo_img | The URL for the favicon displayed on the app page browser tab | "/iconlib/favicon.png" | |
| workspace_tab_title | The title displayed on the app page browser tab | "Cloudfabrix Dashboard" |
![]()
8.3.3 Instructions
-
Create or update the
whitelabelsettings.jsonfile with the required properties as described above. -
Ensure that the image URLs are publicly accessible for the login page and either public or internal for the app pages.
-
Use the RDAC command to upload the
whitelabelsettings.jsonfile and apply the changes.
9. Image Library
The Image Library serves as a centralized, easy-to-manage collection of icons, designed for seamless reuse across your portal. Each icon is assigned a unique URL (/iconlib/name), making it simple to incorporate icons into white-labeling, dashboards, and reports.
Key features include:
-
Effortless Access: Quickly retrieve icons through their unique URLs.
-
Bulk Import & Export: Streamline your workflow by adding new icons or exporting the entire collection as needed.
-
Flexible Formats: Supports both
tar.gzandZIPfiles for importing and exporting. -
Command-Line Efficiency: Leverage RDAC commands for smooth and efficient icon management.
-
Thumbnails: Automatically generates thumbnails for each image uploaded to the Image Library, enabling faster previews without loading the full-size images.
9.1 Importing the Image Library
The import process allows user to upload a tar.gz file or zip file containing icons and an optional manifest.json file in archive into the system.
![]()
9.1.1 Steps to Import Single Icon
Navigation Path : Home -> Menu -> Administration -> Image Library -> Import Icon
![]()
1. Navigate to the Administration - Image Library page in the UI.
2. Click on Import Icon action to upload individual icon with the following formats (ex. jpeg, jpg, png, gif, ico)
3. Click the Import button to start the process.
9.1.2 Steps to Import Bulk Icons
1. Navigate to the Administration - Image Library page in the UI.
2. Click on Import Icons action and Select the tar.gz or zip file to upload.
3. Click the Import button to start the process.
![]()
9.1.2.1 Archived file format for Bulk Import with Examples
![]()
[
    {
        "name": "logo",
        "is_public": true,
        "path": "/icons/logo_16841110.jpeg",
        "id": "16841110",
        "uploadedBy": "acme@cfx.com"
    },
    {
        "name": "fabrix_logo",
        "is_public": true,
        "path": "/icons/fabrix_logo_f93c75bd.png",
        "id": "f93c75bd",
        "uploadedBy": "acme@cfx.com"
    },
    {
        "name": "rdaf",
        "is_public": true,
        "path": "/icons/rdaf_3152b74d.png",
        "id": "3152b74d",
        "uploadedBy": "acme@cfx.com"
    },
    {
        "name": "ingestion",
        "is_public": false,
        "path": "/icons/ingestion_1bcebddb.png",
        "id": "1bcebddb",
        "uploadedBy": "acme@cfx.com"
    },
    {
        "name": "warning",
        "is_public": false,
        "path": "/icons/warning_1fc4b878.png",
        "id": "1fc4b878",
        "uploadedBy": "acme@cfx.com"
    }
]
![]()
![]()
9.1.3 Import Behavior
-
If
manifest.jsonis present in the archive, metadata from the file will be used, and public/private access passed via arguments or form will be ignored. -
Each icon in the library is assigned a unique name, with URLs following the format
/iconlib/name. During the import process, if an icon from thetarfile has the same name as an existing icon, the system automatically generates a new name in theformat name_<UUID string>. This ensures that:- No existing icons are overwritten.
- The import continues seamlessly, without skipping icons or raising errors.
-
If manifest.json is missing, the import function expects icons to be placed in the root directory of the tar file.
-
The import function does not support multiple directories within the tar file.
9.1.4 Tags Feature
Users can now assign one or more tags to an image during upload, making it easier to organize and categorize images. In addition to image names, users can also search images using tags.
How to Use
While uploading an image/icon in the Image Library, use the "Tags" field to enter relevant tags.
In the search bar, users can now enter tags to filter matching images
![]()
9.2 Exporting the Image Library
The export process enables you to create a tar.gz file containing the current image library, including a manifest.json file.
9.2.1 Steps to Export
1. Navigate to the Administration -> Image Library page in the UI and click Export Icons Action.
2. Specify the name for the exported file without extension (e.g., icon_library).
3. Click the Save button to generate the file.
4. The exported file will be added to My Downloads with the given name and can be downloaded from there.
![]()
![]()
![]()
![]()
9.3 Import and Export via RDAC Command
Please use the below mentioned command for help regarding image library
usage:

  import                    Import icons into the library from a zip or tar.gz file. The imported icons will be added to the Icon library
  export                    Export the entire image library to a specified path as a tar.gz file. The exported file will include icons and a manifest.json file with metadata

positional arguments:
  subcommand  icon-library sub-command

options:
  -h, --help  show this help message and exit
Note
To or From paths must be within the mounted directory path, e.g., /home/<any-path>
9.3.1 Import Command
Note
public parameter is optional and by default it is set to False.
Note
Refer section 9.1.2.1 for Source File Format
9.3.2 Export Command
10. SSO
10.1 SSO Auto Login
Automatic Login For SSO Users
This document provides instructions on how to enable SSO Integration with a Default User Group
10.1.1 Adding SSO Details
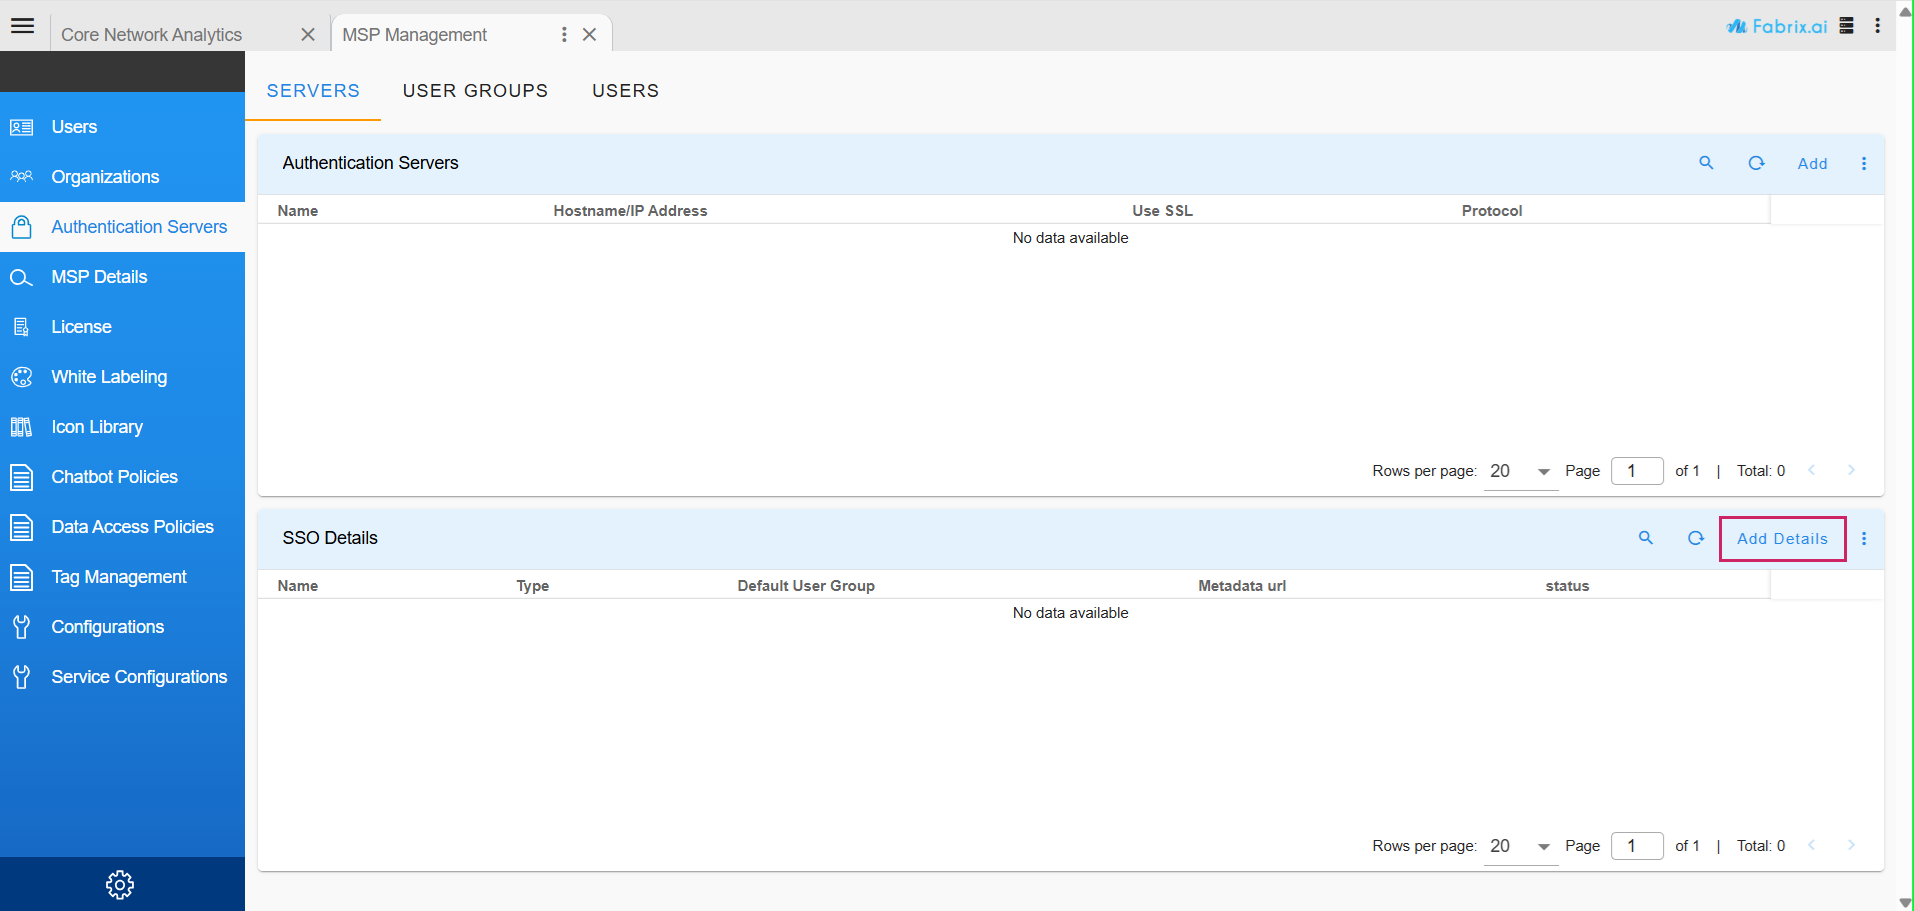
Login to UI → Click on Administration → Click on Authentication Servers → Servers → Click on Add Details in the SSO Details Section
Tip
Please click on the pictures below to enlarge and to go back to the page please click on the back arrow button on the top.

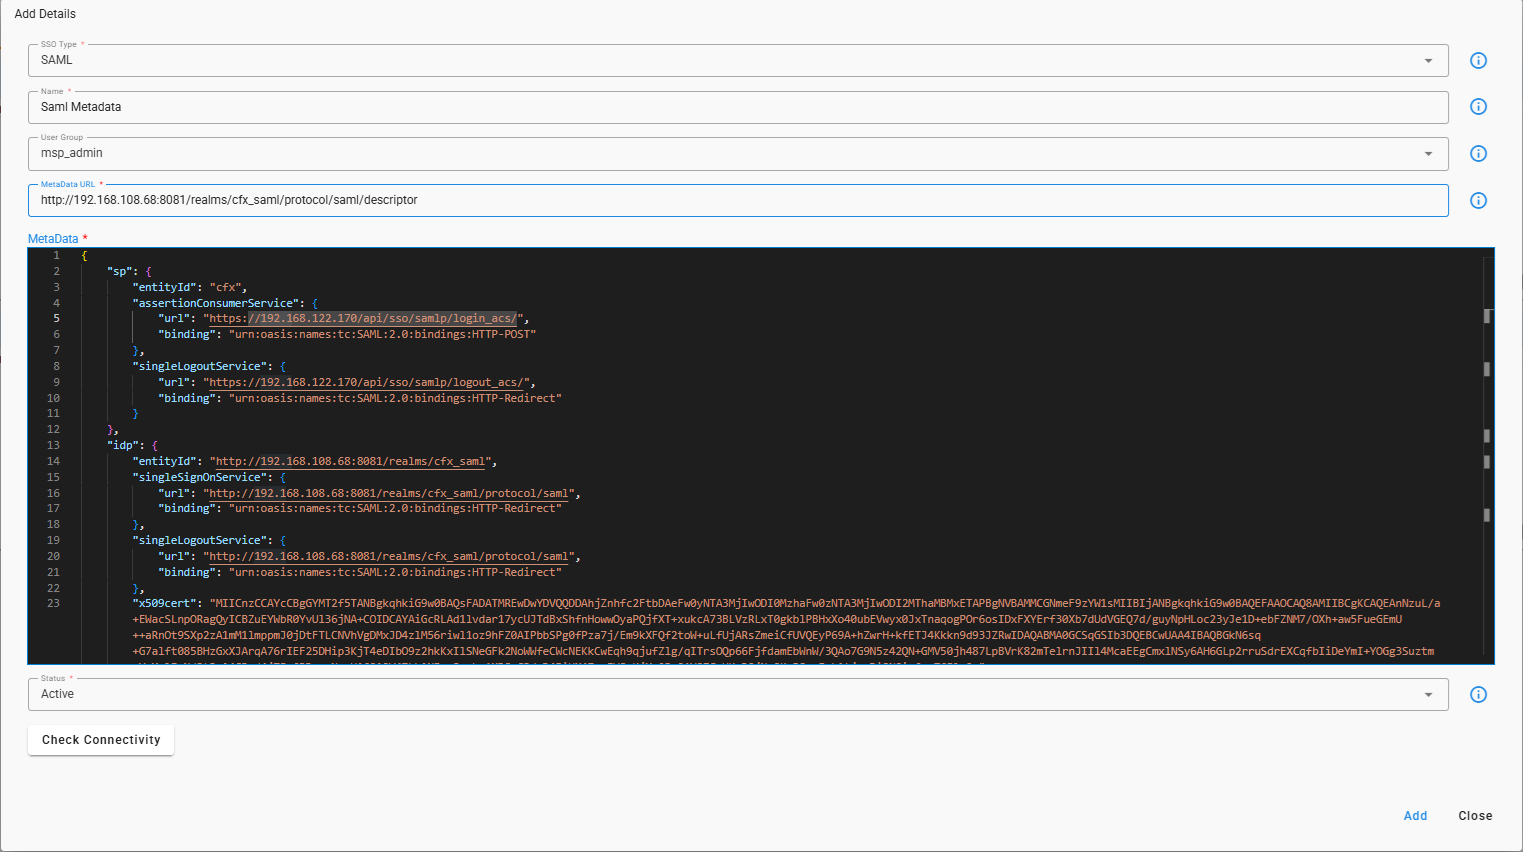
10.1.2 SAML Authentication Details
Please Provide the SSO Type and Name, Select the User Group in the drop down, Provide MetaData URL and Provide SAML Authentication Details in metadata Section as shown below
Note
Select the user group based on the user permissions like MSP Admin Group or Org Admin Group etc… Once you select the user group the remote users can login by default based on the permissions which you select by default.
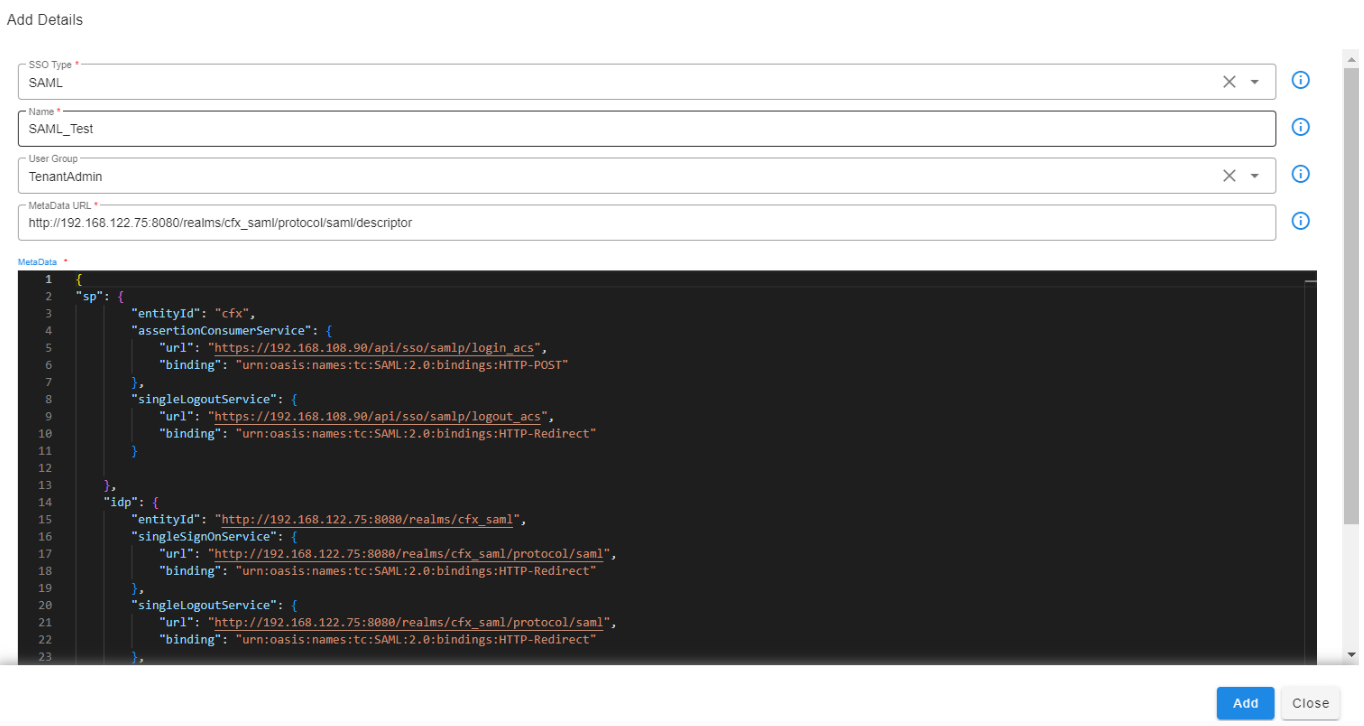
In the above config, the SP section we have to give the UI login IP or Hostname. Example: 192.168.108.90 IP is UI login IP
After successfully adding the SAML configuration, logout from UI and try to login with the remote users details like username and password
It will automatically login to the UI, based on the permissions and the user details will be added in the users section as shown below

10.2 Keycloak Integration
This guide provides instructions to deploy Keycloak in a development environment using Docker Compose.
10.2.1 Pre-Requisites
Before user begins, ensure the following requirements are met on host system:
- Docker is installed and running.
- Port 8080 is open and available.
Note
-
As an example,
192.168.108.68is being used as a host to deploy keycloak. -
https://myapp.example.comis being used as cfx portal base url. -
Replace the example URLs with your actual URLs.
10.2.2 Deploy Keycloak Docker Image
This section provides steps to deploy Keycloak using Docker Compose with a PostgreSQL database in a development environment.
Use the Docker Compose configuration below to deploy Keycloak with an admin user setup.
user can customize the following credentials as per user's preference:
1. Keycloak Admin Credentials
KC_BOOTSTRAP_ADMIN_USERNAME:adminKC_BOOTSTRAP_ADMIN_PASSWORD:admin
2. Database Credentials
POSTGRES_DB:keycloakPOSTGRES_USER:adminPOSTGRES_PASSWORD:admin
Note
Replace these default values with secure credentials for production environments.
Below is the Docker Compose file. You can copy the file and update the values as needed. To start the containers, run the following command.
Docker Compose for Keycloak DEV Environment
services:
  postgres:
    image: postgres:15
    container_name: keycloak_db
    environment:
      POSTGRES_DB: keycloak
      POSTGRES_USER: admin
      POSTGRES_PASSWORD: admin
    volumes:
      - keycloak_db_data:/var/lib/postgresql/data
    networks:
      - keycloak_net

  keycloak:
    image: quay.io/keycloak/keycloak:26.1.0
    container_name: keycloak
    command: start-dev
    environment:
      KC_DB: postgres
      KC_DB_URL_HOST: keycloak_db
      KC_DB_URL_DATABASE: keycloak
      KC_DB_USERNAME: admin
      KC_DB_PASSWORD: admin
      KC_BOOTSTRAP_ADMIN_USERNAME: admin
      KC_BOOTSTRAP_ADMIN_PASSWORD: admin
    ports:
      - 8080:8080
    depends_on:
      - postgres
    networks:
      - keycloak_net
    volumes:
      - keycloak_data:/opt/keycloak/data

volumes:
  keycloak_db_data:
  keycloak_data:

networks:
  keycloak_net:
10.2.3 Login to Keycloak Admin Console After Successful Deployment
After the containers are up and running, follow these steps to access the Keycloak Admin Console:
-
Open your browser and navigate to:
http://192.168.108.68:8080/admin -
Log in using the admin credentials you set during container startup.
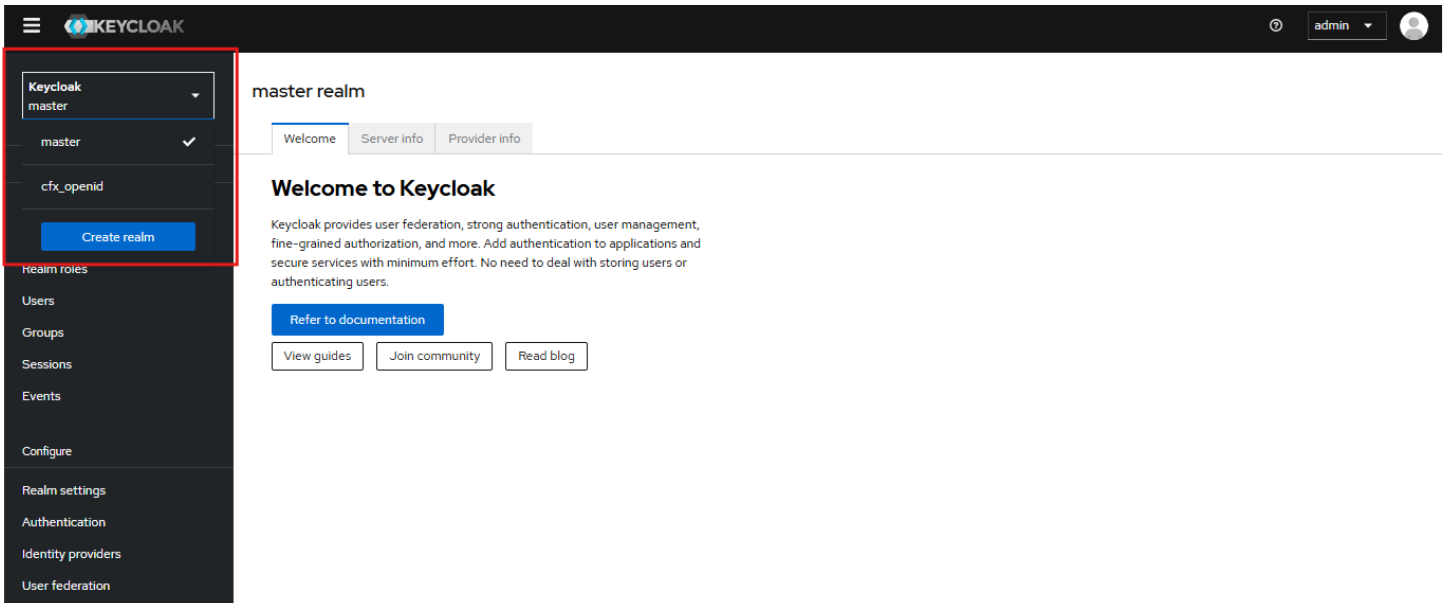
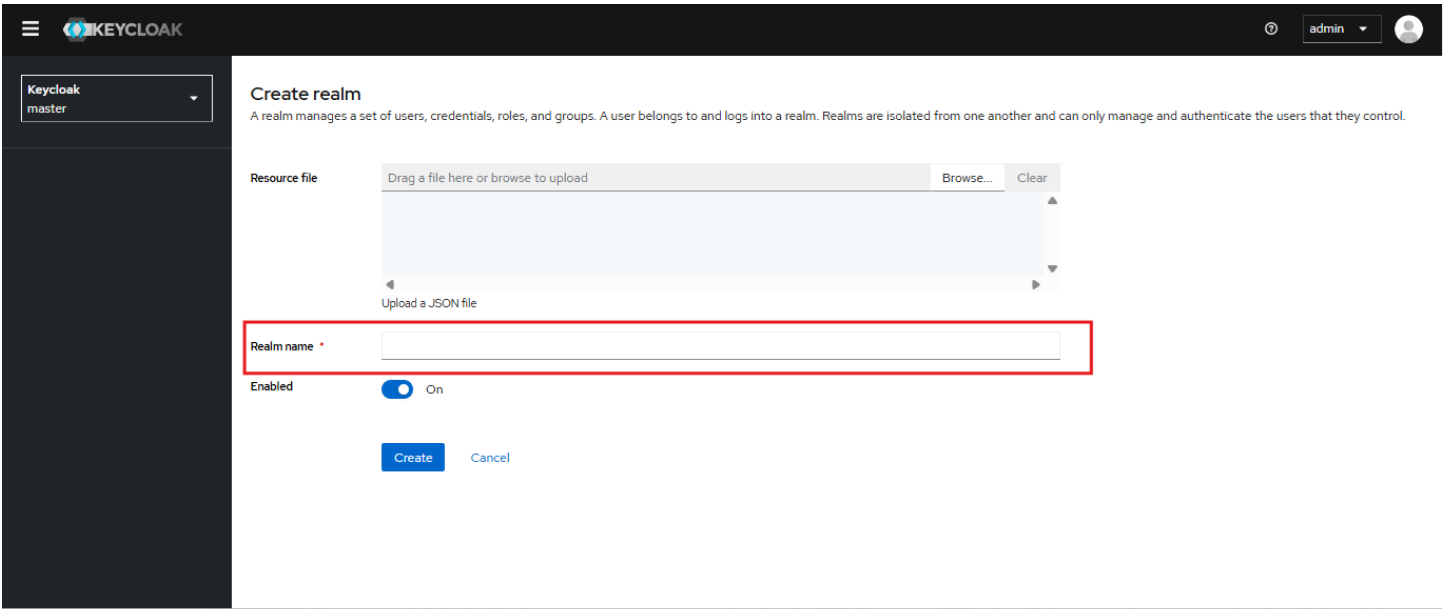
10.2.4 Create a Realm
To create a new Realm in Keycloak:
1. Click the Realm selector (top left corner of the Admin Console).
2. Click "Create Realm".
3. Set the Name, for example: myrealm.
4. Click Create to save the new realm.
Keycloak supports both OpenID Connect (OIDC) and SAML 2.0 protocols for authentication and single sign-on (SSO) integration
10.2.5 Onboarding User on Keycloak
Create User
-
Click Users (top left corner of the Admin Console)
-
Username: Enter an email ID, for example:
myname@cfx.com. -
Enter Email, First name $ Last name
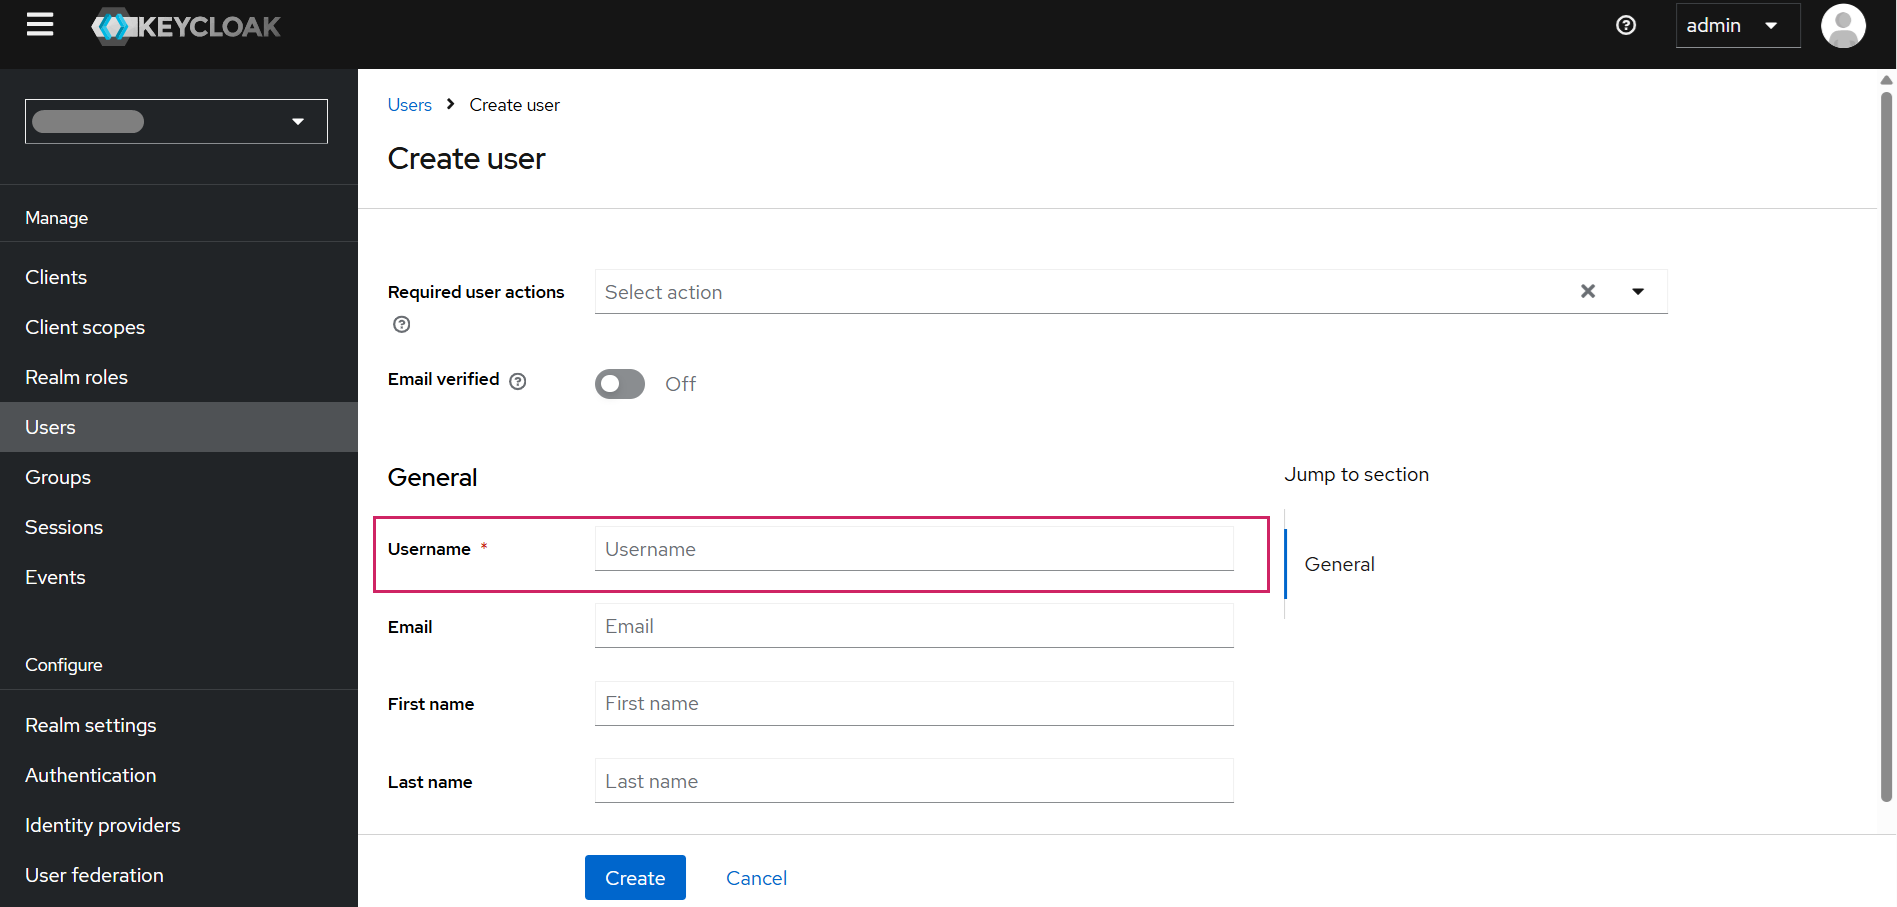
-
After entering the details click on Create
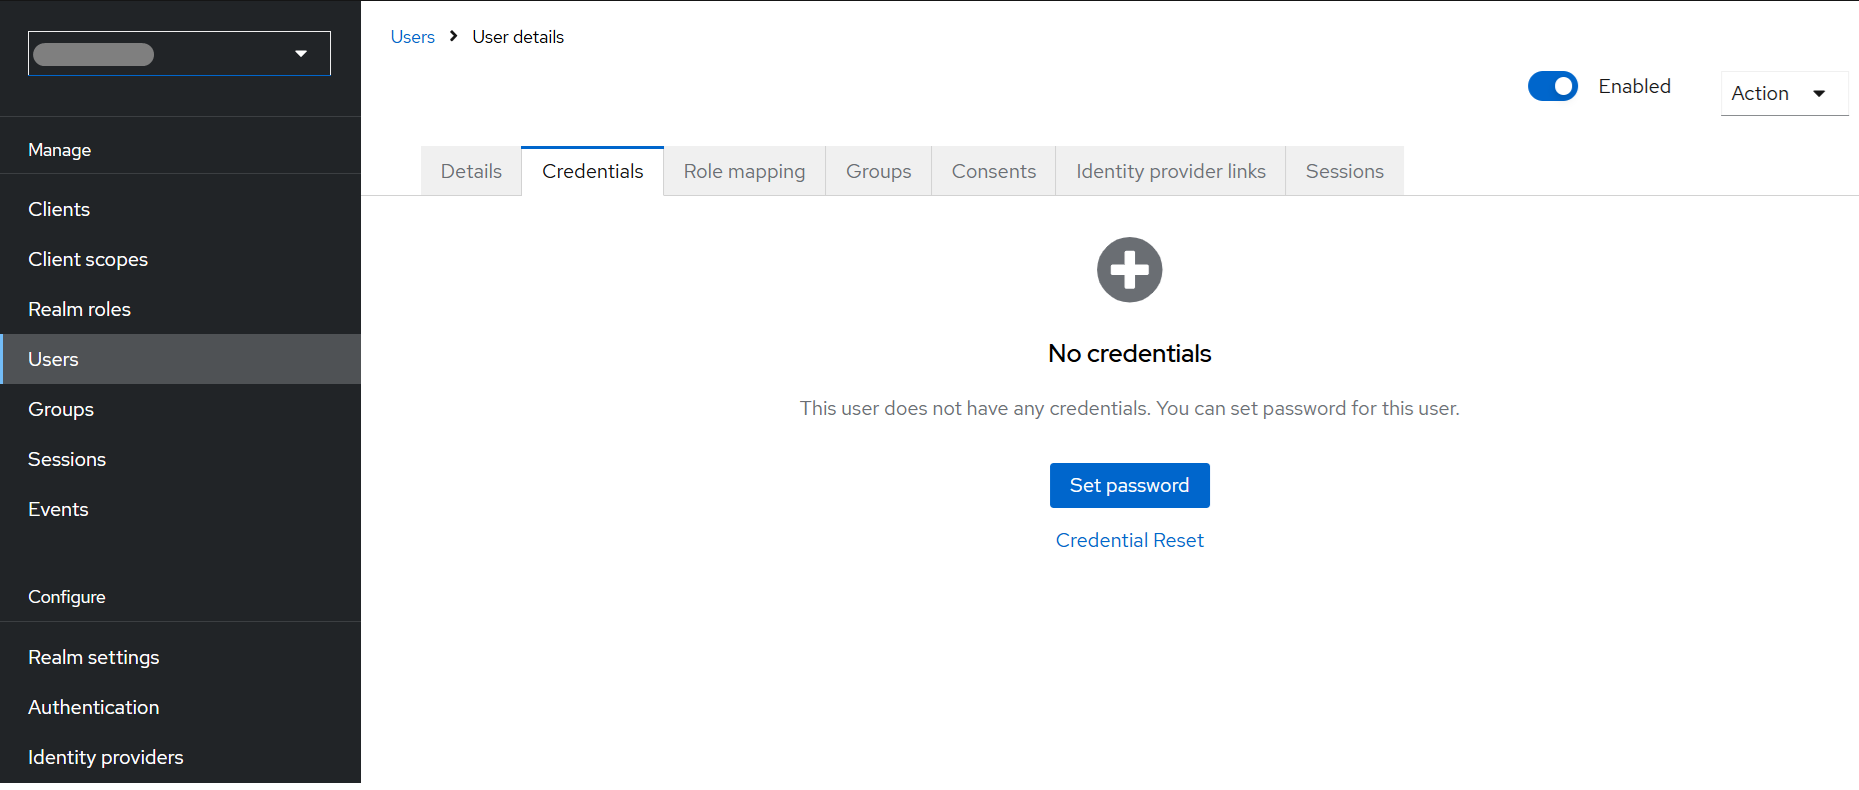
-
When user Clicks Create it would take to the User Details Page
-
Click on Credentials
- Click on Set password as shown in the above screenshot
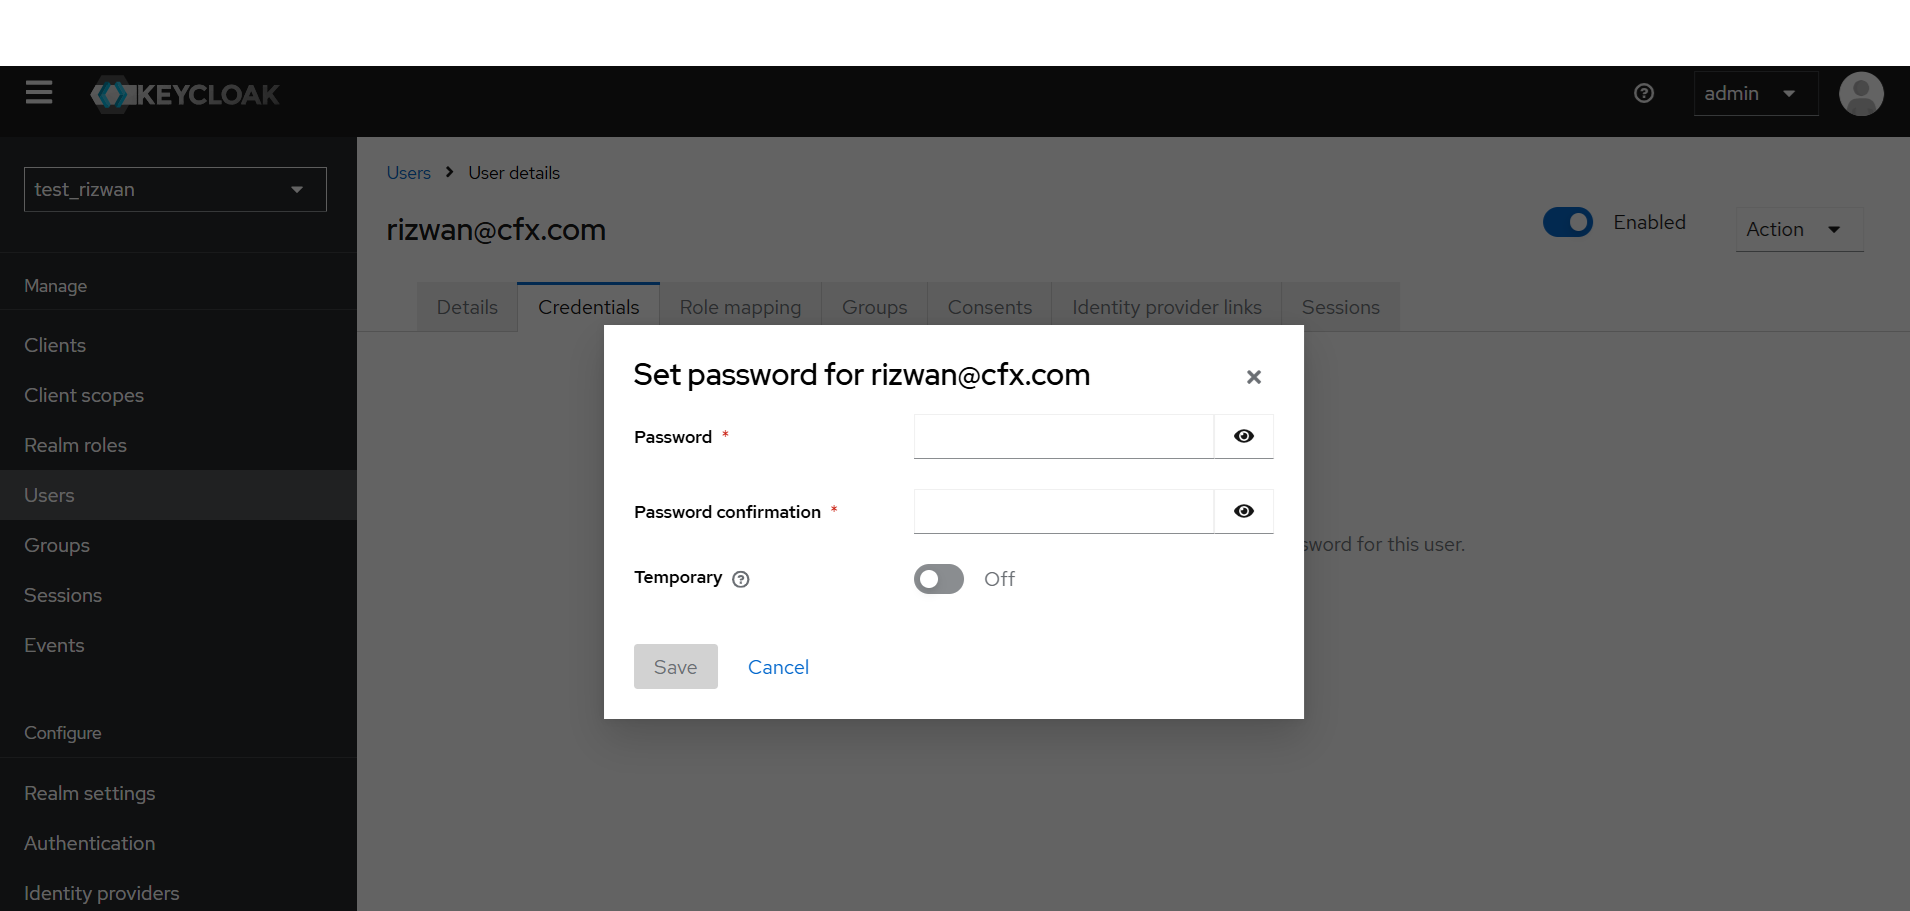
- Set a Password
10.2.6 OpenID Configuration
Step 1. Download OpenID Metadata
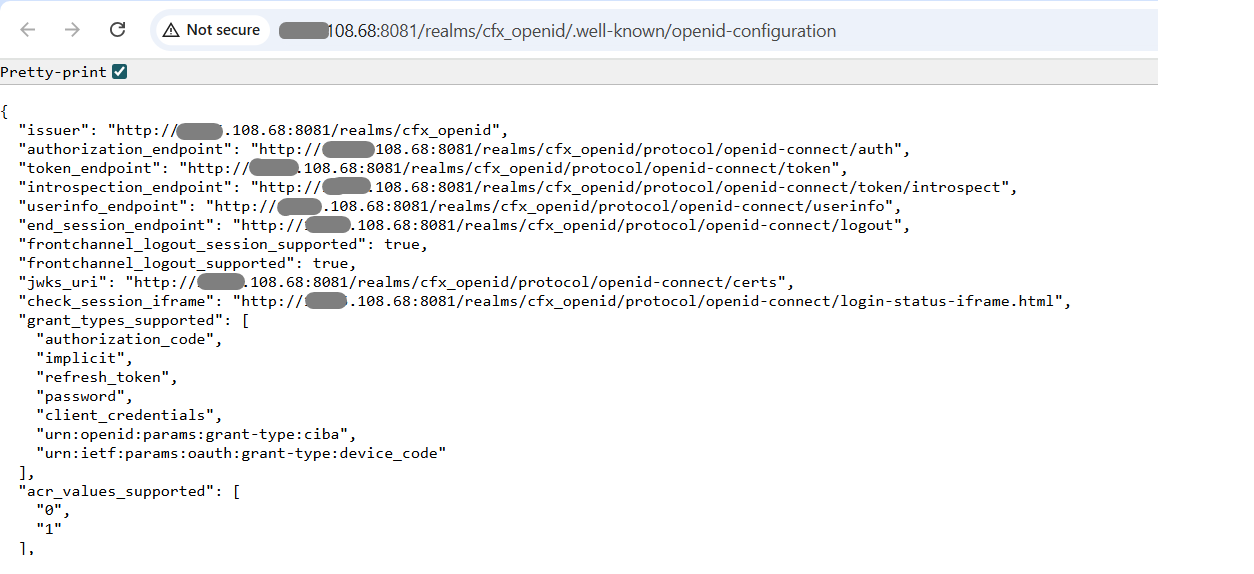
User can download the OpenID Connect configuration metadata from the following URL:
This URL provides all the necessary endpoints and configuration details required for integrating your application with Keycloak using OIDC (OpenID Connect).
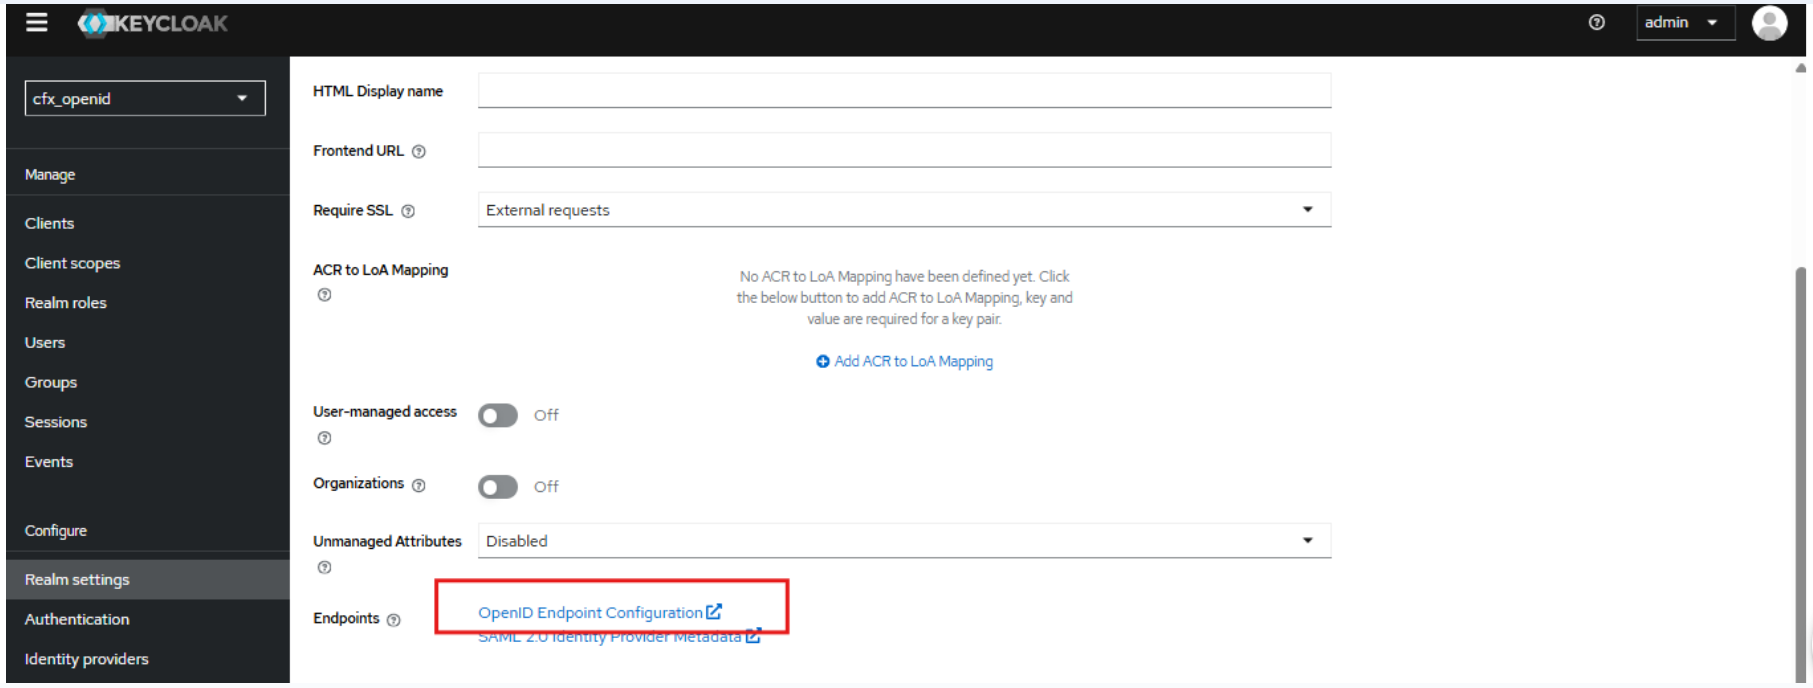
When you click on the Metadata URL, it will display the OpenID configuration, similar to the example shown below.
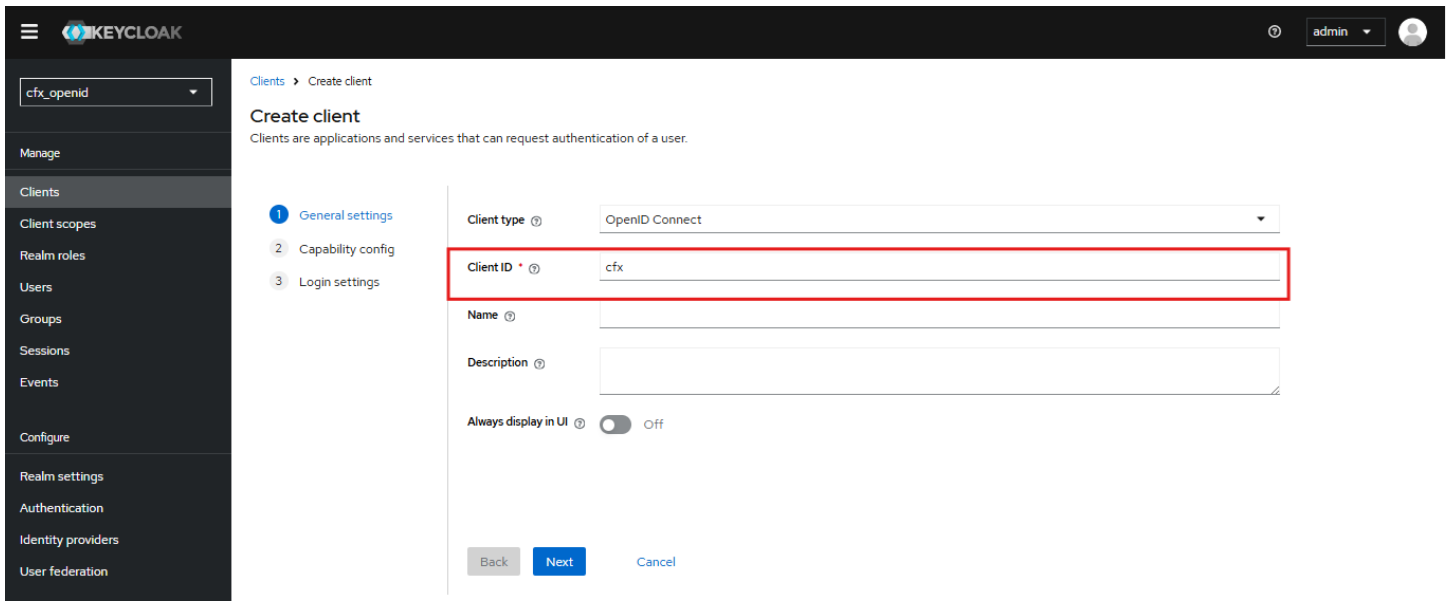
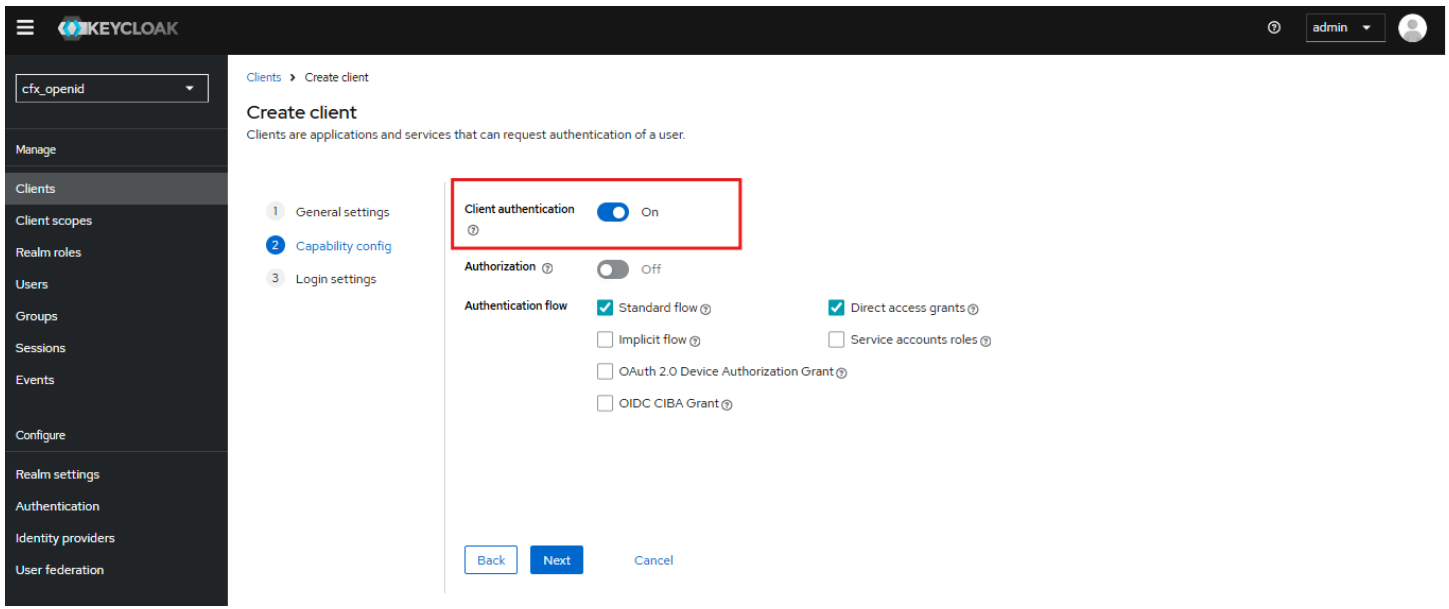
Step 2. Create a OpenID Client
To register a new client application in your Keycloak realm:
1. In the left-hand menu, go to Clients → click Create Client.
2. Select Client Type: OpenID Connect
3. Set the Client ID, e.g., my-client → click Next.
4. Enable Client Authentication → click Next.
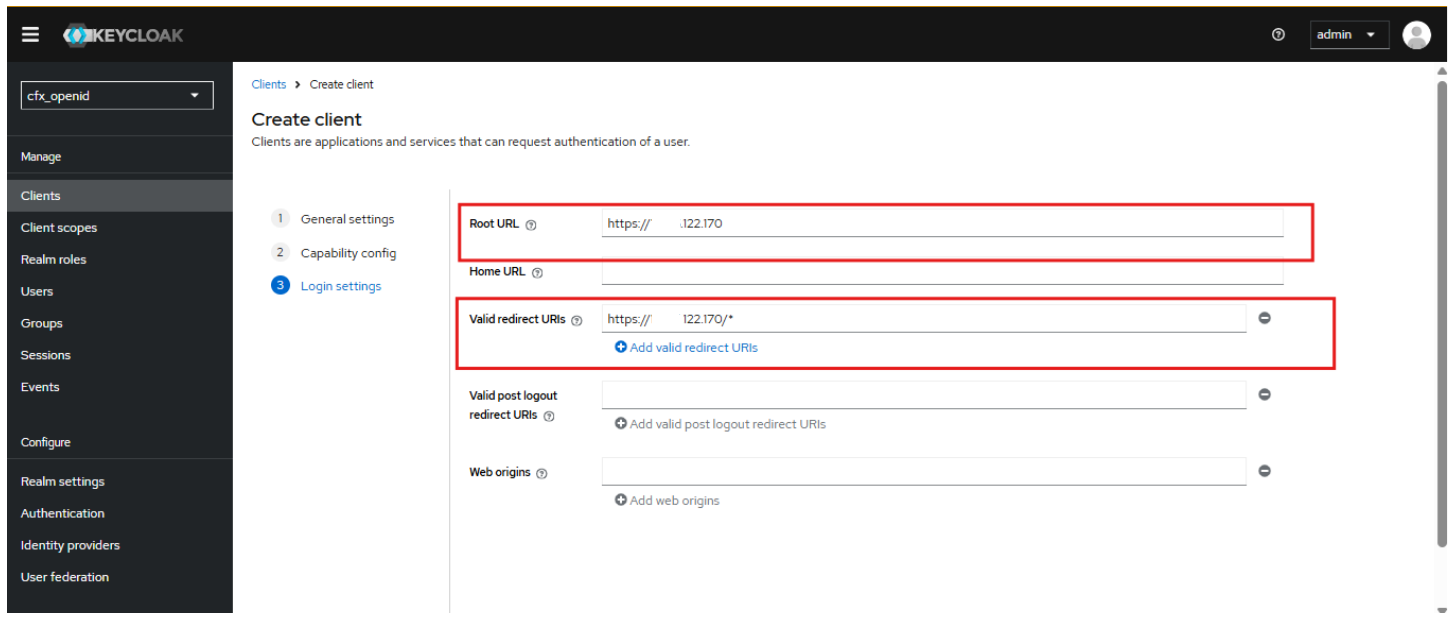
5. Set the Root URL to Client App: https://myapp.example.com
6. Set the Valid Redirect URIs to Client App: https://myapp.example.com/*
7. Click Save to complete the Client setup.
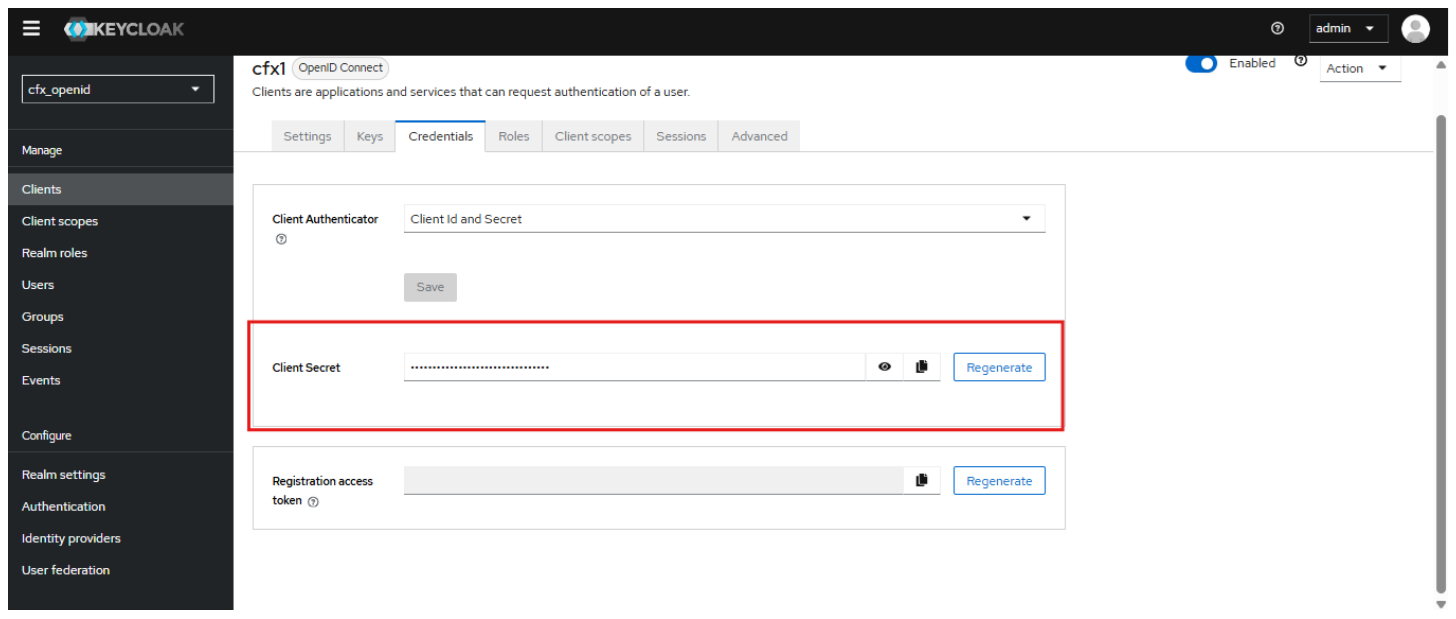
Step 3. Retrieve Client Secret
To get the client secret for your application:
1. Go to Clients in the left-hand menu.
2. Select your client (e.g., my-client).
3. Click the Credentials tab.
4. Copy the Client Secret displayed — this will be used by your application to authenticate with Keycloak.
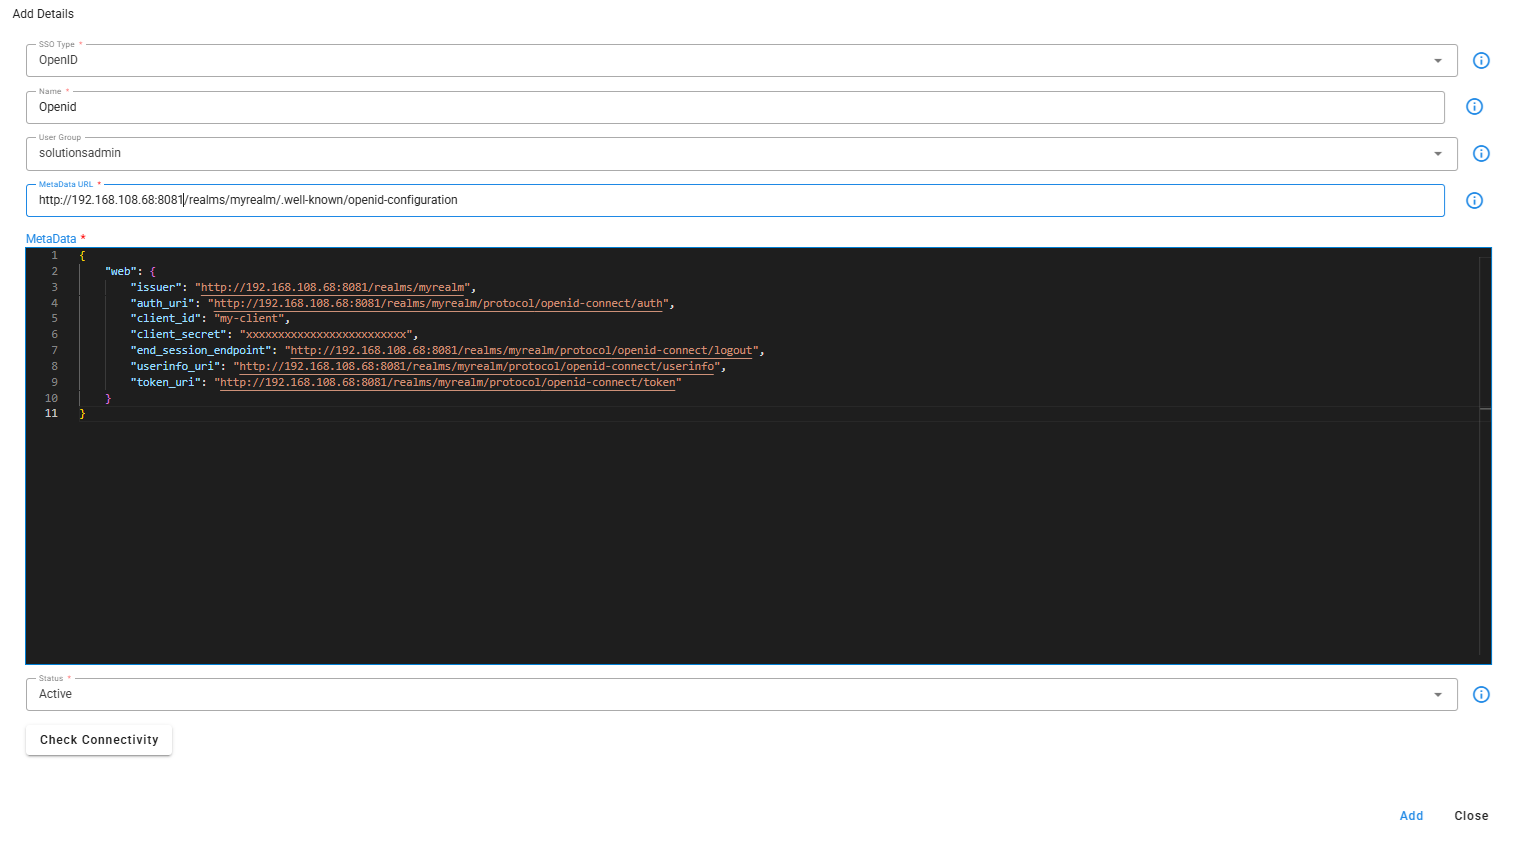
Step 4. Prepare SSO Metadata Object
The user should create a JSON object using the details provided, as illustrated below.
CFX OPENID config
Extract the following fields from the metadata using below provided url
Metadata URL: http://192.168.108.68:8080/realms/myrealm/.well-known/openid-configuration
| Field in metadata | Field in config JSON |
|---|---|
issuer |
issuer |
authorization_endpoint |
auth_uri |
token_endpoint |
token_uri |
userinfo_endpoint |
userinfo_uri |
end_session_endpoint |
end_session_endpoint |
{
    "web": {
        "issuer": "http://192.168.108.68:8080/realms/myrealm",
        "auth_uri": "http://192.168.108.68:8080/realms/myrealm/protocol/openid-connect/auth",
        "client_id": "my-client",
        "client_secret": "xxxxxxxxxxxxxxxxxxxxxxxxx",
        "end_session_endpoint": "http://192.168.108.68:8080/realms/myrealm/protocol/openid-connect/logout",
        "userinfo_uri": "http://192.168.108.68:8080/realms/myrealm/protocol/openid-connect/userinfo",
        "token_uri": "http://192.168.108.68:8080/realms/myrealm/protocol/openid-connect/token"
    }
}
Step 5. Add OpenID Configuration in CFX Portal
- Steps to add OpenID configuration details in CFX Portal
1. Navigate to Administration → Authentication Servers. - Select Add SSO Details. -
2. Add SSO Configuration in the Form
-
Select SSO Type
- Choose OpenID from the SSO type dropdown field.
-
Name
- Give a Name
-
Optional: Select User Group
- Choose a user group to automatically onboard users upon their first login. This step is optional.
-
Enter Metadata Details
- Add the Metadata URL and corresponding metadata information.
-
Check Connectivity
- Use the Test Connectivity button to verify if the metadata URL is functioning correctly.
-
Ensure Valid Metadata Format
- The metadata must be in valid JSON format.
-
After adding a valid SSO configuration
- restart the portal backend using the following commands.
10.2.7 SAML Configuration
Step 1. Download SAML Metadata
User can download the SAML Metadata configuration from the following URL:
This URL provides all the necessary endpoints and configuration details required for integrating your application with Keycloak using SAML.
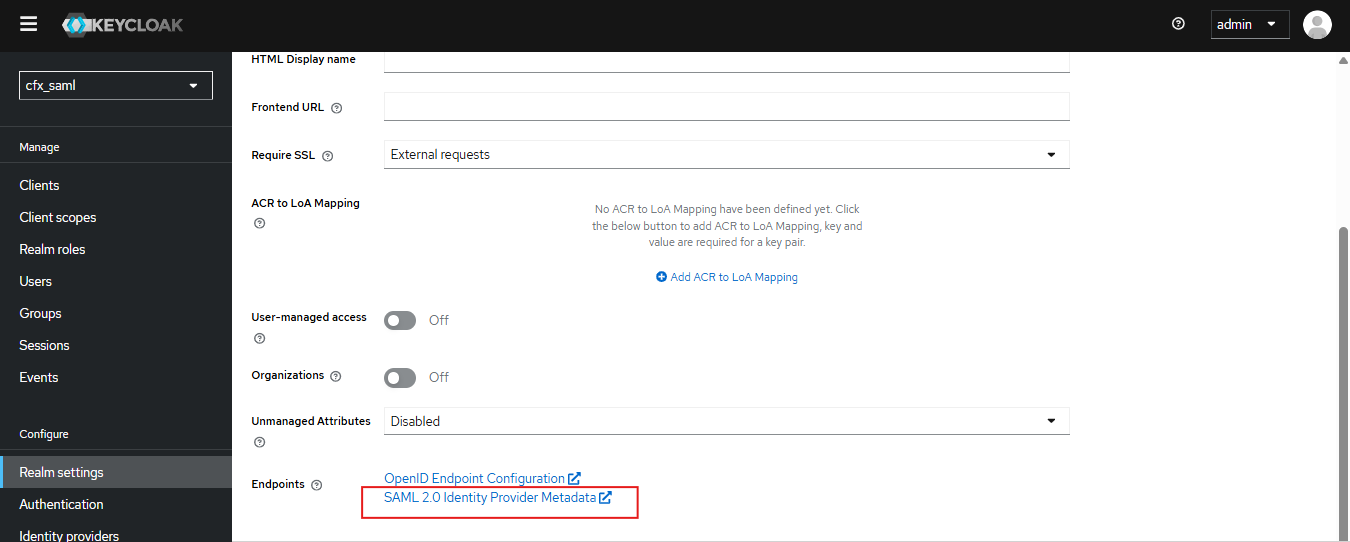
When you click on the Metadata URL, it will display the SAML configuration, similar to the example shown below.
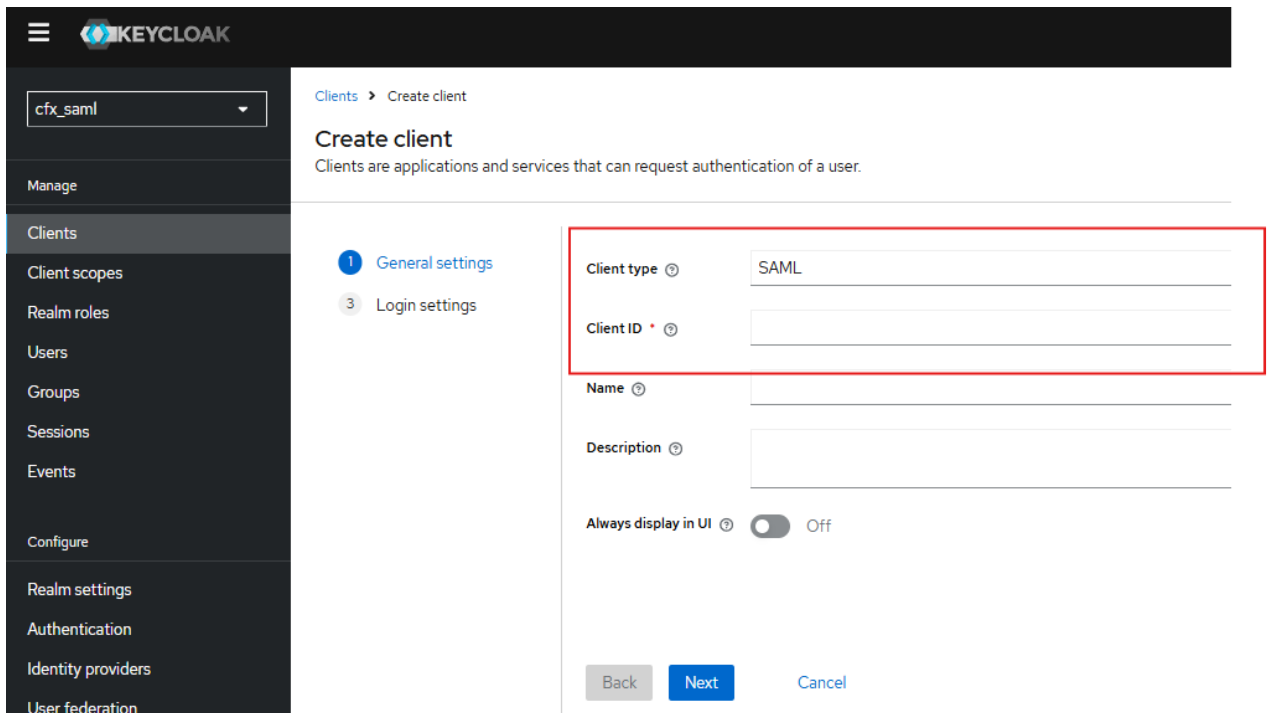
Step 2. Create SAML Client
1. In the left navigation pane, click on "Clients".
2. Click the "Create client" button at the top right.
3. Under "Client type", select "SAML".
4. In the "Client ID" field, enter a unique name (e.g., saml-test-client).
5. Click "Next".
6. Set the Root URL to:
https://myapp.example.com
7. Add Valid Redirect URIs:
https://myapp.example.com/*
8. Click "Save".
Step 3. Configure SAML Client Settings
1. In the Signature and Encryption settings, set "Sign Documents" to ON.
2. Similarly, set "Sign Assertions" to ON within the Signature and Encryption section.
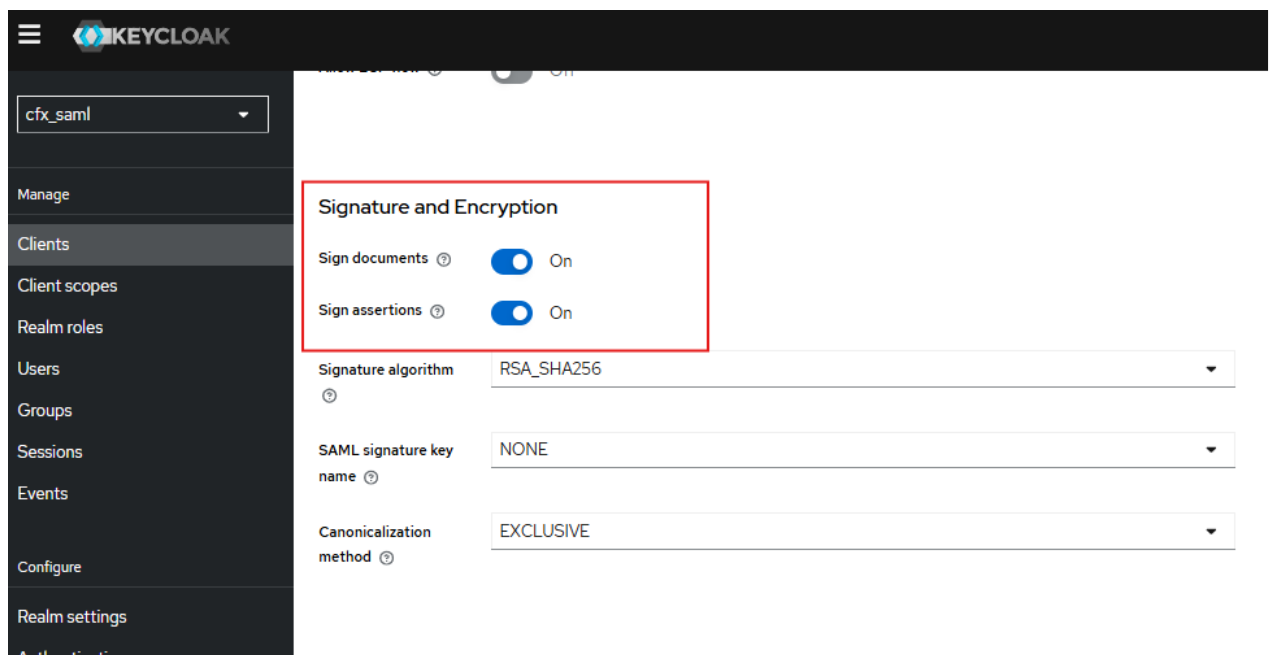
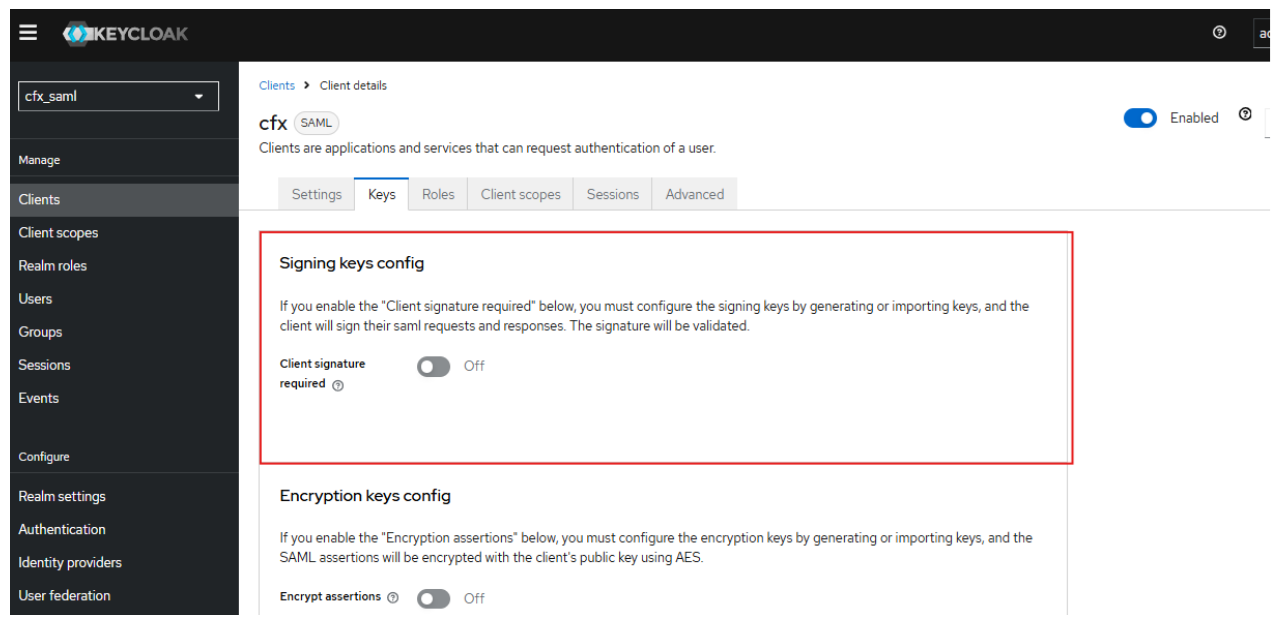
3. In the Keys section, set "Client Signature Required" to OFF.
-
Set "Force POST Binding" to ON.
-
Set Include AuthnStatement to ON.
-
Click "Save" to apply the settings.
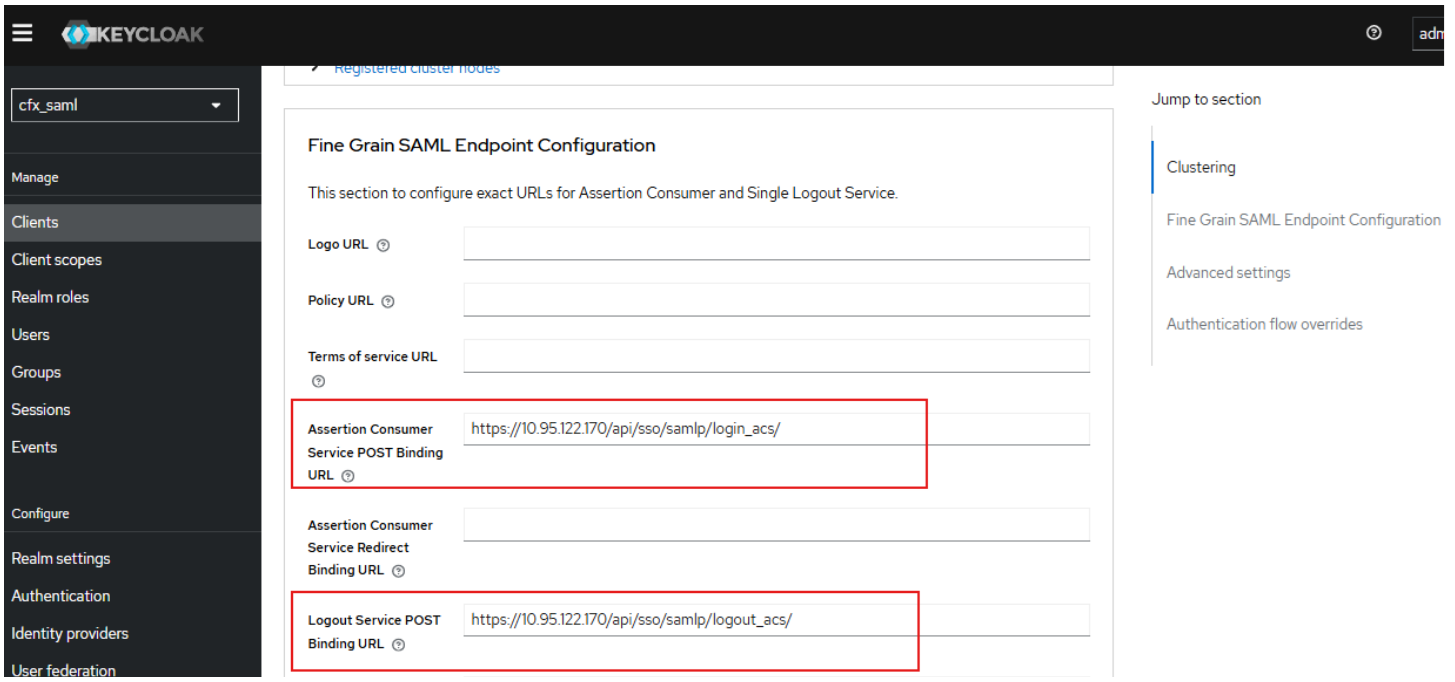
Step 4. Fine Grain SAML Endpoint Configuration
To configure SAML endpoint bindings (such as ACS and Logout URLs), follow these steps:
1. Go to the Advanced tab.
2. Scroll down to the Fine Grain SAML Endpoint Configuration section.
Step 5. Configure ACS (Assertion Consumer Service) Endpoints
-
Assertion Consumer Service POST Binding URL:
https://myapp.example.com/api/sso/samlp/login_acs/ -
Logout Service POST Binding URL:
https://myapp.example.com/api/sso/samlp/logout_acs/
3. Save the configuration.
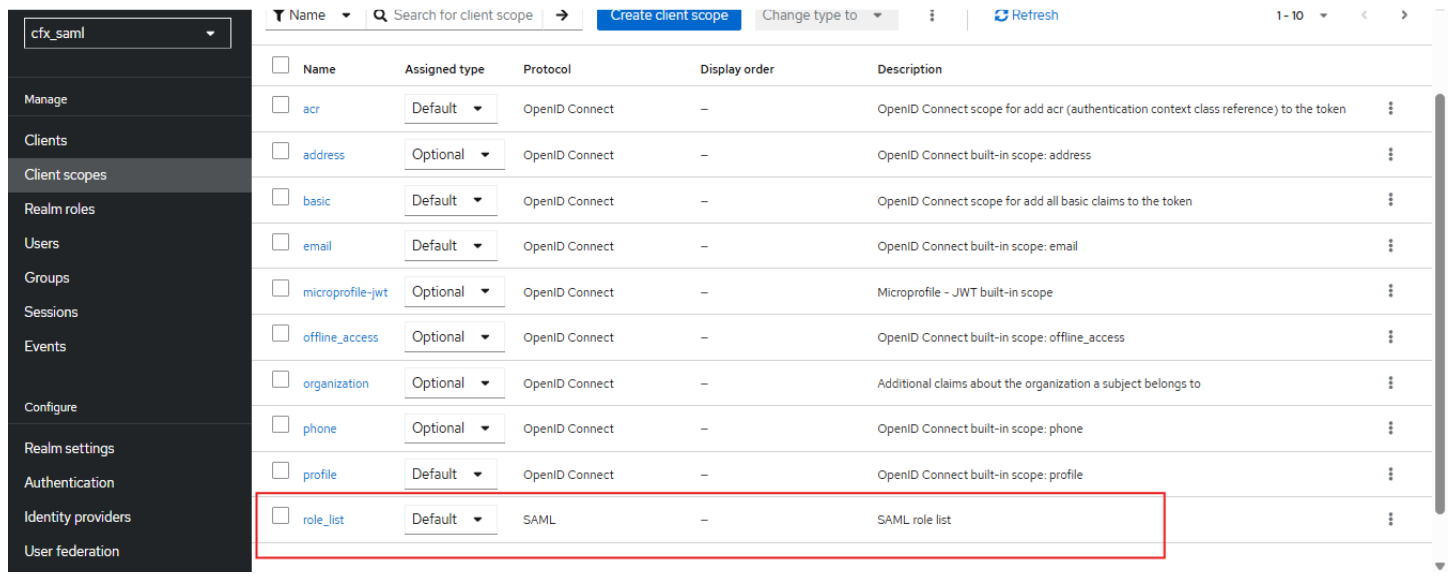
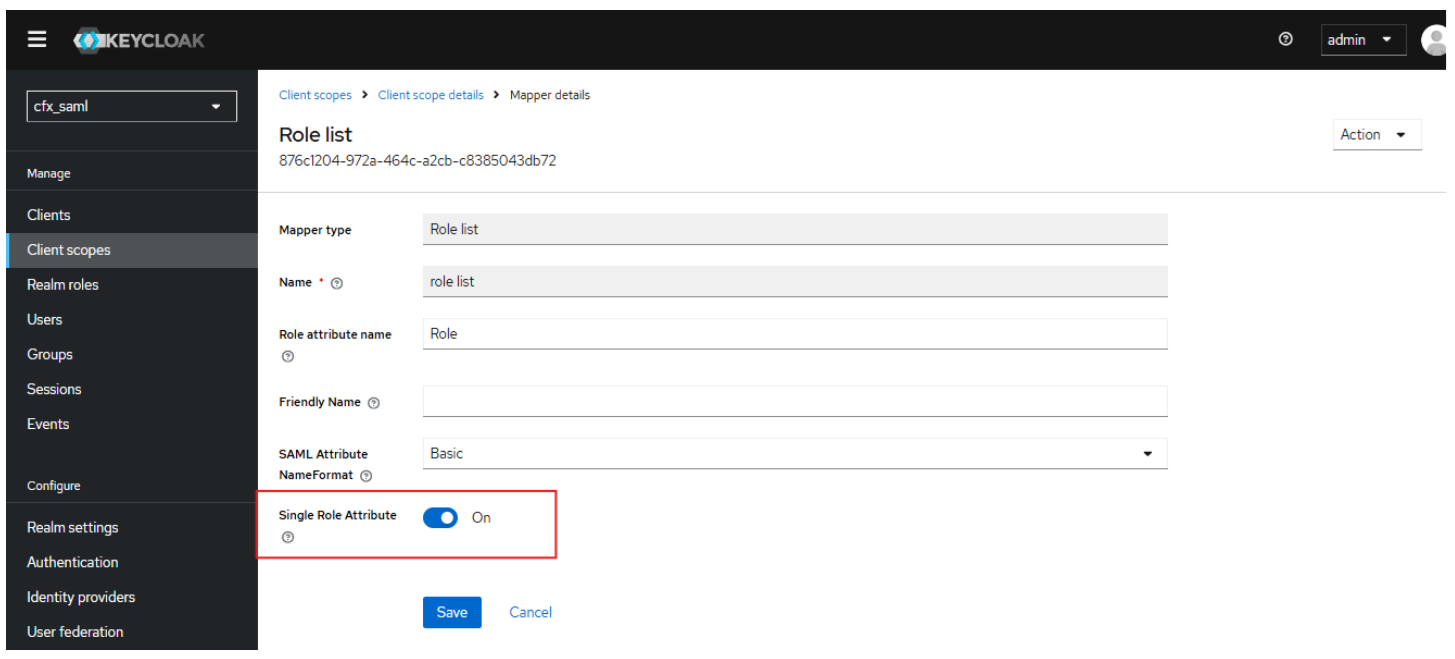
Step 6. Configure Role and Attribute Mappers (via Client Scopes)
1. In the left-hand navigation menu, click on Client Scopes.
2. Select the existing role-list scope.
3. Inside the client scope, go to the Mappers tab and select role-list again.
4. Set the following value:
- Single Role Attribute: ON
5. Click Save to apply the settings.

10.2.7.1 Prepare SAML Metadata
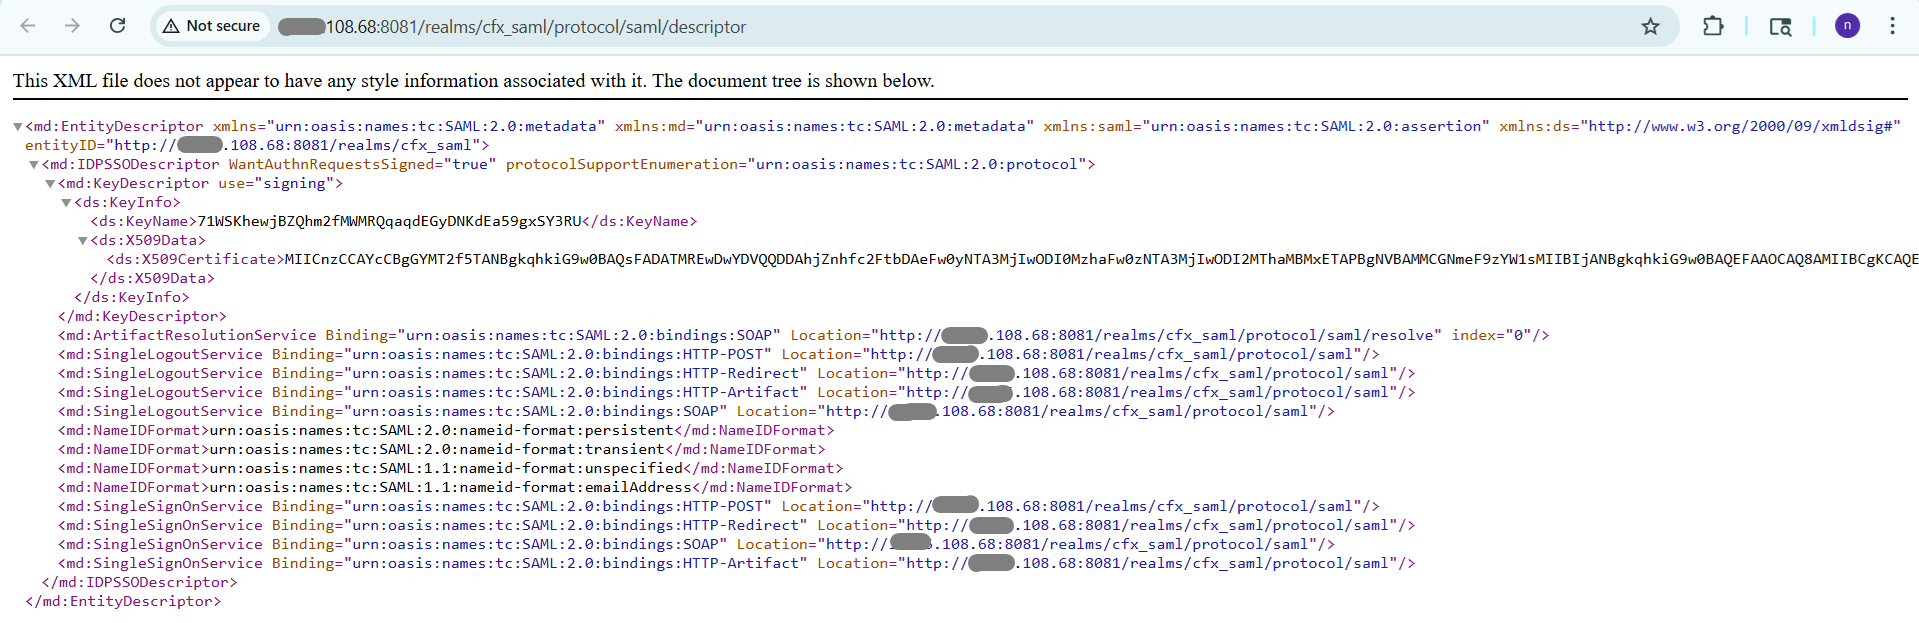
Step 1. SAML_METADATA_URL
- Example:
http://192.168.108.68:8080/realms/myrealm/protocol/saml/descriptor - This URL provides the IdP details(
entityId,singleSignOnService,singleSignoutService,x509cert) which can be retrieved from the above metadata URL.
Step 2. Updating Service Provider (SP) Details
- entityId Client Name
- Assertion Consumer Service URL
- Single Logout Service URL
Step 3. Sample SAML Metadata JSON
{
  "sp": {
    "entityId": "saml-test-client",
    "assertionConsumerService": {
      "url": "https://myapp.example.com/api/sso/samlp/login_acs/",
      "binding": "urn:oasis:names:tc:SAML:2.0:bindings:HTTP-POST"
    },
    "singleLogoutService": {
      "url": "https://myapp.example.com/api/sso/samlp/logout_acs/",
      "binding": "urn:oasis:names:tc:SAML:2.0:bindings:HTTP-Redirect"
    }
  },
  "idp": {
    "entityId": "http://192.168.108.68:8080/realms/myrealm",
    "singleSignOnService": {
      "url": "http://192.168.108.68:8080/realms/myrealm/protocol/saml",
      "binding": "urn:oasis:names:tc:SAML:2.0:bindings:HTTP-Redirect"
    },
    "singleLogoutService": {
      "url": "http://192.168.108.68:8080/realms/myrealm/protocol/saml",
      "binding": "urn:oasis:names:tc:SAML:2.0:bindings:HTTP-Redirect"
    },
    "x509cert": ""
  }
}
10.2.8 Add SSO Configuration in Portal
Steps to Configure
1. Log in as an MSP/Workspace Admin.
2. Navigate to Administration → Authentication Servers.
3. Click on Add SSO Details.
4. Save the configuration.